人的知识就好比一个圆圈,圆圈里面是已知的,圆圈外面是未知的。你知道得越多,圆圈也就越大,你不知道的也就越多。

0%

Spring Cloud Gateway 包含许多内置的路由 predicate factories。所有这些 predicates 都匹配 HTTP 请求的不同属性。我们可以将多个路由 predicate factories 与逻辑和语句组合在一起。

After

接受一个日期类型参数。此 Predicate 匹配在指定日期时间之后发生的请求。示例:

1
2
3
4
5
6
7
8
spring:
cloud:
gateway:
routes:
- id: after_route
uri: https://example.org
predicates:
- After=2017-01-20T17:42:47.789-07:00[America/Denver]

该路由与丹佛时间 2017年1月20日17点42分 之后的任何请求相匹配。

Before

接受一个日期类型参数。此 Predicate 匹配在指定日期时间之前发生的请求。示例:

1
2
3
4
5
6
7
8
spring:
cloud:
gateway:
routes:
- id: before_route
uri: https://example.org
predicates:
- Before=2017-01-20T17:42:47.789-07:00[America/Denver]

该路由与丹佛时间 2017年1月20日17点42分 之前的任何请求相匹配。

Between

接受两个个日期类型参数:datetime1 和 datetime2。此 Predicate 匹配在 datetime1 之后和 datetime2 之前发生的请求。datetime2 参数必须位于 datetime1 之后。示例:

1
2
3
4
5
6
7
8
spring:
cloud:
gateway:
routes:
- id: between_route
uri: https://example.org
predicates:
- Between=2017-01-20T17:42:47.789-07:00[America/Denver],2017-01-21T17:42:47.789-07:00[America/Denver]

该路由与丹佛时间 2017年1月20日17点42分 之后和丹佛时间 2017年1月21日17:42 之前的任何请求匹配。这对于维护窗口可能很有用。

接受两个参数:cookie 名称和一个正则表达式。此 Predicate 匹配具有给定名称且其值与正则表达式匹配的 cookie。示例:

1
2
3
4
5
6
7
8
spring:
cloud:
gateway:
routes:
- id: cookie_route
uri: https://example.org
predicates:
- Cookie=chocolate,ch.p

该路由匹配具有一个名为 chocolate 的 cookie 的请求,该 cookie 的值与 ch.p 正则表达式匹配。

接受两个参数:header 名称和一个正则表达式。此 Predicate 与具有给定名称(其值与正则表达式匹配)的 header 匹配。示例:

1
2
3
4
5
6
7
8
spring:
cloud:
gateway:
routes:
- id: header_route
uri: https://example.org
predicates:
- Header=X-Request-Id,\d+

如果请求的 header 名为 X-Request-Id,其值与 \d+ 正则表达式匹配(即,它的值为一个或多个数字),则该路由将进行匹配。

Host

接受一个参数:host name patterns 列表。此 Predicate 与与模式匹配的 Host header 匹配。示例:

1
2
3
4
5
6
7
8
spring:
cloud:
gateway:
routes:
- id: host_route
uri: https://example.org
predicates:
- Host=**.somehost.org,**.anotherhost.org

还支持 URI 模板变量(例如 {sub}.myhost.org)。

如果请求的 Host header 的值为 www .somehost.org 或 beta.somehost.org 或 www .anotherhost.org,则该路由将进行匹配。

此 Predicate 将 URI 模板变量(如前面示例中定义的 sub)提取为名称和值的映射,并将其放在 ServerWebExchange.getAttributes() 中,并在 ServerWebExchangeUtils.URI_TEMPLATE_VARIABLES_ATTRIBUTE 中定义一个键。然后这些值可供 GatewayFilter 工厂使用。

Method

接受一个或多个参数:要匹配的 HTTP 方法。示例:

1
2
3
4
5
6
7
8
spring:
cloud:
gateway:
routes:
- id: method_route
uri: https://example.org
predicates:
- Method=GET,POST

如果请求方法是 GET 或 POST,则该路由匹配。

Path

接受两个参数:一个 Spring PathMatcher 模式列表和一个名为 matchOptionalTrailingSeparator 的可选标志。示例:

1
2
3
4
5
6
7
8
spring:
cloud:
gateway:
routes:
- id: host_route
uri: https://example.org
predicates:
- Path=/red/{segment},/blue/{segment}

如果请求路径为,例如: /red/1 或 /red/blue 或 /blue/green,则该路由匹配。

此 Predicate 将 URI 模板变量(如前面示例中定义的片段)提取为名称和值的映射,并将其放入 ServerWebExchange.getAttributes() 中,并在 ServerWebExchangeUtils.URI_TEMPLATE_VARIABLES_ATTRIBUTE 中定义了一个键。然后这些值可供 GatewayFilter 工厂使用。

可以使用实用程序方法(称为 get)来简化对这些变量的访问。下面的例子展示了如何使用 get 方法:

1
2
3
Map<String,String> uriVariables = ServerWebExchangeUtils.getPathPredicateVariables(exchange);

String segment = uriVariables.get("segment");

Query

接受两个参数:一个必需的参数和一个可选的 regexp。示例:

1
2
3
4
5
6
7
8
spring:
cloud:
gateway:
routes:
- id: query_route
uri: https://example.org
predicates:
- Query=green

如果请求包含 green 查询参数,则前面的路由匹配。

1
2
3
4
5
6
7
8
spring:
cloud:
gateway:
routes:
- id: query_route
uri: https://example.org
predicates:
- Query=red,gree.

如果请求包含一个 red 查询参数,其值与 gree. 正则表达式 匹配,则前面的路由匹配。

RemoteAddr

接受 CIDR-notation(IPv4 或 IPv6) 字符串列表(最小大小为 1),比如 192.168.0.1/16 (其中 192.168.0.1 是一个 IP 地址,16 是子网掩码)。示例:

1
2
3
4
5
6
7
8
spring:
cloud:
gateway:
routes:
- id: remoteaddr_route
uri: https://example.org
predicates:
- RemoteAddr=192.168.1.1/24

如果请求的远程地址是 192.168.1.10,则该路由匹配。

Weight

有两个参数:组和权值。每组计算权重。示例:

1
2
3
4
5
6
7
8
9
10
11
12
spring:
cloud:
gateway:
routes:
- id: weight_high
uri: https://weighthigh.org
predicates:
- Weight=group1,8
- id: weight_low
uri: https://weightlow.org
predicates:
- Weight=group1,2

该路由将 80% 的流量转发到 weighthigh.org,20% 的流量转发到 weightlow.org。

参考资料

  1. Spring Cloud Gateway

安装 Consul

有关如何安装 Consul 的说明,参阅安装文档 installation documentation

Consul Agent

所有 Spring Cloud Consul 应用程序都必须有 Consul Agent。默认情况下,代理客户端位于 localhost:8500。有关如何启动代理客户端以及如何连接到 Consul 代理服务器群集的详细信息,参阅 Agent documentation。为了进行开发,安装 Consul 后,可以使用以下命令启动 Consul 代理:

1
./src/main/bash/local_run_consul.sh

这将在端口 8500上以服务器模式启动代理,并在 http://localhost:8500/ 上提供用户界面。

服务发现与 Consul

服务发现是基于微服务架构的关键原则之一。尝试手动配置每个客户端或某种形式的约定可能非常困难,也可能非常脆弱。Consul 通过 HTTP API 和 DNS 提供服务发现服务。Spring Cloud Consul 利用 HTTP API 进行服务注册和发现。这并不妨碍非 Spring Cloud 应用程序利用 DNS 接口。Consul Agents 服务器在集群中运行,集群通过 gossip 协议进行通信,并使用 Raft 共识协议。

激活

要激活 Consul 服务发现,,需引入以下依赖:

1
2
3
4
<dependency>
<groupId>org.springframework.cloud</groupId>
<artifactId>spring-cloud-starter-consul-discovery</artifactId>
</dependency>

注册 与 Consul

当客户端向 Consul 注册时,它会提供有关自身的元数据,如主机和端口、id、名称和标签。默认情况下,会创建一个 HTTP 检查,Consul 每 10 秒访问一次 /health 端点。如果运行状况检查失败,则将服务实例标记为严重。

1
2
3
4
5
6
7
8
9
10
11
12
13
14
@SpringBootApplication
@RestController
public class Application {

@RequestMapping("/")
public String home() {
return "Hello world";
}

public static void main(String[] args) {
new SpringApplicationBuilder(Application.class).web(true).run(args);
}

}

(即完全正常的 Spring Boot 应用程序)。如果 Consul 客户端位于 localhost:8500 以外的其它位置,则需要配置来定位客户端。示例:

1
2
3
4
5
spring:
cloud:
consul:
host: localhost
port: 8500

注意: 如果使用 Spring Cloud Consul Config,则需要将上述值放在 bootstrap.yml 而不是 application.yml 中。

从环境中获取的默认服务名、实例 id 和端口分别是 ${spring.application.name}、Spring Context ID 和 ${server.port}。

要禁用 Consul Discovery客户端,可以将 spring.cloud.consul.discovery.enabled 设置为 false。当 spring.cloud.discovery.enabled 设置为 false 时,Consul Discovery Client 也将被禁用。

要禁用服务注册,可以将 spring.cloud.consul.discovery.register 设置为 false。

HTTP 健康检查

Consul 实例的健康检查默认为 “/health”,这是 Spring Boot Actuator 应用程序中一个有用的端点的默认位置。如果使用非默认的上下文路径或 servlet 路径(例如 server.servletPath=/foo)或 management 端点路径(例如 management.server.servlet.context-path=/admin),则即使是 Actuator 应用程序,也需要更改这些内容。Consul 用来检查健康端点的时间间隔也可以配置。“10s” 和 “1min” 分别代表 10 秒和 1 分钟。示例:

1
2
3
4
5
6
spring:
cloud:
consul:
discovery:
healthCheckPath: ${management.server.servlet.context-path}/health
healthCheckInterval: 15s

可以通过设置 management.health.consul.enabled=false 来禁用运行状况检查。

元数据和 Consul 标签

Consul 还不支持服务的元数据。Spring Cloud 的 ServiceInstance 有一个 Map<String,String> 元数据字段。在 Consul 正式支持元数据之前,Spring Cloud Consul 使用 Consul 标记来近似元数据。格式为 key=value 的标签将被拆分,并分别用作映射键和值。不带等号的标记将同时用作键和值。

1
2
3
4
5
spring:
cloud:
consul:
discovery:
tags: foo=bar, baz

上面的配置将得到一个 foo→bar 和 baz→baz 的映射。

使 Consul 实例 ID 唯一

默认情况下,Consul 实例注册的 ID 等于它的 Spring 应用程序上下文 ID。默认情况下,Spring 应用程序上下文 ID 是 ${spring.application.name}:comma,separated,profiles:${server.port}。对于大多数情况,这将允许一台机器上运行一个服务的多个实例。如果需要进一步的唯一性,通过使用 Spring Cloud,可以通过在 spring.cloud.consul.discovery.instanceId 中提供唯一的标识符来覆盖它。例如:

1
2
3
4
5
spring:
cloud:
consul:
discovery:
instanceId: ${spring.application.name}:${vcap.application.instance_id:${spring.application.instance_id:${random.value}}}

有了这个元数据和部署在 localhost 上的多个服务实例,随机值将进入其中,使实例唯一。在 Cloudfoundry 中,vcap.application.instance_id 将在 Spring 引导应用程序中自动填充,因此不需要随机值。

在运行状况检查请求中应用 Headers

Headers 可以应用于健康检查请求。例如,如果要注册使用了 Vault Backend 的 Spring Cloud Config 服务:

1
2
3
4
5
6
spring:
cloud:
consul:
discovery:
health-check-headers:
X-Config-Token: 6442e58b-d1ea-182e-cfa5-cf9cddef0722

根据 HTTP 标准,每个 header 可以有多个值,在这种情况下,可以提供一个数组:

1
2
3
4
5
6
7
8
spring:
cloud:
consul:
discovery:
health-check-headers:
X-Config-Token:
- "6442e58b-d1ea-182e-cfa5-cf9cddef0722"
- "Some other value"

查找服务

使用 Load-balancer

Spring Cloud 支持 Feign 和 Spring RestTemplate,用于使用逻辑服务 names/id 而不是物理 URLs 查找服务。Feign 和 discovery-aware RestTemplate 都利用 Ribbon 来实现客户端负载平衡。

如果我们想使用 RestTemplate 访问服务 STORES,只需声明:

1
2
3
4
5
@LoadBalanced
@Bean
public RestTemplate loadbalancedRestTemplate() {
return new RestTemplate();
}

并像这样使用(注意我们如何使用 Consul 中的 STORES 服务 name/id 而不是完全限定的域名):

1
2
3
4
5
6
@Autowired
RestTemplate restTemplate;

public String getFirstProduct() {
return this.restTemplate.getForObject("https://STORES/products/1", String.class);
}

如果我们在多个数据中心中有 Consul 集群,并且希望访问另一个数据中心中的服务,仅使用服务 name/id 是不够的。在这种情况下,使用属性 spring.cloud.consul.discovery.datacenters.STORES=dc-west,其中 STORES 是服务 name/id,dc-west 是 STORES 服务所在的数据中心。

Spring Cloud 现在还支持Spring Cloud LoadBalancer。

注意: 由于 Spring Cloud Ribbon 目前处于维护中,建议大家将 Spring.Cloud.loadbalancer.Ribbon.enabled 设置为 false,以便使用 BlockingLoadBalancerClient 而不是 RibbonLoadBalancerClient。

使用 DiscoveryClient

我们还可以使用 org.springframework.cloud.client.discovery.DiscoveryClient,它为非特定于 Netflix 的发现客户端提供了一个简单的 API。

1
2
3
4
5
6
7
8
9
10
11
@Autowired
private DiscoveryClient discoveryClient;

public String serviceUrl() {
List<ServiceInstance> list = discoveryClient.getInstances("STORES");
if (list != null && list.size() > 0 ) {
URI uri = list.get(0).getUri();
...
}
return null;
}

Consul Catalog Watch

Consul Catalog Watch 利用 Consul 的能力来 watch services。Catalog Watch 执行一个阻塞的 Consul HTTP API 调用,以确定是否有任何服务发生了变化。如果有新的服务数据,就会发布 Heartbeat Event。

可以通过调整 spring.cloud.consul.config.discovery.catalog-services-watch-delay 的值,来改变 Config Watch 调用的频率。默认值是 1000,以毫秒为单位。延迟是上一次调用结束和下一次调用开始后的时间量。

要禁用 Catalog Watch,设置 spring.cloud.consul.discovery.catalogServicesWatch.enabled=false。

该 watch 使用一个 Spring TaskScheduler 来调度与 Consul 的通话。默认情况下,它是一个 poolSize 为 1 的 ThreadPoolTaskScheduler。若要更改 TaskScheduler,需要创建一个类型为 TaskScheduler 的 bean,该 bean 的名称为 ConsulDiscoveryClientConfiguration.CATALOG_WATCH_TASK_SCHEDULER_NAME 常数。

Consul 分布式配置

Consul 提供用于存储配置和其它元数据的 Key/Value Store。Spring Cloud Consul Config 是 Config Server and Client 的替代品。Configuration 是在特殊的“bootstrap”阶段被加载到Spring Environment 中。Configuration 默认存储在 /config 文件夹中。根据应用程序的名称和激活的 profiles 创建多个 PropertySource 实例,这些激活的 profiles 模仿 Spring Cloud Config 中解析属性的顺序。例如,一个名为“testApp”并带有“dev” profile 的应用程序将创建以下属性源:

1
2
3
4
config/testApp,dev/
config/testApp/
config/application,dev/
config/application/

最具体的属性源位于顶部,最不具体的位于底部。config/application 文件夹中的属性适用于使用 Consul 进行配置的所有应用程序。config/testApp 文件夹中的属性仅对名为“testApp”的服务实例可用。

当前 Configuration 是在应用程序启动时读取。向 /refresh 发送 HTTP POST 将导致重新加载配置。Config Watch 还将自动检测变化并重新加载应用程序上下文。

激活

要开始使用 Consul Configuration,需引入以下依赖:

1
2
3
4
<dependency>
<groupId>org.springframework.cloud</groupId>
<artifactId>spring-cloud-starter-consul-config</artifactId>
</dependency>

这将启用 Spring Cloud Consul Config 的自动装配。

定制

Consul Config 可以使用以下属性自定义:

1
2
3
4
5
6
7
8
spring:
cloud:
consul:
config:
enabled: true
prefix: configuration
defaultContext: apps
profileSeparator: '::'
  • enabled 将此值设置为 false 将禁用 Consul Config。
  • prefix 设置配置值的基本文件夹。
  • defaultContext 设置所有应用程序使用的文件夹名。
  • profileSeparator 设置用于用 profiles 文件分隔属性源中的概要文件名称的分隔符的值

Config Watch

Consul Config Watch 利用 Consul 的能力来 watch a key prefix。Config Watch 执行阻塞的 Consul HTTP API 调用,以确定当前应用程序的任何相关配置数据是否已更改。如果有新的配置数据,则会发布刷新事件。这相当于调用了 /refresh actuator 端点。

可以通过调整 spring.cloud.consul.config.watch.delay 的值,来改变 Config Watch 调用的频率。默认值是 1000,以毫秒为单位。延迟是上一次调用结束和下一次调用开始后的时间量。

要禁用 Config Watch,设置 spring.cloud.consul.config.watch.enabled=false。

该 watch 使用一个 Spring TaskScheduler 来调度与 Consul 的通话。默认情况下,它是一个 poolSize 为 1 的 ThreadPoolTaskScheduler。若要更改 TaskScheduler,需要创建一个类型为 TaskScheduler 的 bean,该 bean 的名称为 ConsulConfigAutoConfiguration.CONFIG_WATCH_TASK_SCHEDULER_NAME 常数。

YAML 或 Properties 与配置

与单独的 key/value 对相比,以 YAML 或 Properties 格式存储配置属性可能更方便。设置 spring.cloud.consul.config.format 属性为 YAML 或 PROPERTIES。例如使用 YAML:

1
2
3
4
5
spring:
cloud:
consul:
config:
format: YAML

YAML 必须在 Consul 的适当 data key 中设置。使用上面的默认 keys 看起来像:

1
2
3
4
config/testApp,dev/data
config/testApp/data
config/application,dev/data
config/application/data

我们可以在上面列出的任意 keys 中存储 YAML 文档。

我们可以使用 spring.cloud.consul.config.data-key 来更改 data key。

git2consul 与配置

git2consul 是一个 Consul 社区项目,它将文件从 git 存储库加载到 Consul 中的各个 key 中。默认情况下,key 的名称是文件的名称。YAML 和 Properties 文件分别支持 .yml 和 .properties 文件扩展名。设置 spring.cloud.consul.config.format=FILES。例如:

1
2
3
4
5
spring:
cloud:
consul:
config:
format: FILES

在 /config 中给定以下 keys,development profile 和 foo 的 application name:

1
2
3
4
5
6
7
.gitignore
application.yml
bar.properties
foo-development.properties
foo-production.yml
foo.properties
master.ref

将创建以下属性源:

1
2
3
config/foo-development.properties
config/foo.properties
config/application.yml

每个 key 的值必须是格式正确的 YAML 或 Properties 文件。

快速失败(Fail Fast)

在某些情况下(如本地开发或某些测试场景),如果 Consul 无法进行配置,则不失败可能很方便。在 bootstrap.yml 中设置 spring.cloud.consul.config.failFast=false 可以让配置模块记录一个警告,而不是抛出一个异常。这将允许应用程序继续正常启动。

Consul 重试

如果我们预计在应用程序启动时 Consul Agent 偶尔不可用,可以要求它在失败后继续尝试。我们需要将 spring-retry 和 spring-boot-starter-aop 添加到类路径中。默认行为是重试 6 次,初始回退间隔为 1000ms,后续回退的指数乘数为 1.1。我们可以使用 spring.cloud.consul.retry.* 配置属性来配置这些属性(以及其它属性)。这可以在 Spring Cloud Consul Config 和 Discovery registration 中使用。

要完全控制重试,可以添加一个类型为 RetryOperationsInterceptor、id 为 consulRetryInterceptor 的 @Bean。Spring Retry 提供了一个 RetryInterceptorBuilder,可以很容易地创建一个。

Spring Cloud Bus 与 Consul

激活

要开始使用 Consul Bus,需引入以下依赖:

1
2
3
4
<dependency>
<groupId>org.springframework.cloud</groupId>
<artifactId>spring-cloud-starter-consul-bus</artifactId>
</dependency>

有关可用的 actuator 端点和如何发送自定义消息,参阅 Spring Cloud Bus 文档。

配置属性

要查看所有 Consul 相关配置属性的列表,请查看附录页面

参考资料

  1. Spring Cloud Consul

Maven 依赖

1
2
3
4
5
<!-- 网关 -->
<dependency>
<groupId>org.springframework.cloud</groupId>
<artifactId>spring-cloud-starter-gateway</artifactId>
</dependency>

路由转发

1
2
3
4
5
6
7
8
9
10
11
12
13
14
15
16
17
18
spring:
cloud:
gateway:
routes:
# 秒杀服务
- id: seckill
# uri: lb://seckill
uri: http://localhost:8081
predicates:
- Path=/api-seckill/**
# 账号服务
- id: account
# uri: lb://account
uri: http://localhost:8082
predicates:
- Path=/api-account/**
default-filters:
- StripPrefix=1

如上,我们访问网关地址 localhost:8080/api-account/ 时,经网关路由转发之后,地址就是 localhost:8082/。

  • 如果我们要使用负载均衡,uri 需配置为 lb://account,account 为属性 spring.application.name 指定的名称。
  • 示例中 StripPrefix=1 是必须的,表示 StripPrefix 过滤器将去掉 URL 路径中的第一个前缀,这里是 api-account。

熔断与降级

Maven 依赖

1
2
3
4
5
<!-- 断路器 -->
<dependency>
<groupId>org.springframework.cloud</groupId>
<artifactId>spring-cloud-starter-circuitbreaker-reactor-resilience4j</artifactId>
</dependency>

自动装配

可以通过设置 spring.cloud.circuitbreaker.resilience4j.enabled=false 来禁用 Resilience4J 自动装配。

配置

1
2
3
4
5
6
7
8
9
10
spring:
cloud:
gateway:
default-filters:
# 断路器
- name: CircuitBreaker
args:
name: circuitBreaker
# 降级 URI
fallback-uri: forward:/fallback

如上,我们访问网关地址 localhost:8080/api-seckill/ 时,如果此时 seckill 服务还未启动,那么网关会触发熔断,并将请求转发到 mapping 为 fallback 的 Controller,以实现服务降级。

在上面的示例中,我们是将请求转发到网关内部的 Controller,我们也可以将请求重新路由到外部应用程序中的 Controller,如下所示:

1
2
3
4
5
6
7
8
9
10
11
12
13
14
15
16
17
spring:
cloud:
gateway:
routes:
- id: ingredients
uri: lb://ingredients
predicates:
- Path=//ingredients/**
filters:
- name: CircuitBreaker
args:
name: fetchIngredients
fallbackUri: forward:/fallback
- id: ingredients-fallback
uri: http://localhost:9994
predicates:
- Path=/fallback

在新的示例中,当我们访问 ingredients 服务并出现熔断后,请求首先会被转发到 fallback,然后再被重新路由到 localhost:9994。

在前面的示例中,我们只是简单配置了 fallback,如果要对断路器做一些高级的配置,如熔断策略、异常处理等,参考 Resilience4J 文档

限流

Maven 依赖

1
2
3
4
5
<!-- 限流(基于redis) -->
<dependency>
<groupId>org.springframework.boot</groupId>
<artifactId>spring-boot-starter-data-redis-reactive</artifactId>
</dependency>

配置

1
2
3
4
5
6
7
8
9
10
11
12
13
14
spring:
cloud:
gateway:
default-filters:
# 限流
- name: RequestRateLimiter
args:
# 限流匹配策略
key-resolver: '#{@ipKeyResolver}'
# 令牌桶的填充速率:用户每秒执行多少请求
redis-rate-limiter.replenishRate: 10
# 令牌桶的容量:用户在一秒钟内执行的最大请求数
# 将此值设置为零将阻塞所有请求;将此值设置为高于 replenishRate,以允许临时突发
redis-rate-limiter.burstCapacity: 20

如上:

  • 限制了用户每秒最多执行 10 次请求;
  • 限制了用户在一秒钟内最多执行 20 次请求;
  • 限流匹配策略使用 ipKeyResolver(ip 限流),ipKeyResolver 为 Spring Bean 的名称。

我们可以自定义各种 KeyResolver,如下所示:

1
2
3
4
5
6
7
8
9
10
11
12
13
14
15
16
17
18
19
20
21
22
23
24
25
26
27
28
29
30
31
32
33
34
35
36
37
@Configuration
public class ThrottlingConfiguration {
private static final String USER_ID_NAME = "userId";

/**
* 接口限流
*/
@Bean
public KeyResolver apiKeyResolver() {
return exchange -> Mono.just(exchange.getRequest().getPath().value());
}

/**
* ip 限流
*/
@Bean
public KeyResolver ipKeyResolver() {
return exchange -> Mono.just(Objects.requireNonNull(exchange.getRequest().getRemoteAddress()).getAddress().getHostAddress());
}

/**
* 用户限流
*/
@Primary
@Bean
public KeyResolver principalNameKeyResolver() {
return new PrincipalNameKeyResolver();
}

/**
* 用户限流(要求请求路径中必须携带 userId 参数)
*/
@Bean
public KeyResolver userKeyResolver() {
return exchange -> Mono.just(Objects.requireNonNull(exchange.getRequest().getQueryParams().getFirst(USER_ID_NAME)));
}
}

断路器配置

使用断路器,我们也能实现限流,示例:

1
2
3
4
5
6
7
@Bean
public Customizer<ReactiveResilience4JCircuitBreakerFactory> defaultCustomizer() {
return factory -> factory.configureDefault(id -> new Resilience4JConfigBuilder(id)
.circuitBreakerConfig(CircuitBreakerConfig.ofDefaults())
// 限制远程调用所花费的时间
.timeLimiterConfig(TimeLimiterConfig.custom().timeoutDuration(Duration.ofSeconds(5)).build()).build());
}

请求耗时统计

1
2
3
4
5
6
7
8
9
10
11
12
13
14
15
16
17
18
19
20
@Slf4j
@Component
public class ElapsedGlobalFilter implements GlobalFilter, Ordered {

@Override
public Mono<Void> filter(ServerWebExchange exchange, GatewayFilterChain chain) {
// 请求执行之前的时间
Long startTime = System.currentTimeMillis();
return chain.filter(exchange).then().then(Mono.fromRunnable(() -> {
// 请求执行之后的时间
Long endTime = System.currentTimeMillis();
log.info("请求 {} 耗时 {}ms", exchange.getRequest().getURI().getRawPath(), endTime - startTime);
}));
}

@Override
public int getOrder() {
return Ordered.HIGHEST_PRECEDENCE;
}
}

如上,我们自定义了全局过滤器 ElapsedGlobalFilter,并将其注册为 Bean。因为该过滤器优先级最高,所以将其 order 设置为 Ordered.HIGHEST_PRECEDENCE。

术语

  • Route(路由):网关的基本构件。它由 ID、目标 URI、Predicates 和 Filters 定义。如果聚合 Predicate 为真,则匹配路由。
  • Predicate(谓词):Java 8 Function Predicate。输入类型是一个 Spring Framework ServerWebExchange。它允许开发人员匹配 HTTP 请求中的任何内容,比如 Header 或参数。
  • Filter(过滤器):用特定工厂构造的 Spring Framework GatewayFilter 实例。在这里,可以在发送下游请求之前或之后修改请求和响应。

工作流程

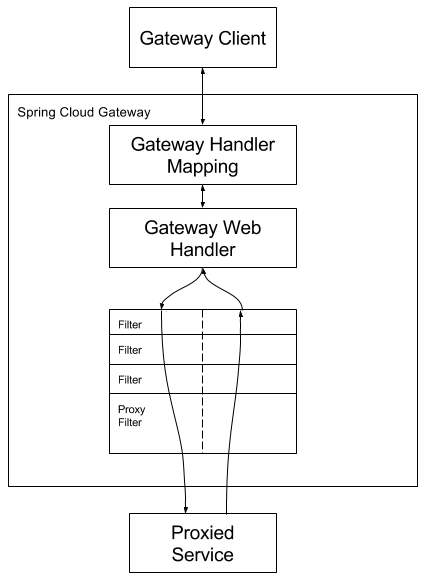
Spring Cloud Gateway 工作流程

  1. 客户端向 Spring Cloud Gateway 发出请求。
  2. 如果 Gateway Handler Mapping 确定请求与某个 Route 匹配,则将其发送给 Gateway Web Handler。
  3. 该 Handler 通过特定于请求的 Filter Chain 运行请求。Filters 被虚线分隔的原因是 Filters 可以在发送代理请求之前和之后运行逻辑。执行所有 Pre Filters 逻辑。然后发出代理请求。发出代理请求后,将运行 Post Filters 逻辑。

概述

不同的微服务一般会有不同的网络地址,而外部客户端可能需要调用多个服务的接口才能完成一个业务需求,如果让客户端直接与各个微服务通信,会有以下的问题:

  • 客户端会多次请求不同的微服务,增加了客户端的复杂性。
  • 存在跨域请求,在一定场景下处理相对复杂。
  • 某些微服务可能使用了防火墙/浏览器不友好的协议,直接访问会有一定的困难。
  • 难以重构,随着项目的迭代,可能需要重新划分微服务。例如,可能将多个服务合并成一个或者将一个服务拆分成多个。如果客户端直接与微服务通信,那么重构将会很难实施。
  • 认证复杂,每个服务都需要独立认证。

以上这些问题可以借助网关解决。

网关的角色是作为一个 API 架构,用来保护、增强和控制对于 API 服务的访问。它是介于客户端和服务器端之间的中间层,所有的外部请求都会先经过网关这一层。也就是说,API 的实现方面更多的考虑业务逻辑,而安全、性能、监控可以交由网关来做,这样既提高业务灵活性又不缺安全性,

架构

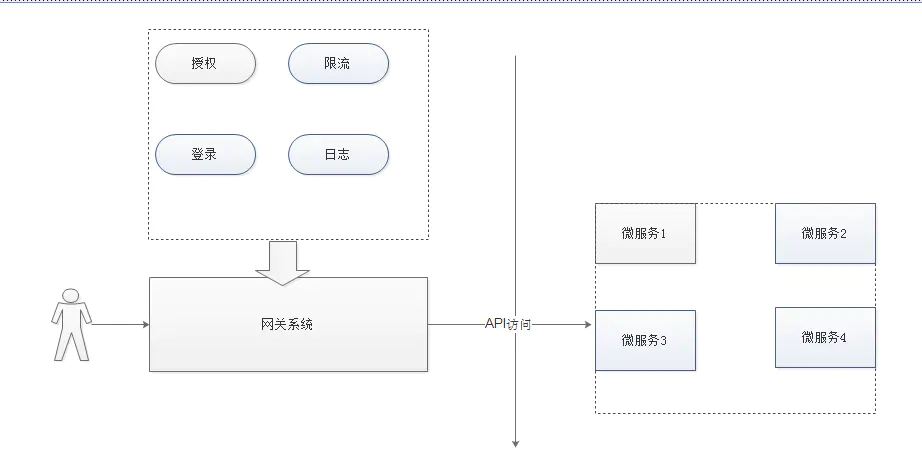
网关的典型架构图如下图所示:
网关架构

四大职能

  • 请求接入: 作为所有 API 接口服务请求的接入点,管理所有的接入请求。
  • 业务聚合: 作为多有后端业务服务的聚合点,所有的业务服务都可以在这里被调用。
  • 中介策略: 实现安全、验证、路由、过滤、流控、缓存等策略,进行一些必要的中介处理。
  • 统一管理: 提供配置管理工具,对所有 API 服务的调用生命周期和相应的中介策略进行统一管理。

分类与功能

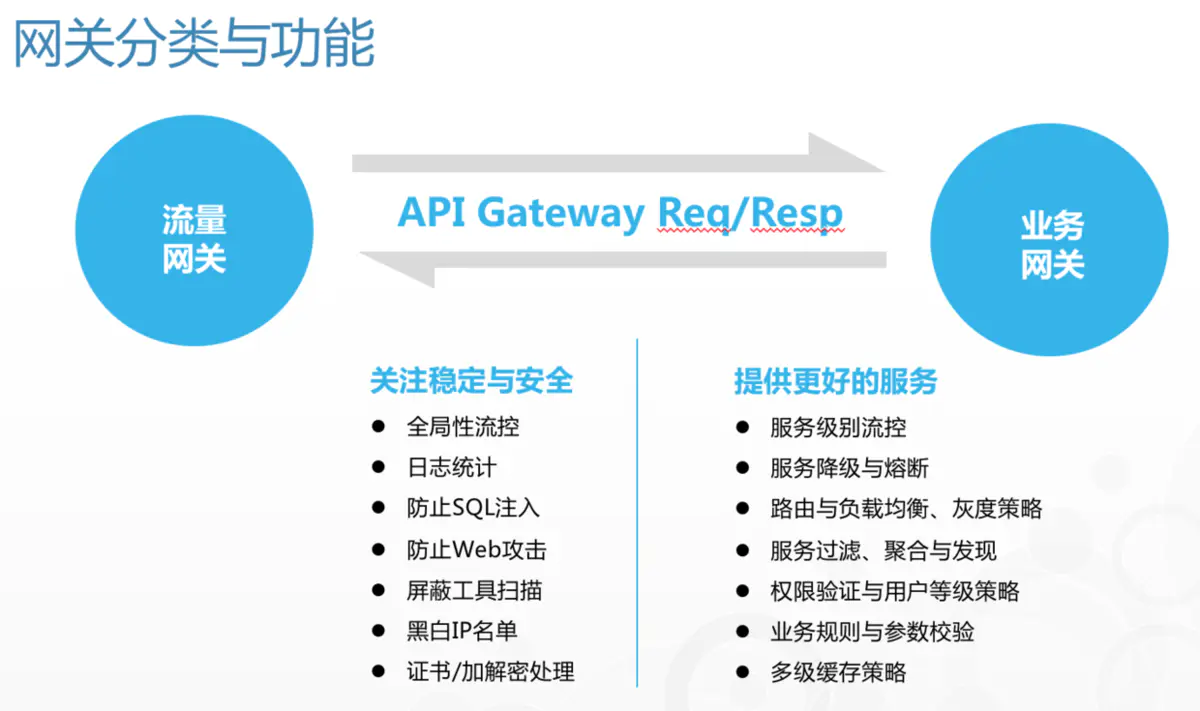
面对互联网复杂的业务系统,基本可以将网关分为两类:流量网关和业务网关。

  • 流量网关: 跟具体的后端业务系统和服务完全无关的部分,比如安全策略、全局性流控策略、流量分发策略等。
  • 业务网关: 针对具体的后端业务系统,或者是服务和业务有一定关联性的部分,并且一般被直接部署在业务服务的前面。业务网关一般部署在流量网关之后,业务系统之前,比流量网关更靠近系统。我们大部分情况下说的 API 网关,狭义上指的是业务网关。并且如果系统的规模不大,我们也会将两者合二为一,使用一个网关来处理所有的工作。

网关分类

应用场景

  • 单点入口
  • 路由转发
  • 限流熔断
  • 日志监控
  • 安全认证

高级应用场景

  • 红绿部署
  • 开发者测试分支
  • 埋点测试
  • 压力测试
  • 调试路由
  • 金丝雀测试(粘性)
  • 失败注入测试
  • 降级测试

网关 VS 反向代理

网关提供的基本功能与传统反向代理是大同小异的,不过网关主要是面向 API 和微服务,以提供更灵活的、可以由研发自助(可编程)的的动态配置的能力。

主流开源网关概览

支持公司 实现语言 亮点 不足
Nginx(2004) Nginx Inc C/Lua 高性能,成熟稳定 门槛高,偏运维,可编程弱
Kong(2014) Kong Inc OpenResty/Lua 高性能,可编程 API 门槛较高
Zuul1(2012) Netflix/Pivotal Java 成熟,简单门槛低 性能一般,可编程一般
Spring Cloud Gateway(2016) Pivotal Java 异步,配置灵活 早期产品
Envoy(2016) Lyft C++ 高性能,可编程 API,ServiceMesh 继承 门槛较高
Traefik(2015) Containous Golang 云原生,可编程 API,对接各种服务发现 生产案例不多

参考资料

  1. 微服务网关

多环境支持是现代互联网应用研发和交付的一个基本需求,通过规范多环境和对应的研发流程,可以同时提升交付质量和效率。

环境划分

通常我们会划分以下 4 个环境:

  • dev 环境:开发环境,开发人员使用,版本变动很大。
  • test 环境:测试环境,测试人员使用,版本相对稳定。
  • pre 环境:灰度环境,外部用户可以访问,但是服务器配置相对较低,其它和生产环境一样。
  • pro 环境:生产环境,面向外部用户,连接上互联网即可访问生产环境。

配置文件切换

在 Spring Boot 中,多环境配置文件名需要使用 application-{profile}.yaml 的格式,这里的 {profile} 对应的就是是环境标识。
比如我们有 dev、test、pre 和 prod 这 4 个环境,那么就可以创建以下 5 个配置文件:

  • application.yaml 存放公共配置
  • application-dev.yaml
  • application-test.yaml
  • application-pre.yaml
  • application-prod.yaml

有 3 种方式可以切换配置文件:

  • 在 application.yaml 中指定 spring.profiles.active: dev
  • 在执行 java -jar 打包的时候,在后面加上 --spring.profiles.active=dev
  • 在 Idea VM options 中设置-Dspring.profiles.active=dev

配置类切换

我们还可以使用注解 @Profile,来指定哪些配置类(@Component/@Configuration/@ConfigurationProperties)在哪些环境下生效,如:

1
2
3
4
5
6
7
@Configuration(proxyBeanMethods = false)
@Profile("production")
public class ProductionConfiguration {

// ...

}

参考资料

  1. DEV SIT UAT PET SIM PRD PROD常见环境英文缩写含义

Swagger 是一个规范和完整的框架,用于生成、描述、调用和可视化 RESTful 风格的 Web 服务。

利用SpringFox,我们可以很快的将 Swagger 集成到 Spring Boot 项目中。

Maven 依赖

1
2
3
4
5
6
7
8
9
<!-- api doc -->
<dependency>
<groupId>io.springfox</groupId>
<artifactId>springfox-swagger2</artifactId>
</dependency>
<dependency>
<groupId>io.springfox</groupId>
<artifactId>springfox-swagger-ui</artifactId>
</dependency>

启用 Swagger

1
2
3
4
5
6
7
8
9
10
11
12
13
14
15
16
17
18
19
20
21
22
23
24
25
26
27
28
29
30
31
32
33
34
35
36
37
38
39
40
41
42
43
44
45
46
47
48
49
50
51
52
53
54
55
56
57
58
59
60
61
62
63
64
65
66
67
68
69
70
71
72
73
74
75
76
77
78
79
80
81
82
83
84
85
86
87
88
@EnableSwagger2
@EnableConfigurationProperties(SwaggerProperties.class)
@Configuration
public class SwaggerConfig {
private final SwaggerProperties swaggerProperties;

public SwaggerConfig(SwaggerProperties swaggerProperties) {
this.swaggerProperties = swaggerProperties;
}

@Bean
public Docket docket() {
return new Docket(DocumentationType.SWAGGER_2).apiInfo(apiInfo());
}

private ApiInfo apiInfo() {
return new ApiInfoBuilder()
.title(swaggerProperties.getTitle())
.description(swaggerProperties.getDescription())
.contact(contact())
.version(swaggerProperties.getVersion())
.build();
}

private Contact contact() {
return new Contact(swaggerProperties.getContact().getName(),
swaggerProperties.getContact().getUrl(),
swaggerProperties.getContact().getEmail());
}
}

@Data
@ConfigurationProperties(prefix = "swagger")
public class SwaggerProperties {

/**
* 标题
*/
private String title;

/**
* 描述
*/
private String description;

/**
* 版本号
*/
private String version;

/**
* 联系人
*/
private final Contact contact = new Contact();

/**
* 联系人
*/
@Data
public static class Contact {
/**
* 名字
*/
private String name;

/**
* 主页
*/
private String url;

/**
* 邮箱
*/
private String email;
}
}

@Configuration
public class WebMvcConfig extends WebMvcConfigurationSupport {

@Override
public void addResourceHandlers(ResourceHandlerRegistry registry) {
registry.addResourceHandler("/**").addResourceLocations("classpath:/static/");
registry.addResourceHandler("swagger-ui.html").addResourceLocations("classpath:/META-INF/resources/");
registry.addResourceHandler("/webjars/**").addResourceLocations("classpath:/META-INF/resources/webjars/");
super.addResourceHandlers(registry);
}
}

属性配置示例:

1
2
3
4
5
6
7
8
swagger:
title: Spring Boot Samples
description: Spring Boot Samples
version: 1.0
contact:
name: cdrcool
url: http://cdrcool.github.io/
email: cdrcool@163.com

Swagger 常用注解

  • @Api 用于类,说明该类的作用
  • @ApiOperation 用于方法,说明方法的用途
  • @ApiImplicitParams 用于方法,包含一组参数说明
  • @ApiImplicitParam 用于 @ApiImplicitParams 注解中,指定一个参数的配置信息
  • @ApiResponses 用于方法,包含一组响应说明
  • @ApiResponse 用于 @ApiResponses 中,指定一个响应的配置信息
  • @ApiModel 用于类,对类进行说明
  • @ApiModelProperty 用于类属性或类方法,对类属性进行说明

访问

应用启动后,访问 http://{ip}:{port}/{projectname}/swagger-ui.html 即可查看自动生成的 API 接口文档,JSON 数据可通过接口 http://{ip}:{port}/{projectname}/v2/api-docs 获取。

Spring 对异步调用提供了良好的支持,只需在启动类上添加注解 @EnableAsync,然后在要执行异步操作的类或方法上添加注解 @Async 即可。

开启异步调用

1
2
3
4
5
6
7
8
@EnableAsync
@SpringBootApplication
public class WebApplication {

public static void main(String[] args) {
SpringApplication.run(WebApplication.class, args);
}
}

创建异步任务

@Async 注解既可以添加在类上,也可以添加在方法上,如果是添加在类上,则该类下的所有方法都将被异步执行。
如果异步方法有返回值,则需要指定其返回对象类型为 Future。

1
2
3
4
5
6
7
8
9
10
11
12
13
14
15
16
17
18
19
20
21
22
23
24
25
26
27
28
@Slf4j
@Component
public class AsyncTask {

@Async
public void execute() {
log.info("Execution thread name: {}", Thread.currentThread().getName());

try {
TimeUnit.SECONDS.sleep(5);
} catch (InterruptedException e) {
log.error("Error!", e);
}
}

@Async
public Future<String> executeAndReturn() {
log.info("Execution thread name: {}", Thread.currentThread().getName());

try {
TimeUnit.SECONDS.sleep(5);
} catch (InterruptedException e) {
log.error("Error!", e);
}

return new AsyncResult<>("Hello world !");
}
}

需要注意的是,由于对于 Spring 默认使用代理模式处理 @Async,因此同一类中的本地调用不会被拦截,即 @Async 将会被忽略

调用异步任务

1
2
3
4
5
6
7
8
9
10
11
12
13
14
15
16
17
18
19
20
21
22
23
24
25
26
27
28
29
30
31
32
33
34
@Slf4j
@RequestMapping(("asyncCall"))
@RestController
public class AsyncCallController {
private final AsyncTask asyncTask;

public AsyncCallController(AsyncTask asyncTask) {
this.asyncTask = asyncTask;
}

@GetMapping("execute")
public void execute() {
log.info("Main thread name: {}", Thread.currentThread().getName());

asyncTask.execute();
}

@GetMapping("executeAndReturn")
public String executeAndReturn() throws ExecutionException, InterruptedException {
log.info("Main thread name: {}", Thread.currentThread().getName());

Future<String> future = asyncTask.executeAndReturn();
// 轮询,直到 future 中有值
while (true) {
if (future.isDone()) {
return future.get();
} else {
log.info("Task is working");
TimeUnit.SECONDS.sleep(1);
}
}
}

}

配置线程池

Spring 会调用由它管理的 Executor 来处理 @Async。如果没有配置 Executor,它会自己创建 SimpleAsyncTaskExecutor。我们可以通过配置参数来调整它的默认配置。

1
2
3
4
5
6
7
8
9
spring:
task:
execution:
pool:
core-size: 5
max-size: 10
queue-capacity: 200
keep-alive: 10s
thread-name-prefix: task-

我们也可以自定义 Executor,只需要实现类 AsyncConfigurer 并在其方法 getAsyncExecutor() 中返回自定义的 Executor。

1
2
3
4
5
6
7
8
9
10
11
12
13
14
15
16
17
18
19
20
21
22
23
24
@Configuration
public class AsyncConfig implements AsyncConfigurer {
public static final String ASYNC_EXECUTOR_NAME = "taskExecutor";

private final TaskExecutionProperties properties;

public AsyncConfig(TaskExecutionProperties properties) {
this.properties = properties;
}

@Bean(ASYNC_EXECUTOR_NAME)
@Override
public Executor getAsyncExecutor() {
ThreadPoolTaskExecutor executor = new ThreadPoolTaskExecutor();
executor.setCorePoolSize(properties.getPool().getCoreSize());
executor.setMaxPoolSize(properties.getPool().getMaxSize());
executor.setQueueCapacity(properties.getPool().getQueueCapacity());
executor.setKeepAliveSeconds((int) properties.getPool().getKeepAlive().getSeconds());
executor.setThreadNamePrefix(properties.getThreadNamePrefix());
executor.setTaskDecorator(new ContextCopyingDecorator());
executor.initialize();
return executor;
}
}

如果需要同时配置多个线程池,可以配置多个 Executor Bean。(如果使用了 Spring MVC 中的异步请求,需求将 Executor 的类型设置为 AsyncTaskExecutor)

有些请求业务处理流程可能比较耗时,比如 IO 操作、长查询、远程调用等,主线程会被一直占用,而 Tomcat 线程池线程有限,处理量就会下降。

Servlet 3.0 以后提供了对异步处理的支持,目的就是将容器线程池和业务线程池分离开,将耗时较长的操作移动到业务线程池中进行,释放容器线程,使得容器线程可以处理其他任务,在业务逻辑执行完毕之后,再通知 Tomcat 容器线程池来继续执行后面的操作。

原始模型在处理业务逻辑的过程中会一直占有容器线程池,而异步 Servlet 模型在业务线程池处理的过程中,有一段时间容器线程池中的那个线程是空闲的,这种设计大大提高了容器的处理请求的能力。

Spring MVC 封装了异步处理,满足用户请求后,主线程很快结束,同时开启其它线程处理任务,并将处理结果异步地响应用户,而主线程就可以接收更多请求。

如果要返回单个异步值,可以在 Controller中 返回 Callable、WebAsyncTask 或 DeferredResult,如果要生成多个异步值并将这些值写入响应,则可以在 Controller 中返回 ResponseBodyEmitter、SseEmitter或 StreamingResponseBody。

Callable

控制器可以用 Callable 包装任何受支持的返回值。返回值由配置的 TaskExecutor 运行给定的任务来获得。

示例:

1
2
3
4
5
6
7
8
9
@GetMapping("callable")
public Callable<String> callable() {
log.info("Main thread name:{}",Thread.currentThread().getName());

return () -> {
log.info("Execution thread name:{}",Thread.currentThread().getName());
return "Hello,World!";
};
}

WebAsyncTask

如果需要超时处理的回调或者错误处理的回调,可以使用 WebAsyncTask 代替 Callable,它包装了 Callable,功能更强大些。

1
2
3
4
5
6
7
8
9
10
11
12
13
14
15
16
17
18
19
20
@GetMapping("asyncTask")
public WebAsyncTask<String> asyncTask() {
log.info("Main thread name:{}",Thread.currentThread().getName());

WebAsyncTask<String> webAsyncTask = new WebAsyncTask<>(3000,() -> {
log.info("Execution thread name:{}",Thread.currentThread().getName());
return "Hello,World!";
});

// 成功回调
webAsyncTask.onCompletion(() -> System.out.println("Finish!"));

// 超时回调
webAsyncTask.onTimeout(() -> "Time out!");

// 错误回调
webAsyncTask.onError(() -> "Error!");

return webAsyncTask;
}

DeferredResult

DeferredResult 使用方式与 Callable 类似,但在返回结果上不一样,它返回的时候实际结果可能还没有生成,实际的结果可能会由另外的线程里面设置到 DeferredResult 中。这个特性非常重要,要实现复杂的功能(比如服务端推技术、订单过期时间处理、长轮询、模拟MQ的功能等等高级应用)都会用到。

1
2
3
4
5
6
7
8
9
10
11
12
13
14
15
16
17
18
19
20
21
22
23
24
25
26
27
28
29
@GetMapping("/deferred")
public DeferredResult<String> deferredResult() {
log.info("Main thread name:{}",Thread.currentThread().getName());

DeferredResult<String> deferredResult = new DeferredResult<>();

// 实际应用中,可以由消息队列、定时任务或其它事件触发
CompletableFuture
.supplyAsync(() -> {
log.info("Execution thread name:{}",Thread.currentThread().getName());
return "Hello,World!";
})
.whenCompleteAsync((result,throwable) -> {
// 重点:将异步结果赋值到 deferredResult 中
deferredResult.setResult(result);
});

// 成功回调
deferredResult.onCompletion(() -> log.info("Finish!"));

// 超时回调
deferredResult.onTimeout(() -> log.warn("Time out!"));

// 错误回调
deferredResult.onError((e) -> log.error("Error!"));

// 虽然这里有 return,但如果一直没有调用 setResult 设置值,线程就会一直 hold 在这里
return deferredResult;
}

ResponseBodyEmitter

我们可以使用 ResponseBodyEmitter 返回值来生成对象流,其中每个对象都使用 HttpMessageConverter 序列化并写入响应。

1
2
3
4
5
6
7
8
9
10
11
12
13
14
15
16
17
18
19
20
21
22
23
24
25
26
27
28
29
30
31
32
33
34
35
36
37
@GetMapping("/emitter")
public ResponseBodyEmitter emitter() {
ResponseBodyEmitter emitter = new ResponseBodyEmitter();

// 线程 1 输出
CompletableFuture.runAsync(() -> {
try {
TimeUnit.SECONDS.sleep(1);
emitter.send("Hello,World!");
} catch (IOException | InterruptedException e) {
log.error("Error!",e);
}
});

// 线程 2 输出
CompletableFuture.runAsync(() -> {
try {
TimeUnit.SECONDS.sleep(1);
emitter.send("Hello,World again!");
} catch (IOException | InterruptedException e) {
log.error("Error!",e);
}
});

// 线程 3 标记结束
CompletableFuture.runAsync(() -> {
try {
TimeUnit.SECONDS.sleep(3);
emitter.complete();
} catch (InterruptedException e) {
log.error("Error!",e);
}
});

// 一直阻塞,直到调用 emitter.complete()
return emitter;
}

我们还可以使用 ResponseBodyEmitter 作为 ResponseEntity 中的主体,从而自定义响应的状态和标题。

SseEmitter

SseEmitter (ResponseBodyEmitter 的子类) 提供对服务器发送事件的支持,从服务器发送的事件根据 W3C SSE 规范进行格式化。要从控制器生成 SSE 流,返回 SseEmitter。

1
2
3
4
5
6
7
8
9
10
11
12
13
14
15
16
17
18
19
20
21
22
23
24
25
26
27
28
29
30
31
32
33
34
35
36
37
@GetMapping("/sseEmitter")
public SseEmitter sseEmitter() {
SseEmitter emitter = new SseEmitter ();

// 线程 1 输出
CompletableFuture.runAsync(() -> {
try {
TimeUnit.SECONDS.sleep(1);
emitter.send("Hello,World!");
} catch (IOException | InterruptedException e) {
log.error("Error!",e);
}
});

// 线程 2 输出
CompletableFuture.runAsync(() -> {
try {
TimeUnit.SECONDS.sleep(1);
emitter.send("Hello,World again!");
} catch (IOException | InterruptedException e) {
log.error("Error!",e);
}
});

// 线程 3 标记结束
CompletableFuture.runAsync(() -> {
try {
TimeUnit.SECONDS.sleep(3);
emitter.complete();
} catch (InterruptedException e) {
log.error("Error!",e);
}
});

// 一直阻塞,直到调用 emitter.complete()
return emitter;
}

虽然 SSE 是流媒体到浏览器的主要选项,但请注意 Internet Explorer 不支持服务器发送的事件。考虑使用 Spring 的 WebSocket 消息传递和 SockJS 回退传输(包括 SSE),这些回退传输针对广泛的浏览器。

StreamingResponseBody

有时,绕过消息转换并直接将流发送到响应 OutputStream 是很有用的(例如,对于文件下载)。我们可以使用 StreamingResponseBody 返回值类型来完成。

1
2
3
4
5
6
7
8
@GetMapping("/download")
public StreamingResponseBody download() {
log.info("Main thread name:{}",Thread.currentThread().getName());
return outputStream -> {
log.info("Execution thread name:{}",Thread.currentThread().getName());
// write...
};
}

我们可以使用 StreamingResponseBody 作为 ResponseEntity 中的主体来定制响应的状态和标题。

配置 AsyncTaskExecutor

Spring MVC 执行异步处理需要用到 AsyncTaskExecutor,这个可以在 WebMvcConfigurationSupport.configureAsyncSupport 方法中提供。如果不提供,则使用 SimpleAsyncTaskExecutor,SimpleAsyncTaskExecutor 不使用线程池,因此推荐提供自定义的 AsyncTaskExecutor。

1
2
3
4
5
6
7
8
9
10
11
12
13
14
15
16
17
@Configuration
public class WebMvcConfig extends WebMvcConfigurationSupport {
/**
* 默认的线程池
*/
private final Executor executor;

public WebMvcConfig(@Qualifier("applicationTaskExecutor") Executor executor) {
this.executor = executor;
}

@Override
public void configureAsyncSupport(AsyncSupportConfigurer configurer) {
configurer.setTaskExecutor((AsyncTaskExecutor) executor);
super.configureAsyncSupport(configurer);
}
}

处理流程

Servlet 异步处理简述

可以通过调用 request.startAsync() 将 ServletRequest 设置为异步模式。这样做的主要效果是 Servlet (以及任何过滤器)可以退出,但是响应仍然是开放的,以便稍后完成处理。

对 request.startAsync() 的调用将返回 AsyncContext,我们可以使用它进一步控制异步处理。例如,它提供分派方法,该方法类似于 Servlet API 的转发,只是它允许应用程序在 Servlet 容器线程上恢复请求处理。

ServletRequest 提供对当前 DispatcherType 的访问,我们可以使用它来区分当前处理的是原始请求、异步分发请求、转发或是其他类型的请求分发类型。

Callable 处理流程

  • Controller 返回一个 Callable。
  • Spring MVC 调用 request.startAsync() 并将调用提交给 TaskExecutor,以便在单独的线程中进行处理。
  • 同时,DispatcherServlet 和所有过滤器退出 Servlet 容器线程,但是响应保持打开状态。
  • 最后,Callable 产生一个结果,Spring MVC 将请求发送回 Servlet 容器以完成处理。
  • 再次调用 DispatcherServlet,然后处理从 Callable异步生成的返回值。

DeferredResult 处理流程

  • Controller 返回一个 DeferredResult,并将其保存在某个可以访问它的内存队列或列表中。
  • Spring MVC 调用 request.startAsync()。
  • 同时,DispatcherServlet 和所有配置的过滤器退出请求处理线程,但是响应保持打开状态。
  • 应用程序从某个线程设置 DeferredResult,Spring MVC 将请求发送回 Servlet 容器。
  • 再次调用 DispatcherServlet,然后继续处理异步生成的返回值。

对比 WebFlux

Servlet API 最初是为通过 Filter-Servlet 链进行单次传递而构建的。在 Servlet 3.0 中添加的异步请求处理允许应用程序退出 Filter-Servlet 链,但保持响应以供进一步处理。Spring MVC 异步支持就是围绕这种机制构建的。当 Controller 返回一个 DeferredResult 时,Filter-Servlet 链被退出,Servlet 容器线程被释放。稍后,当设置 DeferredResult 时,将进行异步分发(到相同的 URL),在此期间将再次映射 Controller,但不是调用它,而是使用 DeferredResult 值(就像 Controller 返回它一样)来恢复处理。

相比之下,Spring WebFlux 既不是基于 Servlet API 构建的,也不需要这样的异步请求处理特性,因为它在设计上就是异步的。异步处理构建在所有框架契约中,并在请求处理的所有阶段得到本质上的支持。

从编程模型的角度来看,Spring MVC 和 Spring WebFlux 都支持异步和 Reactive Types 作为 Controller 方法的返回值。Spring MVC 甚至支持流,包括 reactive back pressure.。但是,对响应的各个写操作仍然是阻塞的(并且是在单独的线程上执行的),这与 WebFlux 不同,后者依赖于非阻塞 IO,并且每次写操作都不需要额外的线程。

另一个基本区别是,Spring MVC 在 Controller 方法参数中不支持异步或 reactive types(例如,@RequestBody、@RequestPart等),也不支持将异步和响应类型作为模型属性。而 Spring WebFlux 却支持所有这些。

概念

  • DTO 数据传输对象
  • DMO 数据模型对象

大多数情况下,DTO 与 DMO 所承载的字段大致是一样的,但是有些时候也会有差别。比如某些情况下,DTO 可能根据会实际需要裁剪或聚合添加某些字段,另外对于不同的 API 接口场景,即使使用同一个 DTO,它们的校验方式也可能不同。因此对于同一个 DMO,我们可能会用到一个或多个 DTO,那么为了交换数据,必然会存在两者之间的转换,也就是数据字段的拷贝。这种拷贝如果手工去做,繁琐且容易出错,好在业界有一些实践,可以帮我们自动处理绝大多数场景下的字段映射。(少数特殊场景下,有些字段可能不能自动匹配映射,只需要简单的定制一些映射逻辑即可)

ModelMapper

依赖

1
2
3
4
5
<dependency>
<groupId>org.modelmapper</groupId>
<artifactId>modelmapper</artifactId>
<version>${modelmapper.version}</version>
</dependency>

使用示例

1
2
ModelMapper modelMapper = new ModelMapper();
OrderDto order = modelMapper.map(orderEntity, OrderDto.class);

MapStruct

依赖

1
2
3
4
5
6
7
8
9
10
<dependency>
<groupId>org.mapstruct</groupId>
<artifactId>mapstruct-jdk8</artifactId>
<version>${mapstruct.version}</version>
</dependency>
<dependency>
<groupId>org.mapstruct</groupId>
<artifactId>mapstruct-processor</artifactId>
<version>${mapstruct.version}</version>
</dependency>

使用示例

1
2
3
4
5
6
7
8
9
10
11
@Mapper
public interface OrderMapper {

OrderDto toDto(OrderEntity entity);

OrderEntity toEntity(OrderDto dto);

}

OrderMapper mapper = Mappers.getMapper(OrderMapper.class);
OrderDto order = mapper.convert(orderEntity);

对比

  • ModelMapper 是在运行期使用反射,而 MapStruct 是在编译期动态生成字节码
  • MapStruct 性能远高于 ModelMapper
  • ModelMapper 易用性高于 MapStruct