人的知识就好比一个圆圈,圆圈里面是已知的,圆圈外面是未知的。你知道得越多,圆圈也就越大,你不知道的也就越多。

0%

服务发现

Maven 依赖

1
2
3
4
5
<!-- 服务注册与发现 -->
<dependency>
<groupId>org.springframework.cloud</groupId>
<artifactId>spring-cloud-starter-consul-discovery</artifactId>
</dependency>

配置属性

1
2
3
4
5
6
7
8
9
10
11
12
13
14
15
16
17
18
19
20
21
22
23
24
25
26
27
28
29
spring:
application:
name: account
cloud:
loadbalancer:
ribbon:
# 由于未使用 Eureka,需要禁用掉默认的 Ribbon 负载均衡
enabled: false
consul:
# 启用服务发现
enabled: true
# 集群地址
host: localhost
# 集群端口
port: 8500
discovery:
# 启用服务注册
register: true
# 服务注册名称
serviceName: ${spring.application.name}
# 服务注册 ID
instanceId: ${spring.application.name}:${spring.cloud.consul.port}
# 服务健康检查地址
healthCheckPath: /actuator/health
# 服务健康检查时间间隔
healthCheckInterval: 10s
# 连接不上 Consul,则抛出异常,终止应用程序启动
# 本地开发时,可能需要设置为 false
failFast: true
  • 在上例中,consul 相关配置都是使用的默认值,即不配置也可以运行。
  • 由于 Spring Cloud 默认会采用 Ribbon 作为负载均衡实现,而这里没有使用 Eureka,所以需要禁用到 Ribbon 负载均衡。
  • 如果使用了 Spring Cloud Config,属性 spring.application.name 需配置在 bootstrap.yml 中。
  • 如果使用了 Spring Cloud Consul Config,consul 相关属性需配置在 bootstrap.yml 中。

查找服务

使用 Feign

定义 API 接口:

1
2
3
4
5
6
7
8
9
10
11
@FeignClient(name = "account", path = "account")
public interface AccountApi {

/**
* 获取用户名
*
* @return 用户名
*/
@GetMapping("username")
String getUsername();
}

调用 API 接口:

1
2
3
4
5
6
7
8
9
10
11
12
13
@Slf4j
@RequestMapping("seckill")
@RestController
public class SeckillController {
@Autowired
private AccountApi accountApi;

@GetMapping("orderId")
public String getOrderId() {
log.info("Username: {}", accountApi.getUsername());
return UUID.randomUUID().toString();
}
}

使用 RestTemplate

声明负载均衡 RestTemplate:

1
2
3
4
5
@LoadBalanced
@Bean
public RestTemplate loadbalancedRestTemplate() {
return new RestTemplate();
}

使用 RestTemplate:

1
2
3
4
5
6
7
8
9
10
11
12
13
@Slf4j
@RequestMapping("seckill")
@RestController
public class SeckillController {
@Autowired
private RestTemplate restTemplate;

@GetMapping("orderId")
public String getOrderId() {
log.info("Username: {}", restTemplate.getForObject("http://account/account/username", String.class));
return UUID.randomUUID().toString();
}
}

使用 DiscoveryClient

1
2
3
4
5
6
7
8
9
10
11
@Autowired
private DiscoveryClient discoveryClient;

public String serviceUrl() {
List<ServiceInstance> list = discoveryClient.getInstances("STORES");
if (list != null && list.size() > 0 ) {
URI uri = list.get(0).getUri();
...
}
return null;
}

HTTP 健康检查

健康检查默认为 /actuator/health,时间间隔默认为 10s。我们可以通过以下属性进行修改:

1
2
3
4
5
6
7
8
spring:
cloud:
consul:
discovery:
# 服务健康检查地址
healthCheckPath: /actuator/health
# 服务健康检查时间间隔
healthCheckInterval: 10s

可以通过设置 management.health.consun.enabled=false 来禁用运行状况检查。

配置中心

Maven 依赖

1
2
3
4
5
<!-- 服务注册与发现 -->
<dependency>
<groupId>org.springframework.cloud</groupId>
<artifactId>spring-cloud-starter-consul-discovery</artifactId>
</dependency>

配置属性

1
2
3
4
5
6
7
8
9
10
11
12
13
14
15
16
17
18
19
20
21
22
23
24
25
26
spring:
application:
name: account
cloud:
consul:
# 启用 consul
enabled: true
# 集群地址
host: localhost
# 集群端口
port: 8500
# 配置中心
config:
# 启用配置中心
enabled: true
# 根文件夹
prefix: config
# 文件格式,默认值 KEY_VALUE
format: YAML
# 文件名
data-key: data
# 应用名和环境分隔符,默认值 ,
profile-separator: '-'
# 连接不上 Consul,则抛出异常,终止应用程序启动
# 本地开发时,可能需要设置为 false
failFast: true
  • 配置属性需放在 bootstrap.yml 文件中。
  • 在上例中,除 format 和 profile-separator 属性外,其它 consul 相关配置都是使用的默认值,即不配置也可以运行。

创建配置文件

  1. 在 Consul 界面 Key/Value 菜单下创建目录:
  • config/account/data account 应用的默认配置
  • config/account-dev/data account 应用的 dev 环境配置

我们也可以创建另外两个目录:

  • config/application/data 所有应用的默认配置
  • config/application-dev/data 所有应用的 dev 环境配置
  1. 在 data 路径下添加配置属性:
    1
    2
    3
    4
    5
    6
    7
    8
    9
    10
    11
    12
    13
    14
    15
    16
    17
    18
    19
    20
    21
    22
    23
    24
    25
    26
    27
    28
    29
    30
    31
    32
    33
    34
    35
    36
    37
    38
    39
    40
    41
    42
    43
    44
    45
    46
    47
    48
    49
    50
    server:
    port: 8082

    spring:
    application:
    name: account
    cloud:
    loadbalancer:
    ribbon:
    # 由于未使用 Eureka,需要禁用掉默认的 Ribbon 负载均衡
    enabled: false
    consul:
    # 启用 consul
    enabled: true
    # 集群地址
    host: localhost
    # 集群端口
    port: 8500
    # 服务发现
    discovery:
    # 启用服务发现
    enabled: true
    # 启用服务注册
    register: true
    # 服务注册名称
    serviceName: ${spring.application.name}
    # 服务注册 ID
    instanceId: ${spring.application.name}:${spring.cloud.consul.port}
    # 服务健康检查地址
    healthCheckPath: /actuator/health
    # 服务健康检查时间间隔
    healthCheckInterval: 10s
    # 连接不上 Consul,则抛出异常,终止应用程序启动
    # 本地开发时,可能需要设置为 false
    failFast: true
    watch:
    # 启动 watch
    enabled: true
    # watch 调用频率,单位:毫秒
    delay: 1000
    # watch 查询阻塞时间,单位:秒
    # 默认值 55 秒,这意味着连续两次快速的修改配置属性,属性不会立即更新为最新的值,因为前面的 watch 查询阻塞了后面的查询
    wait-time: 55

    management:
    endpoints:
    web:
    # 默认只暴露了 health/info 端点
    exposure:
    include: health,info,metrics,refresh,gateway

经过以上两步操作之后,在启动应用程序之后,便会从 Consul 中加载配置属性。

动态刷新配置属性

如果 Consul 中配置属性发生了变化,我们可以通过向 /refresh 端点发送 HTTP POST 请求,来重新加载配置。 /refresh 端点会将发生变化(新增、修改或删除)的属性列表返回给我们。

但是, /refresh 端点并不能动态刷新应用程序中的属性,要做到这点,还需在用到属性的 bean 上添加 @RefreshScope 注解,如下所示:

1
2
3
4
5
6
7
8
9
10
11
12
13
@Slf4j
@RefreshScope
@RequestMapping("account")
@RestController
public class AccountController {
@Value("${username:admin}")
private String username;

@GetMapping("username")
public String getUsername() {
return username;
}
}

其实,即使我们不调用 /refresh 端点,配置属性也会自动刷新,这是因为 Consul Config Watch 利用 Consul 的能力来监控配置属性是否发生变化。我们可以通过设置 watch 相关属性,来启用或关闭 watch,及调整 watch 频率等,如下所示:

1
2
3
4
5
6
7
8
9
10
11
spring:
cloud:
consul:
watch:
# 启动 watch
enabled: true
# watch 调用频率,单位:毫秒
delay: 1000
# watch 查询阻塞时间,单位:秒
# 默认值 55 秒,这意味着连续两次快速的修改配置属性,属性不会立即更新为最新的值,因为前面的 watch 查询阻塞了后面的查询
wait-time: 55

Consul 重试

在应用程序启动时,如果遇到 Consul Agent 连接不上,可以设置重试次数。只需引入以下 2 个依赖:

1
2
3
4
5
6
7
8
9
10
11
<dependencies>
<dependency>
<groupId>org.springframework.retry</groupId>
<artifactId>spring-retry</artifactId>
</dependency>

<dependency>
<groupId>org.springframework.boot</groupId>
<artifactId>spring-boot-starter-aop</artifactId>
</dependency>
</dependencies>

默认情况下,会重试 6 次,初始回退间隔为 1000 ms,后续回退的指数乘数为 1.1。我们可以使用 spring.cloud.consul.retry.* 配置属性来配置这些属性(以及其它属性)。

Consul 重试既可以在服务发现中使用,也可以在配置中心中使用。

Maven 依赖

1
2
3
4
<dependency>
<groupId>org.springframework.cloud</groupId>
<artifactId>spring-cloud-starter-openfeign</artifactId>
</dependency>

基本使用

  1. 在 account-api 模块中定义 API 接口 AccountApi。
1
2
3
4
5
6
7
8
9
10
11
@FeignClient(name = "account", url = "http://localhost:8082", path = "account")
public interface AccountApi {

/**
* 获取用户名
*
* @return 用户名
*/
@GetMapping("username")
String getUsername();
}
  • name 客户端名称,必要属性。如果项目使用了服务发现,name 属性需指定为微服务的名称。
  • url 服务地址,一般用于调试。
  • contextId 具有多个相同名称的 Feign 客户端时,需要设置该属性以区分。
  • path 请求的 mapping 前缀。
  • fallback 定义容错的处理类,当调用远程接口失败或超时时,会调用对应接口的容错逻辑,fallback 指定的类必须实现 @FeignClient 标记的接口。
  • fallbackFactory 工厂类,用于生成 fallback 类实例,通过这个属性我们可以实现每个接口通用的容错逻辑,减少重复的代码。
  • configuration Feign 配置类,可以自定义 Feign 的 Encoder、Decoder、Contract、LogLevel。
  • decode404 当发生 HTTP 404 错误时,如果该属性为 true,会调用 decoder 进行解码,否则抛出 FeignException。
  1. 在 account-api 模块中定义 AccountController。
1
2
3
4
5
6
7
8
9
10
@Slf4j
@RequestMapping("account")
@RestController
public class AccountController {

@GetMapping("username")
public String getUsername() {
return "admin";
}
}

注意:AccountController 不应该继承 AccountApi,因为这会导致服务的调用方和提供方紧密耦合。同时在 SpringMVC 中会有问题,因为请求参数映射是不能被继承的。

  1. 在 seckill-web 中启动 Feign 客户端。
1
2
3
4
5
6
7
8
9
@EnableFeignClients(basePackages = {"account"})
@SpringBootApplication
public class SeckillApplication {

public static void main(String[] args) {
SpringApplication.run(SeckillApplication.class, args);
}

}

注意: 默认会扫描启动类所在根路径下的所有使用了注解 @FeignClient 的 Feign 客户端,如果 Feign 客户端不在启动类所在根路径下,则需要设置 @EnableFeignClients 的属性 basePackages 来指定要扫描的包。

  1. 在 seckill-web 中使用 API 接口。
    1
    2
    3
    4
    5
    6
    7
    8
    9
    10
    11
    12
    13
    @Slf4j
    @RequestMapping("seckill")
    @RestController
    public class SeckillController {
    @Autowired
    private AccountApi accountApi;

    @GetMapping("orderId")
    public String getOrderId() {
    log.info("Username: {}", accountApi.getUsername());
    return UUID.randomUUID().toString();
    }
    }

服务发现支持

如果我们使用了服务发现,如 Consul 或 Eureka,那么在注解 @FeignClient 中就不需要再指定 url 属性,需要注意的是注解 @FeignClient 的 name 属性要与服务注册中心的服务名一致。

Feign 是一个声明式 web 服务客户端,使用它能让编写 web 服务客户端更加简单。Feign 的使用方法是定义一个接口,然后在上面添加注解。它支持可插入的注解支持,包括 Feign 注解和 JAX-RS 注解,同时也支持可插拔的编码器和解码器。Spring Cloud 增加了对 Spring MVC 注解的支持,并支持使用 Spring Web 中默认使用的 HttpMessageConverters。Spring Cloud 集成了 Ribbon 和 Eureka,以及 Spring Cloud LoadBalancer,从而可以使用 Feign 来实现 HTTP 客户端负载均衡。

引入 Feign

要在项目中引入 Feign,需要添加以下依赖:

1
2
3
4
<dependency>
<groupId>org.springframework.cloud</groupId>
<artifactId>spring-cloud-starter-openfeign</artifactId>
</dependency>

使用示例:

1
2
3
4
5
6
7
8
9
10
11
12
13
14
15
16
17
18
@SpringBootApplication
@EnableFeignClients
public class Application {

public static void main(String[] args) {
SpringApplication.run(Application.class, args);
}

}

@FeignClient("stores")
public interface StoreClient {
@RequestMapping(method = RequestMethod.GET, value = "/stores")
List<Store> getStores();

@RequestMapping(method = RequestMethod.POST, value = "/stores/{storeId}", consumes = "application/json")
Store update(@PathVariable("storeId") Long storeId, Store store);
}

在 @FeignClient 注解中,字符串值(上面的 “stores”)是一个任意的客户端名称,用于创建 Ribbon 负载均衡器。还可以使用 url 属性(绝对值或主机名)指定 URL。应用程序上下文中 bean 的名称是接口的完全限定名。要指定自己的别名值,可以使用 @FeignClient 注解的 qualifier 的值。

上面的负载均衡客户端期待发现 “stores” 服务的物理地址。如果我们的应用程序是一个 Eureka 客户端,那么它将在 Eureka 服务注册表中解析服务。如果我们的不想使用Eureka,可以简单地在外部配置中配置一个服务器列表(eg. stores.ribbon.listOfServers: example.com,google.com)。

注意: 为了保持向后兼容性,Spring Cloud Netflix Ribbon 被用作默认的负载均衡实现。但是,Spring Cloud Netflix Ribbon 现在处于维护模式,所以建议大家使用 Spring Cloud LoadBalancer 来代替。为此,设置 spring.cloud.loadbalancer.ribbon.enabled=false。

覆盖 Feign 默认配置

Spring Cloud Feign 中一个核心的概念就是客户端要有一个名字。每一个客户端随时可以向远程服务发起请求,并且每个服务都可以像使用 @FeignClient 注解一样指定一个名字。Spring Cloud 会将所有的 @FeignClient 组合在一起创建一个新的 ApplicationContext, 并使 用FeignClientsConfiguration对Clients 进行配置。配置中包括一个 feign.Decoder,一个 feign.Encoder 和一个 feign.Contract。

Spring Cloud 允许我们通过 configuration 属性完全控制 Feign 的配置信息,这些配置比 FeignClientsConfiguration 优先级要高:

1
2
3
4
@FeignClient(name = "stores", configuration = FooConfiguration.class)
public interface StoreClient {
//..
}

在这个例子中,FooConfiguration 中的配置信息会覆盖掉 FeignClientsConfiguration 中对应的配置。

注意: FooConfiguration 虽然是个配置类,但是它不应该被主上下文(ApplicationContext)扫描到,否则该类中的配置信息就会被应用于所有的 @FeignClient 客户端(本例中 FooConfiguration 中的配置应该只对 StoreClient 起作用)。

注意: serviceId 属性已经被弃用了,取而代之的是 name 属性。

注意: 在先前的版本中在指定了 url 属性时 name 是可选属性,现在无论什么时候 name 都是必填属性。

name 和 url 属性也支持占位符:

1
2
3
4
@FeignClient(name = "${feign.name}", url = "${feign.url}")
public interface StoreClient {
//..
}

Spring Cloud Netflix 为 Feign 默认提供了以下的 beans:(BeanType beanName: ClassName)

  • Decoder feignDecoder: ResponseEntityDecoder (which wraps a SpringDecoder)
  • Encoder feignEncoder: SpringEncoder
  • Logger feignLogger: Slf4jLogger
  • Contract feignContract: SpringMvcContract
  • Feign.Builder feignBuilder: HystrixFeign.Builder
  • Client feignClient: 如果 Ribbon 在类路径中,并且启用了它,那么它就是 LoadBalancerFeignClient,否则,如果 Spring Cloud LoadBalancer 在类路径中,那么就使用 FeignBlockingLoadBalancerClient 。如果它们都不在类路径中,则使用默认的 Feign 客户端。

注意: spring-cloud-starter-openfeign 既包含 spring-cloud-starter-netflix-ribbon,也包含spring-cloud-starter-loadbalancer。

如果要使用 ApacheHttpClient,我们可以将 feign.httpclient.enabled 设置为 true,并保证类路径上有对应的库。还可以通过定义一个 org.apache.http.impl.client.CloseableHttpClient bean 来定制 HTTP 客户端。
如果要使用 OkHttpClient,我们可以将 feign.okhttp.enabled 设置为 true,并保证类路径上有对应的库。还可以通过定义一个 okhttp3.OkHttpClient bean 来定制 HTTP 客户端。

Spring Cloud Netflix 默认没有为 Feign 提供以下的 beans,但是在应用启动时依然会从上下文中查找这些 beans 来构造客户端对象:

  • Logger.Level
  • Retryer
  • ErrorDecoder
  • Request.Options
  • Collection<RequestInterceptor>

如果想要覆盖 Spring Cloud Netflix 默认提供的 beans,需要在 @FeignClient 的 configuration 属性中指定一个配置类,并提供想要覆盖的 beans 即可:

1
2
3
4
5
6
7
8
9
10
11
12
@Configuration
public class FooConfiguration {
@Bean
public Contract feignContract() {
return new feign.Contract.Default();
}

@Bean
public BasicAuthRequestInterceptor basicAuthRequestInterceptor() {
return new BasicAuthRequestInterceptor("user", "password");
}
}

在本例中,我们用 feign.Contract.Default 代替了 SpringMvcContract, 并添加了一个 RequestInterceptor。以这种方式做的配置会在所有的 @FeignClient 中生效。

还可以使用配置属性配置 @FeignClient。

1
2
3
4
5
6
7
8
9
10
11
12
13
14
15
16
feign:
client:
config:
feignName:
connectTimeout: 5000
readTimeout: 5000
loggerLevel: full
errorDecoder: com.example.SimpleErrorDecoder
retryer: com.example.SimpleRetryer
requestInterceptors:
- com.example.FooRequestInterceptor
- com.example.BarRequestInterceptor
decode404: false
encoder: com.example.SimpleEncoder
decoder: com.example.SimpleDecoder
contract: com.example.SimpleContract

可以在 @EnableFeignClients 的属性 defaultConfiguration 中以类似的方式指定默认配置,如上所述。不同的是,这种配置将适用于所有的 Feign 客户端。

如果我们想要使用配置属性来配置所有 @FeignClient,可以使用 default Feign 名称来创建配置属性。

1
2
3
4
5
6
7
feign:
client:
config:
default:
connectTimeout: 5000
readTimeout: 5000
loggerLevel: basic

如果我们同时创建 @Configuration bean和配置属性,则配置属性优先级更高,它将覆盖 @Configuration 值。但是,如果我们想将更改为 @Configuration 优先级更高,则可以将 feign.client.default-to-properties 更改为 false。

注意: 如果我们需要在 RequestInterceptor 中使用 ThreadLocal 变量,那么我们需要将 Hystrix 的线程隔离策略设置为 SEMAPHORE,或者在 Feign 中禁用 Hystrix。

1
2
3
4
5
6
7
8
9
10
11
12
# To disable Hystrix in Feign
feign:
hystrix:
enabled: false

# To set thread isolation to SEMAPHORE
hystrix:
command:
default:
execution:
isolation:
strategy: SEMAPHORE

如果我们想创建多个具有相同名称或 url 的 Feign 客户端,以便它们指向相同的服务器,但每个服务器都具有不同的自定义配置,那么我们必须使用 @FeignClient 的 contextId 属性,以避免这些配置 bean 的名称冲突。

1
2
3
4
5
6
7
8
@FeignClient(contextId = "fooClient", name = "stores", configuration = FooConfiguration.class)
public interface FooClient {
//..
}
@FeignClient(contextId = "barClient", name = "stores", configuration = BarConfiguration.class)
public interface BarClient {
//..
}

Feign 对 Hystrix 的支持

如果 Hystrix 在类路径中且设置了 feign.hystrix.enabled=true,Feign 会默认将所有方法都封装到断路器中。还可以返回 com.netflix.hystrix.HystrixCommand。这允许我们使用响应模式(通过调用 .toObservable() 或 .observe() 或 异步使用(通过调用.queue()))。

如果想只关闭指定客户端的 Hystrix 支持,创建一个 Feign.Builder 组件并标注为 @Scope(prototype):

1
2
3
4
5
6
7
8
@Configuration
public class FooConfiguration {
@Bean
@Scope("prototype")
public Feign.Builder feignBuilder() {
return Feign.builder();
}
}

Feign 对 Hystrix Fallback 的支持

Hystrix 支持 fallback 的概念,即当断路器打开或发生错误时执行指定的失败逻辑。要为指定的 @FeignClient 启用 Fallback 支持, 需要在 fallback 性中指定实现类。还需要将实现类声明为 Spring bean。

1
2
3
4
5
6
7
8
9
10
11
12
@FeignClient(name = "hello", fallback = HystrixClientFallback.class)
protected interface HystrixClient {
@RequestMapping(method = RequestMethod.GET, value = "/hello")
Hello iFailSometimes();
}

static class HystrixClientFallback implements HystrixClient {
@Override
public Hello iFailSometimes() {
return new Hello("fallback");
}
}

如果需要访问 fallback 触发的原因,可以在 @FeignClient 中使用 fallbackFactory 属性。

1
2
3
4
5
6
7
8
9
10
11
12
13
14
15
16
17
18
@FeignClient(name = "hello", fallbackFactory = HystrixClientFallbackFactory.class)
protected interface HystrixClient {
@RequestMapping(method = RequestMethod.GET, value = "/hello")
Hello iFailSometimes();
}

@Component
static class HystrixClientFallbackFactory implements FallbackFactory<HystrixClient> {
@Override
public HystrixClient create(Throwable cause) {
return new HystrixClient() {
@Override
public Hello iFailSometimes() {
return new Hello("fallback; reason was: " + cause.getMessage());
}
};
}
}

注意: Feign 对 Hystrix Fallback 的支持有一个限制:对于返回 com.netflix.hystrix.HystrixCommand 或 rx.Observable 对象的方法,fallback 不起作用。

Feign 和 @Primary

当使用 Feign 和 Hystrix fallbacks 时,ApplicationContext 会存在多个相同类型的 bean。这将导致 @Autowired 不能工作,因为没有一个精确的 bean,或者一个标记为主 bean。为了解决这个问题,Spring Cloud Netflix 将所有 Feign 实例标记为 @Primary,因此 Spring Framework 将知道注入哪个 bean。在某些情况下,这可能是不可取的。要关闭此行为,需将 @FeignClient 的 primary 属性设置为 false。

1
2
3
4
@FeignClient(name = "hello", primary = false)
public interface HelloClient {
// methods here
}

Feign 对继承的支持

Feign 可以通过 Java 的接口支持继承。我们可以把一些公共的操作放到父接口中,然后定义子接口继承之:

1
2
3
4
5
public interface UserService {

@RequestMapping(method = RequestMethod.GET, value ="/users/{id}")
User getUser(@PathVariable("id") long id);
}
1
2
3
4
@RestController
public class UserResource implements UserService {

}
1
2
3
4
5
6
package project.user;

@FeignClient("users")
public interface UserClient extends UserService {

}

注意:在服务的调用端和提供端共用同一个接口定义是不明智的,这会将调用端和提供端的代码紧紧耦合在一起。同时在 SpringMVC 中会有问题,因为请求参数映射是不能被继承的。

Feign 对压缩的支持

我们可能会想要对请求/响应数据进行 Gzip 压缩,指定以下参数即可:

1
2
feign.compression.request.enabled=true
feign.compression.response.enabled=true

也可以添加一些更细粒度的配置:

1
2
3
feign.compression.request.enabled=true
feign.compression.request.mime-types=text/xml,application/xml,application/json
feign.compression.request.min-request-size=2048

上面的 3 个参数可以让我们选择对哪种请求进行压缩,并设置一个最小请求大小的阀值。

对于除 OkHttpClient 外的 HTTP 客户端,可以启用默认的 gzip 解码器对 gzip 响应进行 UTF-8编码解码:

1
2
feign.compression.response.enabled=true
feign.compression.response.useGzipDecoder=true

Feign 日志

每一个 @FeignClient 都会创建一个 Logger, Logger 的名字就是接口的全限定名。Feign 的日志配置参数仅支持 DEBUG:

1
logging.level.project.user.UserClient: DEBUG

Logger.Level 对象允许我们为指定客户端配置想记录哪些信息:

  • NONE 不记录任何信息,默认值。
  • BASIC 记录请求方法、请求URL、状态码和用时。
  • HEADERS 在BASIC的基础上再记录一些常用信息。
  • FULL 记录请求和响应报文的全部内容。

下面的示例将 Level 设置为 FULL:

1
2
3
4
5
6
7
@Configuration
public class FooConfiguration {
@Bean
Logger.Level feignLoggerLevel() {
return Logger.Level.FULL;
}
}

Feign 对 @QueryMap 的支持

OpenFeign @QueryMap 注解支持将 POJOs 作为 GET 参数映射。不幸的是,默认的 OpenFeign QueryMap 注解与 Spring 不兼容,因为它缺少值属性。

Spring Cloud OpenFeign 提供了一个等价的 @SpringQueryMap 注解,用于将 POJO 或 Map 参数注释为查询参数映射。

例如,Params 类定义了参数 param1 和 param2:

1
2
3
4
5
6
7
// Params.java
public class Params {
private String param1;
private String param2;

// [Getters and setters omitted for brevity]
}

下面的 Feign 客户端通过使用 @SpringQueryMap 注释来使用 Params类:

1
2
3
4
5
6
@FeignClient("demo")
public interface DemoTemplate {

@GetMapping(path = "/demo")
String demoEndpoint(@SpringQueryMap Params params);
}

如果需要对生成的查询参数映射进行更多的控制,可以实现一个定制的 QueryMapEncoder bean。

HATEOAS 支持

Spring 提供了一些 API 来创建遵循 HATEOAS 原则、Spring HATEOAS 和 Spring Data REST 的 REST 表示。

如果项目使用 org.springframework.boot:spring-boot-starter-hateoas starter 或 org.springframework.boot:spring-boot-starter-data-rest starter,默认启用 Feign HATEOAS 支持。

当 HATEOAS 支持被启用时,Feign 客户端可以序列化和反序列化 HATEOAS 表示模型:EntityModel、CollectionModel 和 PagedModel。

1
2
3
4
5
6
@FeignClient("demo")
public interface DemoTemplate {

@GetMapping(path = "/stores")
CollectionModel<Store> getStores();
}

参考资料

  1. Spring Cloud OpenFeign
  2. 声明式REST客户端Feign

Resilience4j 是一款轻量级,易于使用的容错库,其灵感来自于 Netflix Hystrix,专为 Java8 和函数式编程而设计。轻量级,因为库只使用了 Vavr,它没有任何其他外部依赖下。相比之下,Netflix Hystrix 对 Archaius 具有编译依赖性,Archaius 具有更多的外部库依赖性,例如 Guava 和 Apache Commons Configuration。

Maven 依赖

1
2
3
4
5
<!-- 断路器 -->
<dependency>
<groupId>org.springframework.cloud</groupId>
<artifactId>spring-cloud-starter-circuitbreaker-reactor-resilience4j</artifactId>
</dependency>

自动装配

可以通过设置 spring.cloud.circuitbreaker.resilience4j.enabled=false 来禁用 Resilience4J 自动装配。

断路器配置

配置属性

配置属性 默认值 描述
failureRateThreshold 50(%) 当故障率等于或大于阈值时,CircuitBreaker 转换为打开状态并开始短路调用。
slowCallRateThreshold 100 配置百分比阈值。当慢速调用的百分比等于或大于阈值时,CircuitBreaker 转换为打开并开始短路调用。
slowCallDurationThreshold 60(s) 配置持续时间阈值,在该阈值以上,调用将被视为慢速并增加慢速调用的速率。
permittedNumberOfCallsInHalfOpenState 10 配置当 CircuitBreaker 半开时允许的调用数。
slideWindowType COUNT_BASED 配置滑动窗口的类型,该窗口用于在 CircuitBreaker 关闭时记录调用结果。滑动窗口可以基于计数或基于时间。如果滑动窗口为 COUNT_BASED,slidingWindowSize 则记录并汇总最近的调用。 如果滑动窗口是 TIME_BASED,则 slidingWindowSize 记录并汇总最近几秒的调用。
slideWindowSize 100 配置滑动窗口的大小,该窗口用于记录 CircuitBreaker 关闭时的调用结果。
minimumNumberOfCalls 10 配置 CircuitBreaker 可以计算错误率之前所需的最小调用数(每个滑动窗口时段)。例如,如果 minimumNumberOfCalls 为 10,则在计算失败率之前,必须至少记录 10 个调用。如果仅记录了 9 个调用,则即使所有 9 个调用均失败,CircuitBreaker 也不会转换为打开。
waitDurationInOpenState 60(s) 从打开状态转为半开状态等待的时间。
recordExceptions empty 需要记录的异常列表。
ignoreExceptions empty 需要忽略的异常列表。
recordException throwable -> true 默认情况下,所有异常都记录为失败。 用于评估是否应将异常记录为失败。如果异常应计为失败,则必须返回 true。如果异常应被视为成功,则必须返回 false,除非该异常被显式忽略 ignoreExceptions。
ignoreException throwable ->false 默认情况下,不会忽略任何异常。 用于评估是否应忽略异常,并且该异常既不算作失败也不算成功。如果应忽略异常,则必须返回 true。否则必须返回 false。
automaticTransitionFromOpenToHalfOpenEnabled false 如果置为true,当等待时间结束会自动由打开变为半开,若置为 false,则需要一个请求进入来触发熔断器状态转换。

默认配置

要为所有断路器提供默认配置,需要创建一个自定义 bean,该 bean 通过一个 ReactiveResilience4JCircuitBreakerFactory 传递。可以使用 configureDefault 方法提供默认配置。

1
2
3
4
5
6
7
@Bean
public Customizer<ReactiveResilience4JCircuitBreakerFactory> defaultCustomizer() {
return factory -> factory.configureDefault(id -> new Resilience4JConfigBuilder(id)
.circuitBreakerConfig(CircuitBreakerConfig.ofDefaults())
// 限制远程调用所花费的时间
.timeLimiterConfig(TimeLimiterConfig.custom().timeoutDuration(Duration.ofSeconds(5)).build()).build());
}

特殊配置

与提供默认配置类似,我们可以创建一个自定义 bean,它传递给一个 ReactiveResilience4JCircuitBreakerFactory。

除了配置所创建的断路器之外,我们还可以在断路器创建之后,但在它返回给调用者之前,对其进行自定义。为此,可以使用 addCircuitBreakerCustomizer 方法。这对于向 Resilience4J 断路器添加事件处理程序是很有用的。

1
2
3
4
5
6
7
8
9
10
11
@Bean
public Customizer<ReactiveResilience4JCircuitBreakerFactory> slowCusomtizer() {
return factory -> {
factory.configure(builder -> builder
.timeLimiterConfig(TimeLimiterConfig.custom().timeoutDuration(Duration.ofSeconds(5)).build())
.circuitBreakerConfig(CircuitBreakerConfig.ofDefaults()), "slow", "slowflux");

factory.addCircuitBreakerCustomizer(circuitBreaker -> circuitBreaker.getEventPublisher()
.onError(normalFluxErrorConsumer).onSuccess(normalFluxSuccessConsumer), "normalflux");
};
}

收集指标

Spring Cloud Circuit Breaker Resilience4j 包含自动配置来设置指标集合,只要类路径上有正确的依赖项。要启用度量集合,需要引入依赖 org.springframework.boot:spring-boot-starter-actuator 和 io.github.resilience4j:resilience4j-micrometer。有关这些依赖项出现时生成的度量标准的更多信息,参阅Resilience4j文档

Spring Retry 断路器配置

Spring Retry 为 Spring 应用程序提供声明性重试支持。项目的一部分包括实现断路器功能的能力。Spring Retry 通过它的 CircuitBreakerRetryPolicy 和有状态重试的组合提供了断路器实现。所有使用 Spring Retry 创建的断路器都将使用 CircuitBreakerRetryPolicy 和 DefaultRetryState 创建。这两个类都可以使用 SpringRetryConfigBuilder 来配置。

默认配置

要为所有断路器提供默认配置,需要创建一个通过 SpringRetryCircuitBreakerFactory 传递的定制 bean。可以使用 configureDefault 方法提供默认配置。

1
2
3
4
5
@Bean
public Customizer<SpringRetryCircuitBreakerFactory> defaultCustomizer() {
return factory -> factory.configureDefault(id -> new SpringRetryConfigBuilder(id)
.retryPolicy(new TimeoutRetryPolicy()).build());
}

特殊配置

与提供默认配置类似,我们可以创建一个自定义 bean,它通过 SpringRetryCircuitBreakerFactory 传递。

1
2
3
4
@Bean
public Customizer<SpringRetryCircuitBreakerFactory> slowCustomizer() {
return factory -> factory.configure(builder -> builder.retryPolicy(new SimpleRetryPolicy(1)).build(), "slow");
}

除了配置所创建的断路器之外,我们还可以在断路器创建之后,但在它返回给调用者之前,对其进行自定义。为此,可以使用 addRetryTemplateCustomizers 方法。这对于将事件处理程序添加到 RetryTemplate 非常有用。

1
2
3
4
5
6
7
8
9
10
11
12
13
14
15
16
17
18
19
20
@Bean
public Customizer<SpringRetryCircuitBreakerFactory> slowCustomizer() {
return factory -> factory.addRetryTemplateCustomizers(retryTemplate -> retryTemplate.registerListener(new RetryListener() {

@Override
public <T, E extends Throwable> boolean open(RetryContext context, RetryCallback<T, E> callback) {
return false;
}

@Override
public <T, E extends Throwable> void close(RetryContext context, RetryCallback<T, E> callback, Throwable throwable) {

}

@Override
public <T, E extends Throwable> void onError(RetryContext context, RetryCallback<T, E> callback, Throwable throwable) {

}
}));
}

参考资料

  1. Spring Cloud Circuit Breaker
  2. Spring Cloud Circuit Breaker
  3. SpringCloud之Resilience4J用法精讲
  4. SpringCloud之在微服务中使用Resilience4J

概述

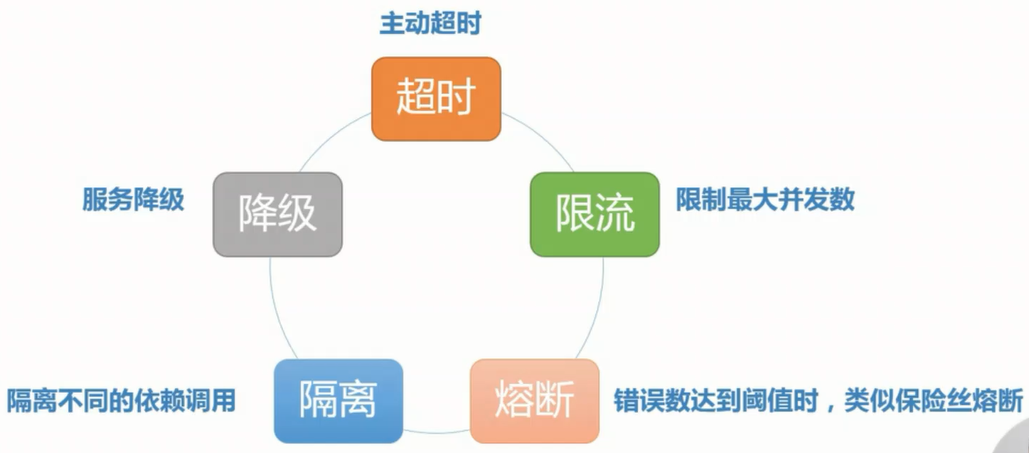
众所周知,微服务架构具有许多优点。包含松散耦合,自治服务,分散治理,更容易连续交付等。但与此同时,它使架构变得脆弱,因为每个用户的操作结果都会调用多个服务。它通过网络上的远程调用替换了单体系结构中的内存调用。但是当一个或多个服务不可用或表现出高延迟时,会导致整个系统出现级联故障。服务客户端的重试逻辑只会使情况更糟糕,并且可能导致系统彻底的崩溃。

断路器模式有助于防止跨多个系统的这种灾难性级联故障。断路器模式允许我们构建容错和弹性的系统,当关键服务不可用或具有高延迟时,系统仍然可以正常运行。

容错模式

容错模式

服务熔断

当调用目标服务的请求和调用大量超时或失败,服务调用方为避免造成长时间的阻塞造成影响其他服务,后续对该服务接口的调用不再经过进行请求,直接执行本地的默认方法。

服务降级

为了保证核心业务在大量请求下能正常运行,根据实际业务情况及流量,对部分服务降低优先级,有策略的不处理或用简单的方式处理。

服务限流

当系统资源不够,不足以应对大量请求,对系统按照预设的规则进行流量限制或功能限制。

回退

在熔断或者限流发生的时候,应用程序的后续处理逻辑是什么?回退是系统的弹性恢复能力,常见的处理策略有,直接抛出异常,也称快速失败(Fail Fast),也可以返回空值或缺省值,还可以返回备份数据,如果主服务熔断了,可以从备份服务获取数据。

容错理念

  • 凡是依赖都可能会失败
  • 凡是资源(CPU/Memory/Threads/Queue)都有限制
  • 网络并不可靠
  • 延迟是应用稳定性杀手

断路器模式

断路器模式源于 Martin Fowler 的 Circuit Breaker 一文。“断路器”本身是一种开关装置,用于在电路上保护线路过载,当线路中有电器发生短路时,“断路器”能够及时的切断故障电路,防止发生过载、发热、甚至起火等严重后果。

在分布式架构中,断路器模式的作用也是类似的,当某个服务单元发生故障(类似用电器发生短路)之后,通过断路器的故障监控(类似熔断保险丝),向调用方返回一个错误响应,而不是长时间的等待。这样就不会使得线程因调用故障服务被长时间占用不释放,避免了故障在分布式系统中的蔓延。

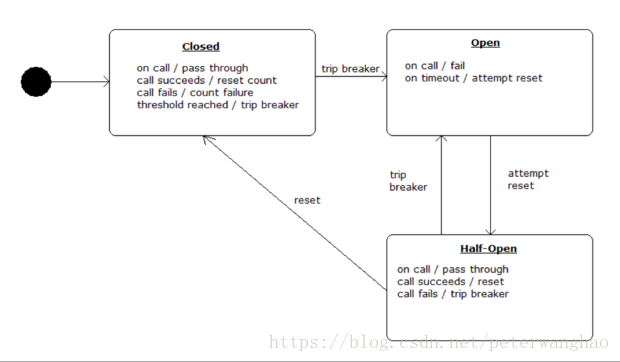
状态机模式

断路器的实现采用状态机模式,它有 3 种不同的状态:关闭、打开和半打开。

  • 关闭:当一切正常时,断路器保持闭合状态,所有调用都能访问到服务。当故障数超过预定阈值时,断路器跳闸,并进入打开状态。
  • 打开:断路器在不执行该服务的情况下为调用返回错误。
  • 半开:超时后,断路器切换到半开状态,以测试问题是否仍然存在。如果在这种半开状态下单个调用失败,则断路器再次打开。如果成功,则断路器重置回正常关闭状态。

状态机模式

断路器模式

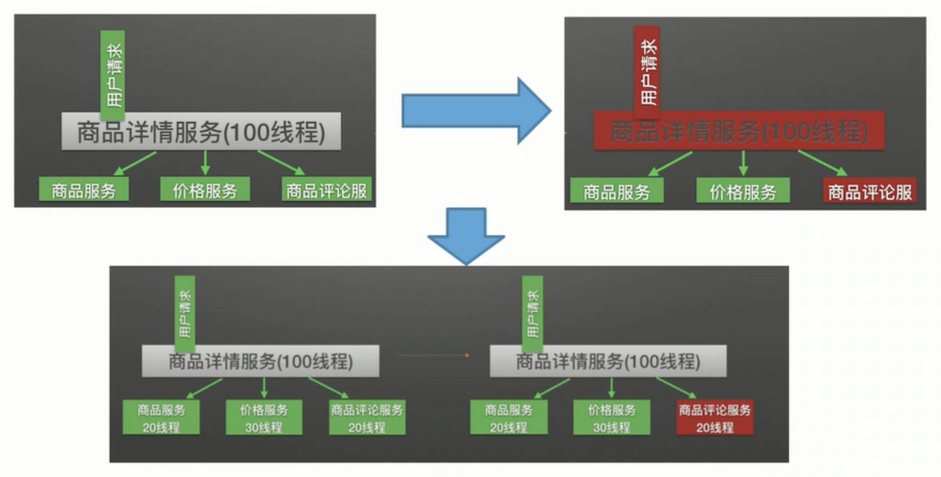
舱壁隔离模式

舱壁隔离模式,顾名思义,该模式像舱壁一样对资源或失败单元进行隔离,如果一个船舱破了进水,只损失一个船舱,其它船舱可以不受影响 。线程隔离就是舱壁隔离模式的一个例子,假定一个应用程序 A 调用了 Svc1/Svc2/Svc3 三个服务,且部署 A 的容器一共有 120 个工作线程,采用线程隔离机制,可以给对 Svc1/Svc2/Svc3 的调用各分配 40 个线程,当 Svc2 慢了,给 Svc2 分配的 40 个线程因慢而阻塞并最终耗尽,线程隔离可以保证给 Svc1/Svc3 分配的 80 个线程可以不受影响,如果没有这种隔离机制,当 Svc2 慢的时候,120 个工作线程会很快全部被对 Svc2 的调用吃光,整个应用程序会全部慢下来。

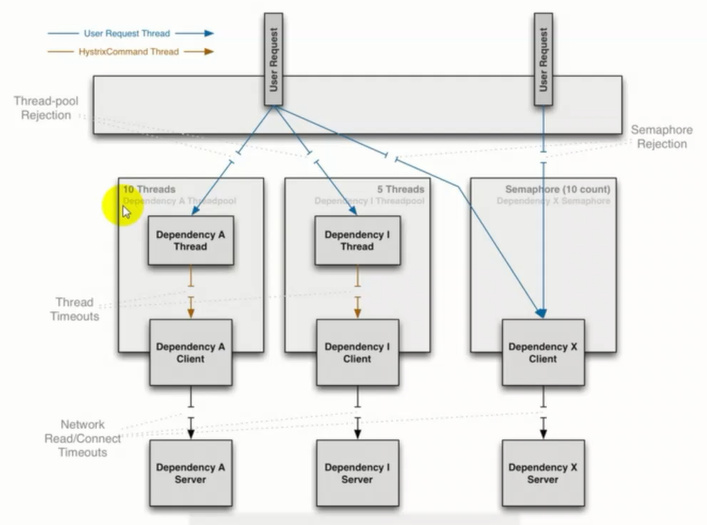
线程池隔离与信号量隔离

概念

线程池与信号量隔离

  • 线程池隔离:每次都开启一个单独线程运行。它的隔离是通过线程池,即每个隔离粒度都是个线程池,互相不干扰。
  • 信号量隔离:每次调用线程,当前请求通过计数信号量进行限制,当信号大于了最大请求数(maxConcurrentRequests)时,进行限制。

对比

特性对比:

线程池隔离 信号量隔离
隔离原理 每个服务单独用线程池 通过信号量的计数器
是否支持熔断 支持,当线程池到达MaxSize后,再请求会触发fallback接口进行熔断 支持,当信号量达到maxConcurrentRequest后,再请求会触发fallback
是否支持超时 支持,可直接返回 不支持,如果阻塞,只能通过调用协议
是否支持异步调用 可以是异步,也可以是同步。看调用的方法 同步调用,不支持异步
资源消耗 大,大量线程的上下文切换,容易造成机器负载高 小,只是个计数器

优缺点对比:

优点 不足 适用
线程池隔离 支持任务排队和超时
支持异步调用
线程调用会产生额外的开销 不受信客户
有限扇出
信号量隔离 轻量,无额外开销 不支持任务排队和主动超时
不支持异步调用
受信客户
高扇出(网关)
高频高速调用(cache)

案例

线程池隔离案例:
线程池隔离案例

主流开源断路器概览

Sentinel Hystrix resilience4j
隔离策略 信号量隔离(并发线程数限流) 线程池隔离/信号量隔离 信号量隔离
熔断降级策略 基于响应时间、异常比率、异常数 基于异常比率 基于异常比率、响应时间
实时统计实现 滑动窗口(LeapArray) 滑动窗口(基于 RxJava) Ring Bit Buffer
动态规则配置 支持多种数据源 支持多种数据源 有限支持
扩展性 多个扩展点 插件的形式 接口的形式
基于注解的支持 支持 支持 支持
限流 基于 QPS,支持基于调用关系的限流 有限的支持 Rate Limiter
流量整形 支持预热模式、匀速器模式、预热排队模式 不支持 简单的 Rate Limiter 模式
系统自适应保护 支持 不支持 不支持
控制台 提供开箱即用的控制台,可配置规则、查看秒级监控、机器发现等 简单的监控查看 不提供控制台,可对接其它监控系统

参考资料

  1. 微服务与断路器
  2. Guideline: 从 Hystrix 迁移到 Sentinel

自定义 Route Predicate Factories

1
2
3
4
5
6
7
8
9
10
11
12
13
14
15
16
@Component
public class CustomRoutePredicateFactory extends AbstractRoutePredicateFactory<CustomRoutePredicateFactory.Config> {

public CustomRoutePredicateFactory() {
super(Config.class);
}

@Override
public Predicate<ServerWebExchange> apply(CustomRoutePredicateFactory.Config config) {
return (GatewayPredicate) serverWebExchange -> true;
}

public static class Config {
//Put the configuration properties for your filter here
}
}

自定义 GatewayFilter Factories

** Pre: **

1
2
3
4
5
6
7
8
9
10
11
12
13
14
15
16
17
18
19
20
21
22
23
24
@Component
public class PreGatewayFilterFactory extends AbstractGatewayFilterFactory<PreGatewayFilterFactory.Config> {

public PreGatewayFilterFactory() {
super(Config.class);
}

@Override
public GatewayFilter apply(Config config) {
// grab configuration from Config object
return (exchange, chain) -> {
//If you want to build a "pre" filter you need to manipulate the
//request before calling chain.filter
ServerHttpRequest.Builder builder = exchange.getRequest().mutate();
//use builder to manipulate the request
return chain.filter(exchange.mutate().request(request).build());
};
}

public static class Config {
//Put the configuration properties for your filter here
}

}

** Post: **

1
2
3
4
5
6
7
8
9
10
11
12
13
14
15
16
17
18
19
20
21
22
23
@Component
public class PostGatewayFilterFactory extends AbstractGatewayFilterFactory<PostGatewayFilterFactory.Config> {

public PostGatewayFilterFactory() {
super(Config.class);
}

@Override
public GatewayFilter apply(Config config) {
// grab configuration from Config object
return (exchange, chain) -> {
return chain.filter(exchange).then(Mono.fromRunnable(() -> {
ServerHttpResponse response = exchange.getResponse();
//Manipulate the response in some way
}));
};
}

public static class Config {
//Put the configuration properties for your filter here
}

}

自定义 Global Filters

1
2
3
4
5
6
7
8
9
10
11
12
13
14
15
16
17
18
19
20
21
22
23
24
25
@Bean
public GlobalFilter customGlobalFilter() {
return (exchange, chain) -> exchange.getPrincipal()
.map(Principal::getName)
.defaultIfEmpty("Default User")
.map(userName -> {
//adds header to proxied request
exchange.getRequest().mutate().header("CUSTOM-REQUEST-HEADER", userName).build();
return exchange;
})
.flatMap(chain::filter);
}

@Bean
public GlobalFilter customGlobalPostFilter() {
return (exchange, chain) -> chain.filter(exchange)
.then(Mono.just(exchange))
.map(serverWebExchange -> {
//adds header to response
serverWebExchange.getResponse().getHeaders().set("CUSTOM-RESPONSE-HEADER",
HttpStatus.OK.equals(serverWebExchange.getResponse().getStatusCode()) ? "It worked": "It did not work");
return serverWebExchange;
})
.then();
}

参考资料

  1. Spring Cloud Gateway

配置

Spring Cloud Gateway 的配置由 RouteDefinitionLocator 实例集合驱动。以下是 RouteDefinitionLocator 的接口定义:

1
2
3
4
5
public interface RouteDefinitionLocator {

Flux<RouteDefinition> getRouteDefinitions();

}

默认情况下,PropertiesRouteDefinitionLocator 通过使用 Spring Boot 的 @ConfigurationProperties 机制加载属性。

有两种方式可以配置:使用命名参数和使用带有位置参数的快捷符号。下面两个例子是等价的:

1
2
3
4
5
6
7
8
9
10
11
12
13
14
spring:
cloud:
gateway:
routes:
- id: setstatus_route
uri: https://example.org
filters:
- name: SetStatus
args:
status: 401
- id: setstatusshortcut_route
uri: https://example.org
filters:
- SetStatus=401

对于网关的某些用法,属性配置是足够的,但是一些生产用例可以从外部源(如数据库)加载配置中获益。将来的里程碑版本将有基于 Spring 数据存储库(如Redis、MongoDB和Cassandra)的 RouteDefinitionLocator 实现。

路由元数据配置

可以使用元数据为每个路由配置额外的参数,如下所示:

1
2
3
4
5
6
7
8
9
10
11
pring:
cloud:
gateway:
routes:
- id: route_with_metadata
uri: https://example.org
metadata:
optionName: "OptionValue"
compositeObject:
name: "value"
iAmNumber: 1

可以从 exchange 中获取所有元数据属性,如下所示:

1
2
3
4
5
Route route = exchange.getAttribute(GATEWAY_ROUTE_ATTR);
// get all metadata properties
route.getMetadata();
// get a single metadata property
route.getMetadata(someKey);

HTTP 超时配置

可以为所有路由配置 Http 超时(响应和连接),并覆盖每个特定路由。

全局超时

配置全局 Http 超时:

  • 必须以毫秒为单位指定连接超时
  • 响应超时必须指定为 java.time.Duration

全局 Http 超时示例:

1
2
3
4
5
6
spring:
cloud:
gateway:
httpclient:
connect-timeout: 1000
response-timeout: 5s

单个路由超时

配置单个路由超时:

  • 必须以毫秒为单位指定连接超时
  • 响应超时必须以毫秒为单位指定

单个路由的 Http 超时示例-配置文件:

1
2
3
4
5
6
7
8
9
- id: per_route_timeouts
uri: https://example.org
predicates:
- name: Path
args:
pattern: /delay/{timeout}
metadata:
response-timeout: 200
connect-timeout: 200

单个路由的 Http 超时示例-Java DSL:

1
2
3
4
5
6
7
8
9
10
11
12
13
14
15
import static org.springframework.cloud.gateway.support.RouteMetadataUtils.CONNECT_TIMEOUT_ATTR;
import static org.springframework.cloud.gateway.support.RouteMetadataUtils.RESPONSE_TIMEOUT_ATTR;

@Bean
public RouteLocator customRouteLocator(RouteLocatorBuilder routeBuilder){
return routeBuilder.routes()
.route("test1", r -> {
return r.host("*.somehost.org").and().path("/somepath")
.filters(f -> f.addRequestHeader("header1", "header-value-1"))
.uri("http://someuri")
.metadata(RESPONSE_TIMEOUT_ATTR, 200)
.metadata(CONNECT_TIMEOUT_ATTR, 200);
})
.build();
}

Fluent Java 路由 API

为了允许在 Java 中进行简单配置,RouteLocatorBuilder bean 提供了 Fluent API。示例:

1
2
3
4
5
6
7
8
9
10
11
12
13
14
15
16
17
18
19
20
21
22
23
24
25
26
// static imports from GatewayFilters and RoutePredicates
@Bean
public RouteLocator customRouteLocator(RouteLocatorBuilder builder, ThrottleGatewayFilterFactory throttle) {
return builder.routes()
.route(r -> r.host("**.abc.org").and().path("/image/png")
.filters(f ->
f.addResponseHeader("X-TestHeader", "foobar"))
.uri("http://httpbin.org:80")
)
.route(r -> r.path("/image/webp")
.filters(f ->
f.addResponseHeader("X-AnotherHeader", "baz"))
.uri("http://httpbin.org:80")
.metadata("key", "value")
)
.route(r -> r.order(-1)
.host("**.throttle.org").and().path("/get")
.filters(f -> f.filter(throttle.apply(1,
1,
10,
TimeUnit.SECONDS)))
.uri("http://httpbin.org:80")
.metadata("key", "value")
)
.build();
}

这种风格还允许使用更多的定制断言。RouteDefinitionLocator bean 定义的谓词列表使用逻辑 AND。通过使用 Fluent Java API,我们可以在类 Predicate 上使用 and()、or() 和 negate() 操作符。

DiscoveryClient 路由定义 Locator

可以使用与 DiscoveryClient 兼容的服务注册中心里注册的服务来创建路由。

要启用此功能,需要设置 spring.cloud.gateway.discovery.locator.enabled=true,并确保类路径上有一个 DiscoveryClient(如 Netflix Eureka、或Zookeeper) 实现。

为 DiscoveryClient 路由配置谓词和过滤器

默认情况下,网关为使用 DiscoveryClient 创建的路由定义单个谓词和过滤器。

默认谓词是使用模式 /serviceId/** 定义的路径谓词,其中 serviceId 是来自 DiscoveryClient 的服务的 ID。

默认的过滤器是一个重写路径过滤器,它使用正则表达式 /serviceId/(?.*) 和替换的 /${remaining}。这将在请求向下游发送之前从路径中删除服务 ID。

如果希望自定义 DiscoveryClient 路由使用的谓词或过滤器,需设置 spring.cloud.gateway.discovery.locator.predicates[x] 和 spring.cloud.gateway.discovery.locator.filters[y]。这样做时,如果希望保留该功能,则需要确保包含前面显示的缺省谓词和筛选器。示例:

1
2
3
4
5
6
7
8
9
spring.cloud.gateway.discovery.locator.predicates[0].name: Path
spring.cloud.gateway.discovery.locator.predicates[0].args[pattern]: "'/'+serviceId+'/**'"
spring.cloud.gateway.discovery.locator.predicates[1].name: Host
spring.cloud.gateway.discovery.locator.predicates[1].args[pattern]: "'**.foo.com'"
spring.cloud.gateway.discovery.locator.filters[0].name: Hystrix
spring.cloud.gateway.discovery.locator.filters[0].args[name]: serviceId
spring.cloud.gateway.discovery.locator.filters[1].name: RewritePath
spring.cloud.gateway.discovery.locator.filters[1].args[regexp]: "'/' + serviceId + '/(?<remaining>.*)'"
spring.cloud.gateway.discovery.locator.filters[1].args[replacement]: "'/${remaining}'"

CORS 配置

可以配置网关来控制 CORS 行为。全局 CORS 配置是 Spring Framework CorsConfiguration 的 URL 模式映射。示例:

1
2
3
4
5
6
7
8
9
spring:
cloud:
gateway:
globalcors:
corsConfigurations:
'[/**]':
allowedOrigins: "https://docs.spring.io"
allowedMethods:
- GET

在前面的示例中,CORS 请求允许来自 docs.spring.io 的所有 GET 请求路径。

要为某些网关路由谓词不能处理的请求提供相同的 CORS 配置,需设置 spring.cloud.gateway.globalcors.add-to-simple-url-handler-mapping=true。当我们试图支持 CORS preflight 请求时,这是很有用的,因为 HTTP 方法是 options,所以路由谓词不为 true。

日志级别

下面的 loggers 可能包含在 DEBUG 和 TRACE 级别上有价值的故障排除信息。

  • org.springframework.cloud.gateway
  • org.springframework.http.server.reactive
  • org.springframework.web.reactive
  • org.springframework.boot.autoconfigure.web
  • reactor.netty
  • redisratelimiter

TLS 和 SSL

网关可以通过 Spring server 配置来监听 HTTPS 请求。示例:

1
2
3
4
5
6
7
server:
ssl:
enabled: true
key-alias: scg
key-store-password: scg1234
key-store: classpath:scg-keystore.p12
key-store-type: PKCS12

可以将网关路由路由到 HTTP 和 HTTPS 后端。如果是路由到一个 HTTPS 后端,可以使用下面的配置使得网关信任所有下游证书:

1
2
3
4
5
6
spring:
cloud:
gateway:
httpclient:
ssl:
useInsecureTrustManager: true

使用不安全的信任管理器不适合生产环境。对于产品部署,可以使用一组已知的证书配置网关,网关可以通过以下配置信任这些证书:

1
2
3
4
5
6
7
8
spring:
cloud:
gateway:
httpclient:
ssl:
trustedX509Certificates:
- cert1.pem
- cert2.pem

如果 Spring Cloud Gateway 没有提供受信任的证书,则使用默认的信任存储区(可以通过设置 javax.net.ssl.trustStore 系统属性来覆盖该存储区)。

TLS 握手

网关维护一个用于路由到后端的客户端池。当通过 HTTPS 通信时,客户端发起 TLS 握手。许多超时都与此握手相关。可以使用下面的配置来调整超时配置:

1
2
3
4
5
6
7
8
spring:
cloud:
gateway:
httpclient:
ssl:
handshake-timeout-millis: 10000
close-notify-flush-timeout-millis: 3000
close-notify-read-timeout-millis: 0

参考资料

  1. Spring Cloud Gateway

我们可以通过 /gateway actuator 端点来监控 Spring Cloud Gateway 应用程序并与之交互。不过要进行远程访问,必须在应用程序配置属性中启用该端点并将其暴露在 HTTP 或 JMX 上。配置如下:

1
2
3
4
5
6
7
8
9
10
management:
endpoint:
gateway:
# 默认已开启
enabled: true
endpoints:
web:
# 默认只暴露了 health/info 端点
exposure:
include: health,info,gateway

详细的 Actuator 格式

Spring Cloud Gateway 增加了一种新的、更详细的格式。它为每个路由添加了更多的细节,允许我们查看与每个路由关联的谓词和过滤器,以及任何可用的配置。

例如,当我们访问端点 /actuator/gateway/routes 时,会得到类似以下响应内容:

1
2
3
4
5
6
7
8
9
10
11
12
13
[{
"predicate": "Paths: [/api-seckill/**], match trailing slash: true",
"route_id": "seckill",
"filters": ["[[StripPrefix parts = 1], order = 1]", "[org.springframework.cloud.gateway.filter.factory.RequestRateLimiterGatewayFilterFactory$$Lambda$775/831609821@27b48b61, order = 2]", "[[SpringCloudCircuitBreakerResilience4JFilterFactory name = 'circuitBreaker', fallback = forward:/fallback], order = 3]"],
"uri": "http://localhost:8081",
"order": 0
}, {
"predicate": "(Paths: [/api-account/**], match trailing slash: true && gateway.routepredicatefactories.CustomRoutePredicateFactory$$Lambda$781/1730708228@7785ff79)",
"route_id": "account",
"filters": ["[[StripPrefix parts = 1], order = 1]", "[gateway.gatewayfilterfactories.CustomPreGatewayFilterFactory$$Lambda$783/509794966@14af153d, order = 1]", "[org.springframework.cloud.gateway.filter.factory.RequestRateLimiterGatewayFilterFactory$$Lambda$775/831609821@71ece0cb, order = 2]", "[gateway.gatewayfilterfactories.CustomPostGatewayFilterFactory$$Lambda$785/1358748845@72809214, order = 2]", "[[SpringCloudCircuitBreakerResilience4JFilterFactory name = 'circuitBreaker', fallback = forward:/fallback], order = 3]"],
"uri": "http://localhost:8082",
"order": 0
}]

默认情况下启用此功能。要禁用它,可以设置以下属性:

1
spring.cloud.gateway.actuator.verbose.enabled: false

检索路由过滤器

本节详细介绍如何检索路由过滤器,包括:

  • 全局过滤器
  • 路由过滤器

全局过滤器

要检索应用于所有路由的全局过滤器,需向端点 /actuator/gateway/globalfilters 发送 GET 请求。得到的响应类似于以下内容:

1
2
3
4
5
6
7
8
9
10
11
12
13
{
"org.springframework.cloud.gateway.filter.RemoveCachedBodyFilter@217235f5": -2147483648,
"org.springframework.cloud.gateway.filter.AdaptCachedBodyGlobalFilter@64502326": -2147482648,
"org.springframework.cloud.gateway.filter.GatewayMetricsFilter@697a0948": 0,
"org.springframework.cloud.gateway.filter.NettyWriteResponseFilter@79957f11": -1,
"org.springframework.cloud.gateway.filter.WebsocketRoutingFilter@28393e82": 2147483646,
"org.springframework.cloud.gateway.filter.ForwardPathFilter@18d47df0": 0,
"gateway.globalfilters.ElapsedGlobalFilter@2dd1086": -2147483648,
"org.springframework.cloud.gateway.filter.RouteToRequestUrlFilter@4b41587d": 10000,
"org.springframework.cloud.gateway.config.GatewayNoLoadBalancerClientAutoConfiguration$NoLoadBalancerClientFilter@7cf63b9a": 10100,
"org.springframework.cloud.gateway.filter.ForwardRoutingFilter@4aebee4b": 2147483647,
"org.springframework.cloud.gateway.filter.NettyRoutingFilter@6b8d54da": 2147483647
}

响应包含已生效的全局过滤器的详细信息。对于每个全局过滤器,有一个过滤器对象的字符串表示(例如,org.springframework.cloud.gateway.filter.LoadBalancerClientFilter@7cf63b9a)和过滤器链中相应的顺序。

路由过滤器

要检索应用于路由的 GatewayFilter 工厂,需向端点 /actuator/gateway/routefilters 发送 GET 请求。得到的响应类似于以下内容:

1
2
3
4
5
6
7
8
9
10
11
12
13
14
15
16
17
18
19
20
21
22
23
24
25
26
27
28
29
30
31
32
33
34
{
"[SetPathGatewayFilterFactory@26c8b296 configClass = SetPathGatewayFilterFactory.Config]": null,
"[PreserveHostHeaderGatewayFilterFactory@1edccfd4 configClass = Object]": null,
"[RewriteLocationResponseHeaderGatewayFilterFactory@45801322 configClass = RewriteLocationResponseHeaderGatewayFilterFactory.Config]": null,
"[RemoveRequestHeaderGatewayFilterFactory@1efac5b9 configClass = AbstractGatewayFilterFactory.NameConfig]": null,
"[RequestSizeGatewayFilterFactory@5b1e88f configClass = RequestSizeGatewayFilterFactory.RequestSizeConfig]": null,
"[DedupeResponseHeaderGatewayFilterFactory@1d2fb82 configClass = DedupeResponseHeaderGatewayFilterFactory.Config]": null,
"[AddRequestParameterGatewayFilterFactory@76c86567 configClass = AbstractNameValueGatewayFilterFactory.NameValueConfig]": null,
"[SaveSessionGatewayFilterFactory@3520958b configClass = Object]": null,
"[RequestRateLimiterGatewayFilterFactory@40df6090 configClass = RequestRateLimiterGatewayFilterFactory.Config]": null,
"[RedirectToGatewayFilterFactory@8c43966 configClass = RedirectToGatewayFilterFactory.Config]": null,
"[RemoveRequestParameterGatewayFilterFactory@11a3a45f configClass = AbstractGatewayFilterFactory.NameConfig]": null,
"[RequestHeaderToRequestUriGatewayFilterFactory@291a4791 configClass = AbstractGatewayFilterFactory.NameConfig]": null,
"[CustomPostGatewayFilterFactory@5a05dd30 configClass = CustomPostGatewayFilterFactory.Config]": null,
"[StripPrefixGatewayFilterFactory@6cc64028 configClass = StripPrefixGatewayFilterFactory.Config]": null,
"[ModifyRequestBodyGatewayFilterFactory@5a4dda2 configClass = ModifyRequestBodyGatewayFilterFactory.Config]": null,
"[RetryGatewayFilterFactory@44d7e24 configClass = RetryGatewayFilterFactory.RetryConfig]": null,
"[ModifyResponseBodyGatewayFilterFactory@34045582 configClass = ModifyResponseBodyGatewayFilterFactory.Config]": null,
"[RequestHeaderSizeGatewayFilterFactory@340cb97f configClass = RequestHeaderSizeGatewayFilterFactory.Config]": null,
"[FallbackHeadersGatewayFilterFactory@11c88cca configClass = FallbackHeadersGatewayFilterFactory.Config]": null,
"[SpringCloudCircuitBreakerResilience4JFilterFactory@6a1568d6 configClass = SpringCloudCircuitBreakerFilterFactory.Config]": null,
"[SecureHeadersGatewayFilterFactory@1d289d3f configClass = Object]": null,
"[SetResponseHeaderGatewayFilterFactory@7f27f59b configClass = AbstractNameValueGatewayFilterFactory.NameValueConfig]": null,
"[PrefixPathGatewayFilterFactory@3db65c0d configClass = PrefixPathGatewayFilterFactory.Config]": null,
"[RewritePathGatewayFilterFactory@8c0a23f configClass = RewritePathGatewayFilterFactory.Config]": null,
"[RemoveResponseHeaderGatewayFilterFactory@69796bd0 configClass = AbstractGatewayFilterFactory.NameConfig]": null,
"[MapRequestHeaderGatewayFilterFactory@250d440 configClass = MapRequestHeaderGatewayFilterFactory.Config]": null,
"[AddRequestHeaderGatewayFilterFactory@dbed7fd configClass = AbstractNameValueGatewayFilterFactory.NameValueConfig]": null,
"[AddResponseHeaderGatewayFilterFactory@7e5efcab configClass = AbstractNameValueGatewayFilterFactory.NameValueConfig]": null,
"[CustomPreGatewayFilterFactory@1b52699c configClass = CustomPreGatewayFilterFactory.Config]": null,
"[SetRequestHeaderGatewayFilterFactory@10f405ff configClass = AbstractNameValueGatewayFilterFactory.NameValueConfig]": null,
"[RewriteResponseHeaderGatewayFilterFactory@1c98b4eb configClass = RewriteResponseHeaderGatewayFilterFactory.Config]": null,
"[SetStatusGatewayFilterFactory@756b2d90 configClass = SetStatusGatewayFilterFactory.Config]": null
}

响应包含应用于任何特定路由的 GatewayFilter 工厂的详细信息。每个工厂都有对应对象的字符串表示(例如,[SecureHeadersGatewayFilterFactory@1d289d3f configClass = object])。注意,null 值是由于端点控制器的实现不完整造成的,因为它试图在过滤器链中设置对象的顺序,而这并不适用于 GatewayFilter 工厂对象。

刷新路由缓存

若要清除路由缓存,需向端点 /actuator/gateway/refresh 发送 POST 请求。请求返回一个没有响应体的 200。

检索网关中定义的路由

要检索网关中定义的路由,需向端点 /actuator/gateway/routes 发送 GET 请求。得到的响应类似于以下内容:

1
2
3
4
5
6
7
8
9
10
11
12
13
[{
"predicate": "Paths: [/api-seckill/**], match trailing slash: true",
"route_id": "seckill",
"filters": ["[[StripPrefix parts = 1], order = 1]", "[org.springframework.cloud.gateway.filter.factory.RequestRateLimiterGatewayFilterFactory$$Lambda$775/831609821@27b48b61, order = 2]", "[[SpringCloudCircuitBreakerResilience4JFilterFactory name = 'circuitBreaker', fallback = forward:/fallback], order = 3]"],
"uri": "http://localhost:8081",
"order": 0
}, {
"predicate": "(Paths: [/api-account/**], match trailing slash: true && gateway.routepredicatefactories.CustomRoutePredicateFactory$$Lambda$781/1730708228@7785ff79)",
"route_id": "account",
"filters": ["[[StripPrefix parts = 1], order = 1]", "[gateway.gatewayfilterfactories.CustomPreGatewayFilterFactory$$Lambda$783/509794966@14af153d, order = 1]", "[org.springframework.cloud.gateway.filter.factory.RequestRateLimiterGatewayFilterFactory$$Lambda$775/831609821@71ece0cb, order = 2]", "[gateway.gatewayfilterfactories.CustomPostGatewayFilterFactory$$Lambda$785/1358748845@72809214, order = 2]", "[[SpringCloudCircuitBreakerResilience4JFilterFactory name = 'circuitBreaker', fallback = forward:/fallback], order = 3]"],
"uri": "http://localhost:8082",
"order": 0
}]

响应包含网关中定义的所有路由的详细信息。下表描述了响应的每个元素(每个都是一个路由)的结构:

属性名 属性类型 属性描述
route_id String The route ID.
predicate Object The route predicate.
filters Array The GatewayFilter factories applied to the route.
uri String The destination URI of the route..
order Number The route order.

检索指定定路由的信息

要检索关于单个路由的信息,需向端点 /actuator/gateway/routes/{id} 发送 GET 请求(例如,/actuator/gateway/routes/account)。得到的响应类似于以下内容:

1
2
3
4
5
6
7
{
"predicate": "(Paths: [/api-account/**], match trailing slash: true && gateway.routepredicatefactories.CustomRoutePredicateFactory$$Lambda$781/1730708228@7785ff79)",
"route_id": "account",
"filters": ["[[StripPrefix parts = 1], order = 1]", "[gateway.gatewayfilterfactories.CustomPreGatewayFilterFactory$$Lambda$783/509794966@14af153d, order = 1]", "[org.springframework.cloud.gateway.filter.factory.RequestRateLimiterGatewayFilterFactory$$Lambda$775/831609821@71ece0cb, order = 2]", "[gateway.gatewayfilterfactories.CustomPostGatewayFilterFactory$$Lambda$785/1358748845@72809214, order = 2]", "[[SpringCloudCircuitBreakerResilience4JFilterFactory name = 'circuitBreaker', fallback = forward:/fallback], order = 3]"],
"uri": "http://localhost:8082",
"order": 0
}

下表描述了响应的结构:

属性名 属性类型 属性描述
route_id String The route ID.
predicate Object The route predicate.
filters Array The GatewayFilter factories applied to the route.
uri String The destination URI of the route..
order Number The route order.

创建和删除指定路由

要创建路由,需向端点 /gateway/routes/{id_route_to_create} 发送 POST 请求并携带 JSON body。JSON body 类似于以下内容:

1
2
3
4
5
6
7
8
9
10
{
"id": "first_route",
"predicates": [{
"name": "Path",
"args": {"_genkey_0":"/first"}
}],
"filters": [],
"uri": "https://www.uri-destination.org",
"order": 0
}]

要删除路由,需向端点 /gateway/routes/{id_route_to_delete} 发送 DELETE 请求。

重述:所有端点列表

下面的表格总结了 Spring Cloud Gateway actuator 的所有端点(注意每个端点都有 /actuator/gateway 作为基本路径):

ID HTTP Method Description
globalfilters GET Displays the list of global filters applied to the routes.
routefilters GET Displays the list of GatewayFilter factories applied to a particular route.
refresh POST Clears the routes cache.
routes GET Displays the list of routes defined in the gateway.
routes/{id} GET Displays information about a particular route.
routes/{id} POST Adds a new route to the gateway.
routes/{id} DELETE Removes an existing route from the gateway.

参考资料

  1. Spring Cloud Gateway

GlobalFilter 接口具有与 GatewayFilter 接相同的签名。这些特殊的过滤器可以有条件的应用于所有的路由。(这些接口和用法在以后的版本中可能会被修改)

Combined Global过滤器and GatewayFilter Ordering

当请求与路由匹配时,filtering web handler 会加载所有的 GlobalFilter 实例以及这个路由上配置的所有的 GatewayFilter,然后组成一个完整的过滤器链。这个合并的过滤器链使用 org.springframework.core.Ordered 接口进行排序,可以通过实现 Ordered 接口中的 getOrder() 方法(或直接使用 @Order 注解)修改过滤器的顺序。

由于 Spring Cloud Gateway 分开执行 “pre” 和 “post” 的过滤器,因此优先级最高的过滤器是 “pre” 阶段的第一个过滤器,是 “post” 阶段的最后一个过滤器。

示例:

1
2
3
4
5
6
7
8
9
10
11
12
13
14
15
16
17
18
@Bean
public GlobalFilter customFilter() {
return new CustomGlobalFilter();
}

public class CustomGlobalFilter implements GlobalFilter, Ordered {

@Override
public Mono<Void> filter(ServerWebExchange exchange, GatewayFilterChain chain) {
log.info("custom global filter");
return chain.filter(exchange);
}

@Override
public int getOrder() {
return -1;
}
}

Forward Routing Filter

此过滤器在 exchange 的 ServerWebExchangeUtils.GATEWAY_REQUEST_URL_ATTR 属性中查找 URI。如果这个 URI 是 forward 模式(如 forward:///localendpoint),则使用 Spring DispatcherHandler 处理请求。请求 URL 的路径部分被转发 URL 中的路径覆盖。未修改的原始 URL 被附加到 ServerWebExchangeUtils.GATEWAY_ORIGINAL_REQUEST_URL_ATTR 属性中。

示例:

1
2
3
4
5
6
7
8
spring:
cloud:
gateway:
routes:
- id: forward_routing_filter
uri: forward:///app
predicates:
- Path=/forwardFilter

LoadBalancerClient Filter

此过滤器在 exchange 的 ServerWebExchangeUtils.GATEWAY_REQUEST_URL_ATTR 属性中查找 URI。如果这个 URI 是 lb 模式(如 lb:///myservice),则使用 Spring Cloud LoadBalancerClient 将名称(本例中为 myservice)解析为实际的主机和端口,并替换相同属性中的 URI。未修改的原始 URL 被附加到 ServerWebExchangeUtils.GATEWAY_ORIGINAL_REQUEST_URL_ATTR 属性中。此过滤器也会查看 exchange 的 ServerWebExchangeUtils.GATEWAY_SCHEME_PREFIX_ATTR 属性值否等于 lb。如果是,则应用相同的规则。

示例:

1
2
3
4
5
6
7
8
spring:
cloud:
gateway:
routes:
- id: myRoute
uri: lb://service
predicates:
- Path=/service/**

默认情况下,当在 LoadBalancer 中找不到服务实例时,将返回一个 503。可以通过设置 spring.cloud.gateway.loadbalancer.use404=true 来配置网关以返回 404。

从 LoadBalancer 返回的 ServiceInstance 的 isSecure 值,会覆盖向网关发出的请求中指定的 scheme。例如,如果请求通过 HTTPS 进入网关,但 ServiceInstance 表明它不安全,则下游请求通过 HTTP 发出。相反的情况也适用。但是,如果网关配置中为路由指定了 GATEWAY_SCHEME_PREFIX_ATTR 属性,则删除前缀,路由 URL 的结果方案将覆盖 ServiceInstance 配置。

ReactiveLoadBalancerClientFilter

此过滤器在 exchange 的 ServerWebExchangeUtils.GATEWAY_REQUEST_URL_ATTR 属性中查找 URI。如果这个 URI 是 lb 模式(如 lb:///myservice),则使用 Spring Cloud ReactorLoadBalancer 将名称(本例中为 myservice)解析为实际的主机和端口,并替换相同属性中的 URI。未修改的原始 URL 被附加到 ServerWebExchangeUtils.GATEWAY_ORIGINAL_REQUEST_URL_ATTR 属性中。此过滤器也会查看 exchange 的 ServerWebExchangeUtils.GATEWAY_SCHEME_PREFIX_ATTR 属性值否等于 lb。如果是,则应用相同的规则。

示例:

1
2
3
4
5
6
7
8
spring:
cloud:
gateway:
routes:
- id: myRoute
uri: lb://service
predicates:
- Path=/service/**

默认情况下,当在 ReactorLoadBalancer 中找不到服务实例时,将返回一个 503。可以通过设置 spring.cloud.gateway.loadbalancer.use404=true 来配置网关以返回 404。

从 ReactiveLoadBalancerClientFilter 返回的 ServiceInstance 的 isSecure 值,会覆盖向网关发出的请求中指定的 scheme。例如,如果请求通过 HTTPS 进入网关,但 ServiceInstance 表明它不安全,则下游请求通过 HTTP 发出。相反的情况也适用。但是,如果网关配置中为路由指定了 GATEWAY_SCHEME_PREFIX_ATTR 属性,则删除前缀,路由 URL 的结果方案将覆盖 ServiceInstance 配置。

Netty Routing Filter

当从 exchange 的 ServerWebExchangeUtils.GATEWAY_REQUEST_URL_ATTR 属性中获取的 URL 的 scheme 是 https 或 http 时,此过滤器生效。它使用 Netty 的 HttpClient 发出下游代理请求,请求返回的结果将存储在 exchange 的 ServerWebExchangeUtils.CLIENT_RESPONSE_ATTR 属性中,过滤器链后面的过滤器可以从中获取返回的结果。(还有一个实验性的 filter:WebClientHttpRoutingFilter,它和 NettyRoutingFilter 的功能一样,但是不使用 netty。)

Netty Write Response Filter

当 exchange 的 ServerWebExchangeUtils.CLIENT_RESPONSE_ATTR 属性中存在 HttpClientResponse 时,此过滤器生效。它在所有的其它的过滤器执行完成之后运行,将响应的数据发送给网关的客户端。 (还有一个实验性的 filter:WebClientWriteResponseFilter,它和 NettyWriteResponseFilter 的功能一样,但是不使用 netty。)

RouteToRequestUrl Filter

当 exchange 的 ServerWebExchangeUtils.GATEWAY_ROUTE_ATTR 属性中有一个路由对象时,此过滤器生效。它根据请求的 URI 创建一个新的 URI,但使用路由对象的 URI 属性进行更新。新的 URI 存放在 exchange 的 ServerWebExchangeUtils.GATEWAY_REQUEST_URL_ATTR 属性中。

如果 URI 有一个 scheme 前缀,例如 lb:ws://serviceid,则从 URI 中剥离 lb 模式并将其放入 ServerWebExchangeUtils.GATEWAY_SCHEME_PREFIX_ATTR 属性中,稍后在过滤器链中使用。

The Websocket Routing Filter

当位于 excahnge 的 ServerWebExchangeUtils.GATEWAY_REQUEST_URL_ATT 属性中的 URL 有一个 ws 或 wss scheme 时,此过滤器生效。它使用 Spring WebSocket 基础设施将 WebSocket 请求转发到下游。

可以通过在 URI 前面加上 lb 来实现负载平衡,比如 lb:ws://serviceid。

示例:

1
2
3
4
5
6
7
8
9
10
11
12
13
14
spring:
cloud:
gateway:
routes:
# SockJS route
- id: websocket_sockjs_route
uri: http://localhost:3001
predicates:
- Path=/websocket/info/**
# Normal Websocket route
- id: websocket_route
uri: ws://localhost:3001
predicates:
- Path=/websocket/**

The Gateway Metrics Filter

要启用网关指标,添加 spring-boot-starter-actuator 作为项目依赖项。
在默认情况下,只有属性 spring.cloud.gateway.metrics.enabled 不是 false,此过滤器就会生效。此过滤器会添加一个名字为 gateway.requests 和 tags 为如下的 timer metric:

  • routeId 路由的 ID
  • routeUri 被路由的的 URI
  • outcome 被 HttpStatus.Series 标记的结果
  • status 返回给客户端的 HTTP 状态码
  • httpStatusCode 返回给客户端的 HTTP 状态码
  • httpMethod 请求使用的 HTTP 方法

可以通过 /actuator/metrics/gateway.requests 提取这些指标,这些指标可以很容易地与 Prometheus 集成,以创建一个 Grafana dashboard。

要启用 prometheus endpoint,添加 micrometer-registry-prometheus 作为项目依赖项。

Marking An Exchange As Routed

如果网关已经路由过一个 ServerWebExchange,它将标记这个 exchange 已经被路由过,记录在 exchange 的 ServerWebExchangeUtils.GATEWAY_ALREADY_ROUTED_ATTR 属性中。一旦被标记完成了路由,其它的路由过滤器将不会再路由本次请求,直接跳过此过滤器。有两个方便的方法,可以使用它们标记已路由过或检测是否已路由过。

  • ServerWebExchangeUtils.isAlreadyRouted takes a ServerWebExchange object and checks if it has been “routed”
  • ServerWebExchangeUtils.setAlreadyRouted takes a ServerWebExchange object and marks it as “routed”

参考资料

  1. Spring Cloud Gateway
  2. Spring Gateway 全局过滤器 Global Filters

路由过滤器允许以某种方式修改传入的 HTTP 请求或返回的 HTTP 响应。路由过滤器的作用域是特定的路由。Spring Cloud Gateway 包含许多内置的 GatewayFilter Factories。

AddRequestHeader

接受名称和值两个参数。示例:

1
2
3
4
5
6
7
8
spring:
cloud:
gateway:
routes:
- id: add_request_header_route
uri: https://example.org
filters:
- AddRequestHeader=X-Request-red, blue

这将为所有匹配的请求在下游请求的 headers 中添加 header X-Request-red:blue。

AddRequestHeader 知道用于匹配路径或主机的 URI 变量。URI 变量可以在值中使用,并在运行时展开。示例:

1
2
3
4
5
6
7
8
9
10
spring:
cloud:
gateway:
routes:
- id: add_request_header_route
uri: https://example.org
predicates:
- Path=/red/{segment}
filters:
- AddRequestHeader=X-Request-Red, Blue-{segment}

AddRequestParameter

接受名称和值两个参数。示例:

1
2
3
4
5
6
7
8
spring:
cloud:
gateway:
routes:
- id: add_request_parameter_route
uri: https://example.org
filters:
- AddRequestParameter=red, blue

这将为所有匹配的请求在下游请求的查询字符串中添加 red=blue。

AddRequestParameter 知道用于匹配路径或主机的 URI 变量。URI 变量可以在值中使用,并在运行时展开。示例:

1
2
3
4
5
6
7
8
9
10
spring:
cloud:
gateway:
routes:
- id: add_request_parameter_route
uri: https://example.org
predicates:
- Host: {segment}.myhost.org
filters:
- AddRequestParameter=foo, bar-{segment}

AddResponseHeader

接受名称和值两个参数。示例:

1
2
3
4
5
6
7
8
spring:
cloud:
gateway:
routes:
- id: add_response_header_route
uri: https://example.org
filters:
- AddResponseHeader=X-Response-Red, Blue

这将为所有匹配的请求在下游响应的 headers 中添加 header X-Response-Red:Blue。

AddResponseHeader 知道用于匹配路径或主机的 URI 变量。URI 变量可以在值中使用,并在运行时展开。示例:

1
2
3
4
5
6
7
8
9
10
spring:
cloud:
gateway:
routes:
- id: add_response_header_route
uri: https://example.org
predicates:
- Host: {segment}.myhost.org
filters:
- AddResponseHeader=foo, bar-{segment}

DedupeResponseHeader

接受名称参数和可选策略参数。名称可以包含以空格分隔的 header 名列表。示例:

1
2
3
4
5
6
7
8
spring:
cloud:
gateway:
routes:
- id: dedupe_response_header_route
uri: https://example.org
filters:
- DedupeResponseHeader=Access-Control-Allow-Credentials Access-Control-Allow-Origin

当网关 CORS 逻辑和下游逻辑都添加它们时,这将从相应的 headers 中移除重复的 Access-Control-Allow-Credentials 和 Access-Control-Allow-Origin。

DedupeResponseHeader 过滤器也接受一个可选的策略参数。接受的值是 RETAIN_FIRST(默认值)、RETAIN_LAST 和 RETAIN_UNIQUE。

Spring Cloud CircuitBreaker

此过滤器使用 Spring Cloud CircuitBreaker API 将 Gateway 路由封装在断路器中。Spring Cloud CircuitBreaker 支持两个可与 Spring Cloud Gateway 一起使用的库,即 Hystrix 和 Resilience4J。由于 Netflix 将 Hystrix 置于仅维护模式,建议大家使用 Resilience4J。

要启用此 filter,需要将 spring-cloud-starter-circuitbreaker-reactor-resilience4j 或 spring-cloud-starter-netflix-hystrix 置于类路径中。示例:

1
2
3
4
5
6
7
8
spring:
cloud:
gateway:
routes:
- id: circuitbreaker_route
uri: https://example.org
filters:
- CircuitBreaker=myCircuitBreaker

要配置断路器,请参阅所使用的断路器实现的配置。

此过滤器也可以接受一个可选的 fallbackUri 参数。目前仅支持转发:支持 schemed URIs。如果调用了 fallback,请求将被转发给 URI 匹配的 controller。下面的示例配置了这样的 fallback:

1
2
3
4
5
6
7
8
9
10
11
12
13
14
spring:
cloud:
gateway:
routes:
- id: circuitbreaker_route
uri: lb://backing-service:8088
predicates:
- Path=/consumingServiceEndpoint
filters:
- name: CircuitBreaker
args:
name: myCircuitBreaker
fallbackUri: forward:/inCaseOfFailureUseThis
- RewritePath=/consumingServiceEndpoint, /backingServiceEndpoint

下面的代码在 Java 中做了相同的事情:

1
2
3
4
5
6
7
8
@Bean
public RouteLocator routes(RouteLocatorBuilder builder) {
return builder.routes()
.route("circuitbreaker_route", r -> r.path("/consumingServiceEndpoint")
.filters(f -> f.circuitBreaker(c -> c.name("myCircuitBreaker").fallbackUri("forward:/inCaseOfFailureUseThis"))
.rewritePath("/consumingServiceEndpoint", "/backingServiceEndpoint")).uri("lb://backing-service:8088")
.build();
}

此示例在调用断路器 fallback 时转发到 /inCaseofFailureUseThis URI。注意,这个示例还演示了 Spring Cloud Netflix Ribbon 负载平衡(可选)(由目标 URI 上的 lb 前缀定义)。

主要的场景是使用 fallbackUri 来定义网关应用程序中的内部控制器或处理程序。但是,我们也可以将请求重新路由到外部应用程序中的控制器或处理程序,如下所示:

1
2
3
4
5
6
7
8
9
10
11
12
13
14
15
16
17
spring:
cloud:
gateway:
routes:
- id: ingredients
uri: lb://ingredients
predicates:
- Path=//ingredients/**
filters:
- name: CircuitBreaker
args:
name: fetchIngredients
fallbackUri: forward:/fallback
- id: ingredients-fallback
uri: http://localhost:9994
predicates:
- Path=/fallback

在本例中,网关应用程序中没有 fallback endpoint 或 handler。但是,在另一个应用程序中有一个,注册在 localhost:9994 下。

在请求被转发到 fallback 的情况下,此过滤器也提供了导致 fallback 的 Throwable。它作为属性 ServerWebExchangeUtils.CIRCUITBREAKER_EXECUTION_EXCEPTION_ATTR 被添加到 ServerWebExchange 中,可以在处理网关应用程序中的 fallback 时使用。

FallbackHeaders

此过滤器允许向转发到外部应用程序的 fallbackUri 的请求的 headers 中添加 Hystrix 或 Spring Cloud CircuitBreaker 执行异常细节。示例:

1
2
3
4
5
6
7
8
9
10
11
12
13
14
15
16
17
18
19
20
21
spring:
cloud:
gateway:
routes:
- id: ingredients
uri: lb://ingredients
predicates:
- Path=//ingredients/**
filters:
- name: CircuitBreaker
args:
name: fetchIngredients
fallbackUri: forward:/fallback
- id: ingredients-fallback
uri: http://localhost:9994
predicates:
- Path=/fallback
filters:
- name: FallbackHeaders
args:
executionExceptionTypeHeaderName: Test-Header

在本例中,在运行断路器时发生执行异常后,请求被转发到运行在 localhost:9994 上的应用程序中的 fallback endpoint 或 handler。包含异常类型、消息和根原因异常类型和消息的 headers 由此过滤器添加到该请求。

可以通过设置以下参数的值(与默认值一起显示)来覆盖配置中 header 的名称:

  • executionExceptionTypeHeaderName (“Execution-Exception-Type”)
  • executionExceptionMessageHeaderName (“Execution-Exception-Message”)
  • rootCauseExceptionTypeHeaderName (“Root-Cause-Exception-Type”)
  • rootCauseExceptionMessageHeaderName (“Root-Cause-Exception-Message”)

MapRequestHeader

它创建了一个新的 header(toHeader),其值是从传入的 http 请求的 header(fromHeader)中提取出来的。如果传入的 header 不存在,则过滤器没有影响。如果新的 header 已经存在,它的值将被新值扩充。示例:

1
2
3
4
5
6
7
8
spring:
cloud:
gateway:
routes:
- id: map_request_header_route
uri: https://example.org
filters:
- MapRequestHeader=Blue, X-Request-Red

将 X-Request-Red: header 添加到下游请求中,并将其值更新为传入的 HTTP 请求中的 Blue header 的值。

PrefixPath

接受单个 prefix 参数。示例:

1
2
3
4
5
6
7
8
spring:
cloud:
gateway:
routes:
- id: prefixpath_route
uri: https://example.org
filters:
- PrefixPath=/mypath

这将为所有匹配请求的路径加上前缀 /mypath。因此,对 /hello 的请求将被发送到 /mypath/hello。

PreserveHostHeader

没有参数。此过滤器设置路由过滤器检查的请求属性,以确定是否应该发送原始 host header,而不是由 HTTP 客户端确定的 host header。示例:

1
2
3
4
5
6
7
8
spring:
cloud:
gateway:
routes:
- id: preserve_host_route
uri: https://example.org
filters:
- PreserveHostHeader

RequestRateLimiter

此过滤器使用一个 RateLimiter 实现来确定当前请求是否被允许继续。如果不是,则返回 HTTP 429 的状态—太多的请求(默认情况下)。

此过滤器接受一个可选的 keyResolver 参数和特定于速率限制器的参数。

keyResolver 是实现 keyResolver 接口的 bean。在配置中,使用 SpEL 按名称引用 bean。#{@myKeyResolver} 是一个 SpEL 表达式,它引用一个名为 myKeyResolver 的 bean。下面的代码显示了 KeyResolver 接口:

1
2
3
public interface KeyResolver {
Mono<String> resolve(ServerWebExchange exchange);
}

KeyResolver 的默认实现是 PrincipalNameKeyResolver,它从 ServerWebExchange 中获取 Principal 并调用 Principal.getname()。

默认情况下,如果 KeyResolver 没有找到 key,请求将被拒绝。可以通过设置 spring.cloud.gateway.filter.request-rate-limiter.deny-empty-key (true or false) 和 spring.cloud.gateway.filter.request-rate-limiter.empty-key-status-code 属性来调整此行为。

Redis RateLimiter

Redis 的实现基于 Stripe 完成的工作。它需要使用 spring-boot-starter-data-redis-reactive Spring Boot starter。

使用的算法是令牌桶算法(Token Bucket Algorithm)

  • redis-rate-limiter.replenishRate 允许用户每秒执行多少请求,而不需要删除任何请求。这是令牌桶被填充的速率。

  • redis-rate-limiter.burstCapacity 用户在一秒钟内允许执行的最大请求数。这是令牌桶可以容纳的令牌数量。将此值设置为 0 将阻塞所有请求。

一个稳定的速率是通过设置相同的 replenishRate 和 burstCapacity 来实现的。可以通过将 burstCapacity 设置为高于 replenishRate 来允许临时突发。在这种情况下,需要允许速率限制器在突发之间留出一些时间(根据 replenishRate),因为两个连续的突发将导致请求下降(HTTP 429—请求太多)。

示例:

1
2
3
4
5
6
7
8
9
10
11
spring:
cloud:
gateway:
routes:
- id: requestratelimiter_route
uri: https://example.org
filters:
- name: RequestRateLimiter
args:
redis-rate-limiter.replenishRate: 10
redis-rate-limiter.burstCapacity: 20

下面的示例在 Java 中配置一个 KeyResolver:

1
2
3
4
@Bean
KeyResolver userKeyResolver() {
return exchange -> Mono.just(exchange.getRequest().getQueryParams().getFirst("user"));
}

这定义了每个用户的请求速率限制为 10。允许 20 个请求,但是在接下来的一秒内,只有 10 个请求可用。KeyResolver 是一个简单的工具,它获取用户请求参数(注意,不建议在生产环境中使用这个参数)。

我们还可以将速率限制器定义为实现了 RateLimiter 接口的 bean。在配置中,可以使用 SpEL 通过名称引用 bean。#{@myRateLimiter} 是一个 SpEL 表达式,它引用一个名为 myRateLimiter 的 bean。下面的配置定义了一个速率限制器,它使用前面配置中定义的 KeyResolver:

1
2
3
4
5
6
7
8
9
10
11
spring:
cloud:
gateway:
routes:
- id: requestratelimiter_route
uri: https://example.org
filters:
- name: RequestRateLimiter
args:
rate-limiter: "#{@myRateLimiter}"
key-resolver: "#{@userKeyResolver}"

RedirectTo

接受两个参数:status 和 url。状态参数应该是 300 系列的重定向 HTTP 代码,比如 301。url 参数应该是一个有效的 url。这是 Location header 的值。示例:

1
2
3
4
5
6
7
8
spring:
cloud:
gateway:
routes:
- id: prefixpath_route
uri: https://example.org
filters:
- RedirectTo=302, https://acme.org

这将发送一个 302 状态码来执行重定向,重定向的地址为 https://acme.org。

RemoveHopByHopHeadersFilter

从转发的请求中移除 headers。

默认移除的 headers 由:

  • Connection
  • Keep-Alive
  • Proxy-Authenticate
  • Proxy-Authorization
  • TE
  • Trailer
  • Transfer-Encoding
  • Upgrade

要更改移除的 headers,可以设置 spring.cloud.gateway.filter.remove-non-proxy-header.headers 属性来指明要删除的 headers 列表。

RemoveRequestHeader

接受名称参数。它是要删除的 header 的名称。示例:

1
2
3
4
5
6
7
8
spring:
cloud:
gateway:
routes:
- id: removerequestheader_route
uri: https://example.org
filters:
- RemoveRequestHeader=X-Request-Foo

这将在 X-Request-Foo header 被发送到下游之前删除它。

RemoveResponseHeader

接受名称参数。它是要删除的 header 的名称。示例:

1
2
3
4
5
6
7
8
spring:
cloud:
gateway:
routes:
- id: removeresponseheader_route
uri: https://example.org
filters:
- RemoveResponseHeader=X-Response-Foo

这将在响应返回到网关客户端之前从响应中删除 X-Response-Foo header。

要删除任何类型的敏感标头,我们应该为希望删除的任何 routes 配置这个 filter。此外,还可以使用 spring.cloud.gateway.default-filters 配置此过滤器一次,并将其应用于所有 routes。

RemoveRequestParameter

接受名称参数。它是要删除的查询参数的名称。示例:

1
2
3
4
5
6
7
8
spring:
cloud:
gateway:
routes:
- id: removerequestparameter_route
uri: https://example.org
filters:
- RemoveRequestParameter=red

这将在 red 参数被发送到下游之前删除它。

RewritePath

接受一个路径 regexp 参数和一个替换参数。它使用 Java 正则表达式以一种灵活的方式重写请求路径。示例:

1
2
3
4
5
6
7
8
9
10
spring:
cloud:
gateway:
routes:
- id: rewritepath_route
uri: https://example.org
predicates:
- Path=/foo/**
filters:
- RewritePath=/red(?<segment>/?.*), $\{segment}

对于 /red/blue 的请求路径,这将在发出下游请求之前将路径设置为 /blue。注意,由于 YAML 规范的原因,应该将 $ 替换为 $\。

RewriteLocationResponseHeader

修改 Location 响应 header 的值,通常去掉后端特定的细节。它接受 stripVersionMode、locationHeaderName、hostValue 和 protocolsRegex 参数。示例:

1
2
3
4
5
6
7
8
spring:
cloud:
gateway:
routes:
- id: rewritelocationresponseheader_route
uri: http://example.org
filters:
- RewriteLocationResponseHeader=AS_IN_REQUEST, Location, ,

例如,对于请求 POST api.example.com/some/object/name,object-service.prod.example.net/v2/some/object/id 的 Location 响应 header 被重写为 api.example.com/some/object/id。

stripVersionMode 参数有以下可能的值:NEVER_STRIP、AS_IN_REQUEST(默认值) 和 ALWAYS_STRIP。

  • NEVER_STRIP 即使原始请求路径不包含 version,也不会删除 version。
  • AS_IN_REQUEST 仅当原始请求路径不包含 version 时,才剥离 version。
  • ALWAYS_STRIP 即使原始请求路径包含 version,version 也总是被剥离。

如果提供了 hostValue 参数,则该参数用于替换响应的 Location header 的 host:port 部分。如果没有提供,则使用 Host request header。

protocolsRegex 参数必须是有效的 regex 字符串,协议名与之匹配。如果不匹配,则筛选器什么也不做。默认是 http|https|ftp|ftps。

RewriteResponseHeader

接受名称、regexp 和替换参数。它使用 Java 正则表达式以一种灵活的方式重写响应头值。示例:

1
2
3
4
5
6
7
8
spring:
cloud:
gateway:
routes:
- id: rewriteresponseheader_route
uri: https://example.org
filters:
- RewriteResponseHeader=X-Response-Red, , password=[^&]+, password=***

对于 header 值 /42?user=ford&password=omg!what&flag=true,在提出下游请求之后,它被设置为 /42?user=ford&password=***&flag=true。根据 YAML 规范,必须使用 $\ 表示 $。

SaveSession

将调用转发到下游之前,强制执行 WebSession::save 操作。这在使用带有惰性数据存储的 Spring Session 之类的技术时特别有用,我们需要确保在进行转发调用之前保存了会话状态。示例:

1
2
3
4
5
6
7
8
9
10
spring:
cloud:
gateway:
routes:
- id: save_session
uri: https://example.org
predicates:
- Path=/foo/**
filters:
- SaveSession

如果我们将 Spring Security 与 Spring Session 集成,并希望确保安全细节已被转发到远程进程,这是非常重要的。

SecureHeaders

SecureHeaders 在响应中添加了许多 headers。

  • X-Xss-Protection:1 (mode=block)
  • Strict-Transport-Security (max-age=631138519)
  • X-Frame-Options (DENY)
  • X-Content-Type-Options (nosniff)
  • Referrer-Policy (no-referrer)
  • Content-Security-Policy (default-src ‘self’ https:; font-src ‘self’ https: data:; img-src ‘self’ https: data:; object-src ‘none’; script-src https:; style-src ‘self’ https: ‘unsafe-inline)’
  • X-Download-Options (noopen)
  • X-Permitted-Cross-Domain-Policies (none)

要更改默认值,请在 spring.cloud.gateway.filter.secure-headers 命名空间中设置适当的属性。

要禁用默认值,请设置 spring.cloud.gateway.filter.secure-headers.disable 属性,属性值由逗号分隔值。示例:

1
spring.cloud.gateway.filter.secure-headers.disable: x-frame-options,strict-transport-security

SetPath

接受一个路径模板参数。它提供了一种通过允许模板化路径片段来操作请求路径的简单方法。它使用来自 Spring Framework 的 URI 模板。允许多个匹配段。示例:

1
2
3
4
5
6
7
8
9
10
spring:
cloud:
gateway:
routes:
- id: setpath_route
uri: https://example.org
predicates:
- Path=/red/{segment}
filters:
- SetPath=/{segment}

对于 /red/blue 的请求路径,这将在发出下游请求之前将路径设置为 /blue。

SetRequestHeader

接受名称和值参数。示例:

1
2
3
4
5
6
7
8
spring:
cloud:
gateway:
routes:
- id: setrequestheader_route
uri: https://example.org
filters:
- SetRequestHeader=X-Request-Red, Blue

此过滤器使用给定名称替换(而不是添加)所有 headers。因此,如果下游服务器响应一个 X-Request-Red:1234,这将被替换为 X-Request-Red:Blue,这是下游服务将接收的内容。

SetRequestHeader 知道用于匹配路径或 host 的 URI 变量。URI 变量可以在值中使用,并在运行时展开。示例:

1
2
3
4
5
6
7
8
9
10
spring:
cloud:
gateway:
routes:
- id: setrequestheader_route
uri: https://example.org
predicates:
- Host: {segment}.myhost.org
filters:
- SetRequestHeader=foo, bar-{segment}

SetResponseHeader

接受名称和值参数。示例:

1
2
3
4
5
6
7
8
spring:
cloud:
gateway:
routes:
- id: setresponseheader_route
uri: https://example.org
filters:
- SetResponseHeader=X-Response-Red, Blue

此过滤器使用给定名称替换(而不是添加)所有 headers。因此,如果下游服务器响应一个 X-Response-Red:1234,这将被替换为 X-Response-Red:Blue,这是网关客户端将接收到的内容。

SetResponseHeader知道用于匹配路径或主机的URI变量 知道用于匹配路径或 host 的 URI 变量。URI 变量可以在值中使用,并在运行时展开。示例:

1
2
3
4
5
6
7
8
9
10
spring:
cloud:
gateway:
routes:
- id: setresponseheader_route
uri: https://example.org
predicates:
- Host: {segment}.myhost.org
filters:
- SetResponseHeader=foo, bar-{segment}

SetStatus

接受单个参数 status。它必须是一个有效的 Spring HttpStatus。它可以是整数值 404 或枚举的字符串表示形式:NOT_FOUND。示例:

1
2
3
4
5
6
7
8
9
10
11
12
spring:
cloud:
gateway:
routes:
- id: setstatusstring_route
uri: https://example.org
filters:
- SetStatus=BAD_REQUEST
- id: setstatusint_route
uri: https://example.org
filters:
- SetStatus=401

在这两种情况下,响应的 HTTP 状态都设置为 401。

我们可以配置 SetStatus GatewayFilter,以在响应的 header 中返回代理请求的原始 HTTP 状态代码。如果配置了以下属性,header 将添加到响应:

1
2
3
4
5
spring:
cloud:
gateway:
set-status:
original-status-header-name: original-http-status

StripPrefix

接受一个参数 parts。parts 参数表示在将请求发送到下游之前,从请求中剥离的路径中的部件数。示例:

1
2
3
4
5
6
7
8
9
10
spring:
cloud:
gateway:
routes:
- id: nameRoot
uri: https://nameservice
predicates:
- Path=/name/**
filters:
- StripPrefix=2

当通过网关向 /name/blue/red 发出请求时,向 nameservice 发出的请求看起来就像 nameservice/red。

Retry

支持以下参数:

  • retries 应该尝试的重试次数。默认 3 次。
  • statuses 应该重试的 HTTP 状态代码,用 org.springframework.http.HttpStatus 表示。
  • methods 应该重试的 HTTP 方法,用 org.springframework.http.HttpMethod 表示。默认 GET。
  • series 重试状态码的序列,用 org.springframework.http.HttpStatus.Series 表示。默认 5XX series。
  • exceptions 应该重试的抛出异常的列表。默认 IOException 和 TimeoutException。
  • backoff 为重试配置的指数后退。在 firstBackoff * (factor ^ n) 的回退间隔后执行重试,其中 n 为迭代。如果配置了 maxBackoff,则应用的最大 backoff 限制为 maxBackoff。如果 basedOnPreviousValue 为 true,则使用 prevBackoff * 因子计算回退。默认 disabled。

示例:

1
2
3
4
5
6
7
8
9
10
11
12
13
14
15
16
17
18
spring:
cloud:
gateway:
routes:
- id: retry_test
uri: http://localhost:8080/flakey
predicates:
- Host=*.retry.com
filters:
- name: Retry
args:
retries: 3
statuses: BAD_GATEWAY
backoff:
firstBackoff: 10ms
maxBackoff: 50ms
factor: 2
basedOnPreviousValue: false

RequestSize

当请求大小大于允许的限制时,此过滤器可以限制请求到达下游服务。接受RequestSize参数。它是以字节为单位定义的请求的允许大小限制。示例:

1
2
3
4
5
6
7
8
9
10
11
12
spring:
cloud:
gateway:
routes:
- id: request_size_route
uri: http://localhost:8080/upload
predicates:
- Path=/upload
filters:
- name: RequestSize
args:
maxSize: 5000000

此过滤器将响应状态设置为 413 负载太大,并在请求因大小而被拒绝时附加一个header errorMessage。下面的例子显示了这样一个错误消息:

1
errorMessage` : `Request size is larger than permissible limit. Request size is 6.0 MB where permissible limit is 5.0 MB

如果路由定义中没有提供过滤器参数,则默认请求大小设置为 5mb。

Default Filters

要添加一个过滤器并将其应用于所有 routes,我们可以使用 spring.cloud.gateway.default-filters。此属性接受 filters 列表。示例:

1
2
3
4
5
6
spring:
cloud:
gateway:
default-filters:
- AddResponseHeader=X-Response-Default-Red, Default-Blue
- PrefixPath=/httpbin

参考资料

  1. Spring Cloud Gateway