人的知识就好比一个圆圈,圆圈里面是已知的,圆圈外面是未知的。你知道得越多,圆圈也就越大,你不知道的也就越多。

0%

开始使用

前序准备

本地环境需要安装 yarn、node 和 git。我们的技术栈基于 ES2015+、React、UmiJS、dva、g2 和 antd,提前了解和学习这些知识会非常有帮助。

安装

新建一个空的文件夹作为项目目录,并在目录下执行:

1
yarn create umi

选择 ant-design-pro:

1
2
3
4
5
6
Select the boilerplate type (Use arrow keys)
❯ ant-design-pro - Create project with an layout-only ant-design-pro boilerplate, use together with umi block.
app - Create project with a simple boilerplate, support typescript.
block - Create a umi block.
library - Create a library with umi.
plugin - Create a umi plugin.

Ant Design Pro 脚手架将会自动安装。

目录结构

Ant Design Pro 已经为我们生成了一个完整的开发框架,提供了涵盖中后台开发的各类功能和坑位,下面是整个项目的目录结构。

1
2
3
4
5
6
7
8
9
10
11
12
13
14
15
16
17
18
19
├── config                   # umi 配置,包含路由,构建等配置
├── mock # 本地模拟数据
├── public
│ └── favicon.png # Favicon
├── src
│ ├── assets # 本地静态资源
│ ├── components # 业务通用组件
│ ├── e2e # 集成测试用例
│ ├── layouts # 通用布局
│ ├── models # 全局 dva model
│ ├── pages # 业务页面入口和常用模板
│ ├── services # 后台接口服务
│ ├── utils # 工具库
│ ├── locales # 国际化资源
│ ├── global.less # 全局样式
│ └── global.tsx # 全局 JS
├── tests # 测试工具
├── README.md
└── package.json

本地开发

安装依赖:

1
yarn install

启动:

1
yarn start

启动完成后会自动打开浏览器访问 localhost:8000,看到下面的页面就代表成功了。

Ant Design Pro预览

接下来我们可以修改代码进行业务开发了,Ant Design Pro 内建了模拟数据、HMR 实时预览、状态管理、国际化、全局路由等等各种实用的功能辅助开发,我们可以继续阅读和探索其他文档。

个性化调整

更换地址栏 logo和标题

更改 logo:
该 logo 位于 /public/favicon.svg,可以用其它 logo 将其替换掉,或者修改 /src/pages/document.ejs 中的 link 元素的 href 属性。

更换标题:
修改 /src/pages/document.ejs 中的 title 内容。

更换主页 logo 和标题

更换 logo:
该 logo 位于 /src/assets/logo.svg,可以用其它 logo 将其替换掉,或者修改 BasicLayout.tsx 中的 ProLayout 组件的 logo 属性。

更换标题:
修改 /config/defaultSetting.ts 中的 title 属性。

更换启动时 logo 和标题

修改 /src/pages/document.ejs 中第 2 个 img 元素的 src 属性和紧跟 img 后的内容。

该 logo 位于 /public/pro_icon.svg,可以用其它 logo 将其替换掉,或者修改 /src/pages/document.ejs 中的第 1 个 img 元素的 src 属性。

修改页脚内容

修改 /src/layouts/BasicLayout.tsx 中的 DefaultFooter 组件的 copyright 和 links 属性。

更换主题

Ant Design Pro 默认提供了 dark(默认) 和 light 这两种主题,可以通过修改 /config/defaultSetting.js 中的 navTheme 属性来更换主题。

更换导航模式

Ant Design Pro 同时支持侧边栏和顶部栏显示导航,可以通过修改 /config/defaultSetting.js 中的 layout 属性来更换导航模式。

移除头部不必要的小组件

在实际开发过程中,我们的项目可能不需要 “全局搜索”、”使用文档” 、”国际化切换”这些组件,可以到 /src/components/GlobalHeader/RightContent.js 中注释掉 HeaderSearch、Tooltipown、SelectLang 这几个组件的使用。

显示个人中心/设置菜单

在 /src/components/GlobalHeader/RightContent.tsx 中引用 AvatarDropdown 组件的地方添加 menu 属性。

显示通知/消息/代办

在 /src/components/GlobalHeader/RightContent.js 中引入并使用 NoticeIconView 组件。

调整用户登录页

对于用户登录页的 logo、标题、描述、登录方式、页脚和国际化支持,也可以到 /src/layouts/UserLayout.tsx 中做相应调整。

不显示页面 title

每个页面都由 PageHeaderWrapper 封装,PageHeaderWrapper 默认会显示页面 title,但是 title 已经在面包屑中显示了,因此可以隐藏掉 PageHeaderWrapper 中的 title,具体做法是给其传递 title = false。

未登录跳转到登录页

默认情况下,用户未登录也会跳转到欢迎页,如果要实现未登录时跳转到登录页,只需在 /config/config.js 中的 routes 列表里的 ../layouts/SecurityLayout 那一项中添加 Routes: [‘src/pages/Authorized’]。
还有一点需要注意,默认在用户退出登录后,Ant Design Pro 并没有清理掉用户权限信息,我们需要在 /src/models/login.ts 的 logout 方法中添加 localStorage.removeItem(‘antd-pro-authority’) 。

不启动 Umi UI

1
yarn start:no-ui

关闭 Mock 数据

  1. 启动命令改为:yarn start:no-mock
  2. 修改 /config/proxy.ts:
    1
    2
    3
    4
    5
    6
    7
    8
    9
    ...
    dev: {
    '/api/': {
    target: 'http://localhost:8080/',
    changeOrigin: true,
    pathRewrite: {'^/api/': ''},
    }
    }
    ...

注意:查看控制台,会发现请求的地址还是 localhost:8000/,但实际上已经请求到后端地址了。

Maven 依赖

1
2
3
4
5
<!-- 消息中间件使用 RabbitMQ -->
<dependency>
<groupId>org.springframework.cloud</groupId>
<artifactId>spring-cloud-starter-stream-rabbit</artifactId>
</dependency>

基于 Spring Cloud Function 的支持

基本示例

StreamApplication.java

1
2
3
4
5
6
7
8
9
10
11
12
13
14
15
16
17
18
@Slf4j
@SpringBootApplication
public class StreamApplication {

public static void main(String[] args) {
SpringApplication.run(StreamApplication.class, args);
}

@Bean
public Consumer<Person> consume() {
return person -> log.info("Data received: {}", person);
}

@Data
public static class Person {
private String name;
}
}

应用程序启动之后,转到 RabbitMQ 管理控制台(localhost:15672/),并向 consume-in-0.anonymous.X4taA71HT0yGbcyc7E06_Q 发送一条消息:

1
{"name":"Sam Spade"}

然后,在控制台中我们就会看到以下输出:

1
Receive message: StreamApplication.Person(name=Sam Spade)

消息转发

StreamApplication.java

1
2
3
4
5
6
7
8
9
10
11
12
13
14
15
16
17
18
19
20
21
22
23
24
25
26
27
28
29
30
31
32
33
34
@Slf4j
@SpringBootApplication
public class StreamApplication {

public static void main(String[] args) {
SpringApplication.run(StreamApplication.class, args);
}

@Bean
public Function<String, String> transform() {
return payload -> {
log.info("Data received before transform: {}", payload);
return payload.toUpperCase();
};
}

static class TestSource {
private AtomicBoolean semaphore = new AtomicBoolean(true);

@Bean
public Supplier<String> send() {
return () -> semaphore.getAndSet(!semaphore.get()) ? "foo" : "bar";

}
}

static class TestSink {

@Bean
public Consumer<String> receive() {
return payload -> log.info("Data received after transform: {}", payload);
}
}
}

application.yml

1
2
3
4
5
6
7
8
9
10
11
12
13
14
spring:
cloud:
stream:
function:
definition: transform;send;receive
bindings:
transform-in-0:
destination: testtock
transform-out-0:
destination: xformed
send-out-0:
destination: testtock
receive-in-0:
destination: xformed

应用程序启动之后,默认会每秒发送一条消息到 testtock,消息经转换后再发送到 xformed。控制台输出如下所示:

1
2
3
4
5
Origin data received: foo
Transformed data received: FOO
Origin data received: bar
Transformed data received: BAR
...

基于注解的支持(遗留)

基本示例

消费者

ConsumerApplication.java

1
2
3
4
5
6
7
8
@Slf4j
@SpringBootApplication
public class ConsumerApplication {

public static void main(String[] args) {
SpringApplication.run(Consumer2Application.class, args);
}
}

MessageReceiver.java

1
2
3
4
5
6
7
8
9
10
11
12
13
14
15
@Slf4j
@EnableBinding({Sink.class})
@Component
public class MessageReceiver {

/**
* 接收消息
*
* @param message 消息
*/
@StreamListener(Processor.INPUT)
public void handleMessage(String message) {
log.info("Message received: " + message);
}
}

application.yml

1
2
3
4
5
6
7
8
9
10
11
12
server:
port: 8081

spring:
cloud:
stream:
bindings:
input:
# 对应 RabbitMQ 中的 Exchange(要与 output.destination 保持一致)
destination: default-topic
# 对应 RabbitMQ 中的 Queue
group: default-topic-group

生产者

ProducerApplication.java

1
2
3
4
5
6
7
8
9
10
11
12
13
14
15
16
17
@Slf4j
@SpringBootApplication
public class ProducerApplication implements CommandLineRunner {
@Autowired
private MessageSender messageSender;

public static void main(String[] args) {
SpringApplication.run(ProducerApplication.class, args);
}

@Override
public void run(String... args) {
for (int i = 0; i < 10; i++) {
messageSender.sendMessage(MessageBuilder.withPayload(String.format("Hello World, {201%s}!", i)).build());
}
}
}

MessageSender.java

1
2
3
4
5
6
7
8
9
10
@EnableBinding(Source.class)
@Component
public class MessageSender {
@Autowired
private Source source;

public void sendMessage(Message<String> message) {
source.output().send(message);
}
}

application.yml

1
2
3
4
5
6
7
8
9
10
server:
port: 8080

spring:
cloud:
stream:
bindings:
output:
# 对应 RabbitMQ 中的 Exchange(要与 input.destination 保持一致)
destination: default-topic

消息转发

消费者接收到消息之后,可以将处理后的消息转发给其他消费者。

消费者

TransformSource.java

1
2
3
4
5
6
7
8
9
10
11
12
13
public interface TransformSource {

/**
* Name of the output channel.
*/
String OUTPUT = "transform-output";

/**
* @return output channel
*/
@Output(TransformSource.OUTPUT)
MessageChannel output();
}

TransformSink.java

1
2
3
4
5
6
7
8
9
10
11
12
13
public interface TransformSink {

/**
* Input channel name.
*/
String INPUT = "transform-input";

/**
* @return input channel.
*/
@Input(TransformSink.INPUT)
SubscribableChannel input();
}

TransformProcessor.java

1
2
3
public interface TransformProcessor extends TransformSource, TransformSink {

}

MessageReceiver.java

1
2
3
4
5
6
7
8
9
10
11
12
13
14
15
16
17
18
19
20
21
22
23
24
25
26
27
28
29
30
31
32
33
34
35
36
37
38
@Slf4j
@EnableBinding({Processor.class, TransformProcessor.class})
@Component
public class MessageReceiver {

/**
* 接收消息(与 transformMessage 接收的是同一个队列中的消息,一条消息只会被一个方法接收到
*
* @param message 消息
*/
@StreamListener(Processor.INPUT)
@SendTo(TransformProcessor.OUTPUT)
public String handleMessage(String message) {
log.info("Message received: " + message);
return message.toLowerCase();
}

/**
* 接收后转换消息(与 handleMessage 接收的是同一个队列中的消息,一条消息只会被一个方法接收到
*
* @param message 消息
*/
@Transformer(inputChannel = Processor.INPUT, outputChannel = TransformProcessor.OUTPUT)
public String transformMessage(String message) {
log.info("Message received and transform: " + message);
return message.toUpperCase();
}

/**
* 接收转换后消息
*
* @param message 消息
*/
@StreamListener(TransformProcessor.INPUT)
public void handleTransformedMessage(String message) {
log.info("Transformed Message received: " + message);
}
}

application.yml

1
2
3
4
5
6
7
8
9
10
11
12
13
14
15
16
17
18
server:
port: 8081

spring:
cloud:
stream:
bindings:
input:
# 对应 RabbitMQ 中的 Exchange(要与 output.destination 保持一致)
destination: default-topic
# 对应 RabbitMQ 中的 Queue
group: default-topic-group
transform-output:
destination: transform-topic
group: transform-topic-group
transform-input:
destination: transform-topic
group: transform-topic-group

基于内容路由

消费者

MessageReceiver.java

1
2
3
4
5
6
7
8
9
10
11
12
13
14
15
16
17
18
19
20
21
22
23
24
25
@Slf4j
@EnableBinding({Sink.class})
@Component
public class MessageReceiver {

/**
* 接收消息
*
* @param message 消息
*/
@StreamListener(target = Processor.INPUT, condition = "headers['version']=='1.5'")
public void handleMessageWithHeader(String message) {
log.info("Message received with header: " + message);
}

/**
* 接收消息(不生效,原因还不清楚)
*
* @param message 消息
*/
@StreamListener(target = Processor.INPUT, condition = "payload == 'Hello World, {2016}!'")
public void handleMessageWithPayload(String message) {
log.info("Message received with payload: " + message);
}
}

生产者

ProducerApplication.java

1
2
3
4
5
6
7
8
9
10
11
12
13
14
15
16
17
18
19
20
@Slf4j
@SpringBootApplication
public class ProducerApplication implements CommandLineRunner {
@Autowired
private MessageSender messageSender;

public static void main(String[] args) {
SpringApplication.run(ProducerApplication.class, args);
}

@Override
public void run(String... args) {
for (int i = 0; i < 10; i++) {
messageSender.sendMessage(MessageBuilder
.withPayload(String.format("Hello World, {201%s}!", i))
.setHeader("version", String.format("1.%s", i))
.build());
}
}
}

定时发送消息

生产者

MessageSender.java

1
2
3
4
5
6
7
8
9
10
11
12
13
14
15
@EnableBinding(Source.class)
@Component
public class MessageSender {

/**
* 定时发送消息:每隔 1s 发送一次,每次发送 1 条
*
* @return 消息
*/
@Bean
@InboundChannelAdapter(value = Source.OUTPUT, poller = @Poller(fixedDelay = "1000", maxMessagesPerPoll = "1"))
public MessageSource<String> timerMessageSource() {
return () -> new GenericMessage<>("Hello Spring Cloud Stream!");
}
}

Spring Security 中的高级授权功能是其流行的最引人注目的原因之一。无论选择如何进行身份验证—无论是使用 Spring Security-provided 机制和提供者,还是与容器或其他非 Spring Security 身份验证授权机构集成—都会发现授权服务可以在应用程序中以一致且简单的方式使用。

在本部分中,我们将探讨不同的 AbstractSecurityInterceptor 实现,然后我们将继续研究如何通过使用域访问控制列表来调整授权。

授权架构

权限

Authentication,讨论所有 Authentication 实现如何存储 GrantedAuthority 对象列表。这些代表了授予主体的权力。GrantedAuthority 由 AuthenticationManager 插入到 Authentication 对象中,然后由 AccessDecisionManager 在作出授权决策时读取。

GrantedAuthority 是一个只有一个方法的接口:

1
String getAuthority();

此方法允许 AccessDecisionManager 获取 GrantedAuthority 的精确字符串表示形式。通过返回一个表示为字符串的形式,大多数 AccessDecisionManager 可以轻松地“读取” GrantedAuthority。如果 GrantedAuthority 不能精确地表示为字符串,则认为 GrantedAuthority 是“复杂的”,getAuthority() 必须返回 null。

“复杂” GrantedAuthority 的一个例子是一个实现,它存储一个操作列表和适用于不同客户帐号的权限阈值。将这个复杂的 GrantedAuthority 表示为字符串非常困难,因此 getAuthority() 方法应该返回 null。这将向任何 AccessDecisionManager 指示,它将需要专门支持 GrantedAuthority 实现,以便理解其内容。

Spring Security 包括一个具体的 GrantedAuthority 实现 SimpleGrantedAuthority。这允许将任何用户指定的字符串转换为 GrantedAuthority。安全体系结构中包含的所有 AuthenticationProviders 都使用 SimpleGrantedAuthority 来填充 Authentication 对象。
预调用处理

Spring Security 提供了拦截器,用于控制对安全对象(如方法调用或 web 请求)的访问。AccessDecisionManager将在调用前决定是否允许继续调用。

AccessDecisionManager

AccessDecisionManager 由 AbstractSecurityInterceptor 调用,负责做出最终的访问控制决策。AccessDecisionManager 接口包含三个方法:

1
2
3
4
5
6
void decide(Authentication authentication, Object secureObject,
Collection<ConfigAttribute> attrs) throws AccessDeniedException;

boolean supports(ConfigAttribute attribute);

boolean supports(Class clazz);

AccessDecisionManager 的 decide 方法将传递它所需的所有相关信息,以便进行授权决策。特别是,传递安全对象可以检查实际安全对象调用中包含的那些参数。例如,假设安全对象是 MethodInvocation。查询 MethodInvocation 中的任何客户参数都很容易,然后在 AccessDecisionManager 中实现某种安全逻辑,以确保允许主体对该客户进行操作。如果访问被拒绝,则实现将抛出 AccessDeniedException。

AbstractSecurityInterceptor 在启动时调用 supports(ConfigAttribute) 方法,以确定 AccessDecisionManager 是否可以处理传递的 ConfigAttribute。安全拦截器实现调用 supports(Class) 方法,以确保配置的 AccessDecisionManager 支持安全拦截器将提供的安全对象的类型。

基于投票的 AccessDecisionManager 实现

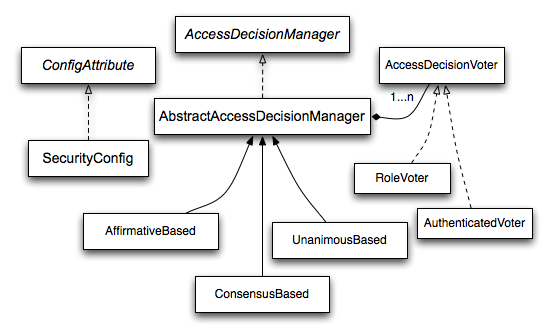
虽然用户可以实现自己的 AccessDecisionManager 来控制授权的所有方面,但 Spring Security 包含几个基于投票的 AccessDecisionManager 实现。投票决策管理器演示了相关的类。

access-decision-voting

使用此方法,将对一系列 AccessDecisionVoter 实现进行授权决策的轮询。然后 AccessDecisionManager 根据它对投票的评估来决定是否抛出 AccessDeniedException。

AccessDecisionVoter 接口有三个方法:

1
2
3
4
5
int vote(Authentication authentication, Object object, Collection<ConfigAttribute> attrs);
boolean supports(ConfigAttribute attribute);

boolean supports(Class clazz);

具体的实现返回一个 int,可能的值反映在 AccessDecisionVoter 静态字段 ACCESS_ABSTAIN、ACCESS_DENIED 和 ACCESS_GRANTED 中。如果投票实现对授权决策没有意见,则返回 ACCESS_ABSTAIN。如果它有意见,它必须返回 ACCESS_DENIED 或 ACCESS_GRANTED。

Spring Security 提供了三个具体的 AccessDecisionManager 来记录投票。ConsensusBased 实现将基于不弃权投票的共识批准或拒绝访问。属性用于在投票相等或所有投票弃权的情况下控制行为。如果收到一个或多个 ACCESS_GRANTED 投票,AffirmativeBased 将授予访问权(即,如果至少有一个授予投票,则拒绝投票将被忽略)。与 ConsensusBased 一样,如果所有选民都弃权,则有一个参数控制行为。UnanimousBased 提供者期望一致的 ACCESS_GRANTED 投票来授予访问权限,而忽略弃权。如果有任何 ACCESS_DENIED 投票,它将拒绝访问。与其他实现一样,如果所有投票者都弃权,则有一个参数控制行为。

可以实现一个自定义 AccessDecisionManager,它以不同的方式记录投票。例如,来自特定 AccessDecisionVoter 的投票可能会获得额外的权重,而来自特定投票者的拒绝投票可能会产生否决效果。

RoleVoter

Spring Security 提供的最常用的 AccessDecisionVoter 是简单的 RoleVoter,它将配置属性视为简单的角色名,如果用户被分配了该角色,则通过投票来授予访问权。

如果任何 ConfigAttribute 以前缀 ROLE_ 开头,它就会进行投票。如果有一个 GrantedAuthority 返回一个字符串表示(通过 getAuthority() 方法)恰好等于一个或多个以 ROLE_ 开头的 ConfigAttributes,那么它将投票授予访问权。如果以 ROLE_ 开头的 ConfigAttribute 没有完全匹配,RoleVoter 将投票拒绝访问。如果没有 ConfigAttribute 以 ROLE_ 开头,投票者将弃权。

AuthenticatedVoter

我们已经隐式看到的另一个投票者是 AuthenticatedVoter,它可用于区分匿名的、完全身份验证的和 remember-me 身份验证的用户。许多站点在 remember-me 身份验证下允许某些有限的访问,但要求用户通过登录进行完全访问来确认自己的身份。

当我们使用属性 IS_AUTHENTICATED_ANONYMOUSLY 来授予匿名访问时,此属性由 AuthenticatedVoter 处理。

自定义投票者

显然,还可以实现一个自定义的 AccessDecisionVoter,并且可以在其中加入任何想要的访问控制逻辑。它可能特定于的应用程序(与业务逻辑相关),也可能实现一些安全管理逻辑。例如,在 Spring web 站点上有一篇博客文章,其中描述了如何使用投票者实时拒绝帐户已挂起的用户访问。

后调用处理

虽然 AccessDecisionManager 是由 AbstractSecurityInterceptor 在继续安全对象调用之前调用的,但是一些应用程序需要一种修改安全对象调用实际返回的对象的方法。虽然可以轻松实现自己的 AOP 关注点来实现这一点,但 Spring Security 提供了一个方便的挂钩,它有几个与 ACL 功能集成的具体实现。

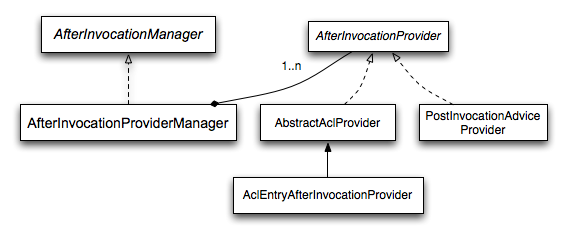
After Invocation 实现演示了 Spring Security 的 AfterInvocationManager 及其具体实现。

after-invocation

像 Spring Security 的许多其他部分一样, AfterInvocationManager 有一个具体实现 AfterInvocationProviderManager,它轮询 AfterInvocationProvider 的列表。允许每个 AfterInvocationProvider 修改返回对象或抛出 AccessDeniedException。实际上,多个提供程序可以修改对象,因为上一个提供程序的结果将传递给列表中的下一个提供程序。

注意,如果使用的是 AfterInvocationManager,仍然需要配置属性来允许 MethodSecurityInterceptor 的 AccessDecisionManager 允许一个操作。如果使用的是典型的包含 Spring Security 的 AccessDecisionManager 实现,没有为特定的安全方法调用定义配置属性将导致每个 AccessDecisionVoter 放弃投票。反过来,如果 AccessDecisionManager 的属性 allowIfAllAbstainDecisions 为 false,则抛出 AccessDeniedException。 可以通过将 allowIfAllAbstainDecisions 设置为 true(尽管通常不建议这样做) 或简单地确保 AccessDecisionVoter 将投票授予访问权限的配置属性至少有一个来避免此潜在问题。后一种(推荐的)方法通常通过 ROLE_USER 或 ROLE_AUTHENTICATED 配置属性实现。

层次化角色

应用程序中的特定角色应自动“包含”其他角色,这是一个常见的要求。例如,在具有“admin”和“user”角色概念的应用程序中,我们可能希望管理员能够执行普通用户可以执行的所有操作。为了实现这一点,可以确保所有管理员用户也被分配了“user”角色。或者,可以修改要求“user”角色也包括“admin”角色的每个访问约束。如果应用程序中有很多不同的角色,这可能会变得相当复杂。

使用角色层次结构允许配置哪些角色(或权限)应该包含其他角色。Spring Security 的 RoleVoter 的扩展版本 RoleHierarchyVoter 配置了一个 RoleHierarchy,从这个 RoleHierarchy 中可以获得分配给用户的所有“可访问权限”。典型的配置可能如下所示:

1
2
3
4
5
6
7
8
9
10
11
12
13
14
<project>
<bean id="roleVoter" class="org.springframework.security.access.vote.RoleHierarchyVoter">
<constructor-arg ref="roleHierarchy" />
</bean>
<bean id="roleHierarchy" class="org.springframework.security.access.hierarchicalroles.RoleHierarchyImpl">
<property name="hierarchy">
<value>
ROLE_ADMIN > ROLE_STAFF
ROLE_STAFF > ROLE_USER
ROLE_USER > ROLE_GUEST
</value>
</property>
</bean>
</project>

在这里,我们有四个角色在层次结构中,角色是 ROLE_ADMIN、ROLE_STAFF、ROLE_USER、ROLE_GUEST。当根据配置有上述 RoleHierarchyVoter 的 AccessDecisionManager 评估安全约束时,使用 ROLE_ADMIN 进行身份验证的用户将表现为拥有所有四个角色。> 符号可以被认为是“包含”的意思。

角色层次结构提供了一种方便的方法,可以简化应用程序的访问控制配置数据和/或减少需要分配给用户的权限数。对于更复杂的需求,您可能希望定义应用程序所需的特定访问权限与分配给用户的角色之间的逻辑映射,并在加载用户信息时在两者之间进行转换。

使用 FilterSecurityInterceptor 授权 HttpServletRequest

本节通过深入研究授权如何在基于 Servlet 的应用程序中工作来构建 Servlet 体系结构和实现。

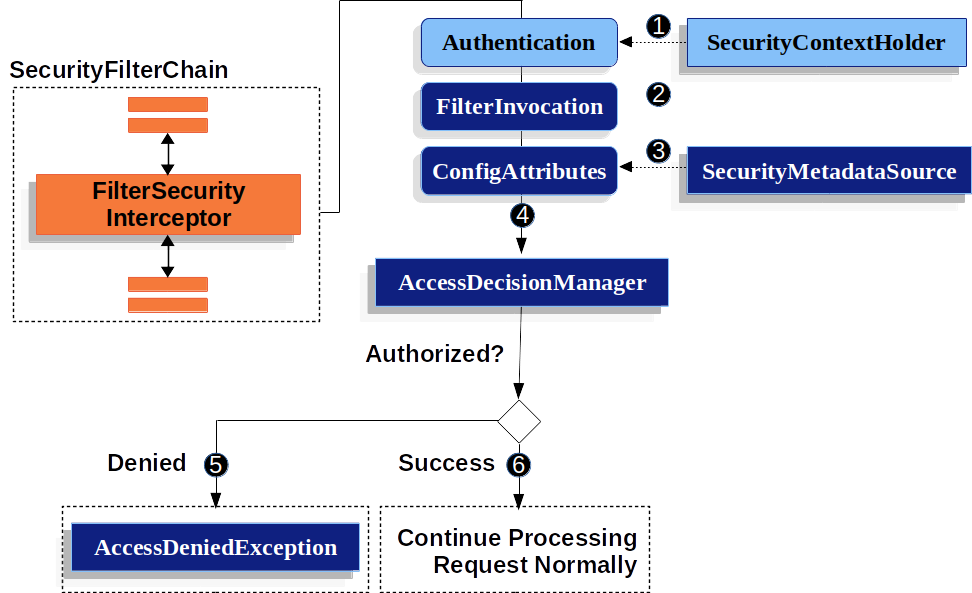
FilterSecurityInterceptor 为 HttpServletRequests 提供授权。它作为安全过滤器之一插入到 FilterChainProxy 中。

filtersecurityinterceptor

  1. 首先,FilterSecurityInterceptor 从 SecurityContextHolder 获得 Authentication 。
  2. 其次,FilterSecurityInterceptor 从传递到 FilterSecurityInterceptor 的 HttpServletRequest、HttpServletResponse 和 FilterChain 创建一个 FilterInvocation。

  3. 接下来,它将 FilterInvocation 传递给 SecurityMetadataSource 来获取 ConfigAttributes。

  4. 最后,它将 Authentication、FilterInvocation 和 ConfigAttributes 传递给 AccessDecisionManager。

  5. 如果拒绝授权,则抛出 AccessDeniedException。在本例中,ExceptionTranslationFilter 处理 AccessDeniedException。

  6. 如果允许访问,FilterSecurityInterceptor 将继续使用 FilterChain,它允许应用程序正常处理。

默认情况下,Spring Security 的授权将要求对所有请求进行身份验证。显式配置如下:

1
2
3
4
5
6
7
rotected void configure(HttpSecurity http) throws Exception {
http
// ...
.authorizeRequests(authorize -> authorize
.anyRequest().authenticated()
);
}

我们可以通过按照优先顺序添加更多的规则来配置 Spring Security,使其具有不同的规则。

1
2
3
4
5
6
7
8
9
10
protected void configure(HttpSecurity http) throws Exception {
http
// ...
.authorizeRequests(authorize -> authorize
.mvcMatchers("/resources/**", "/signup", "/about").permitAll()
.mvcMatchers("/admin/**").hasRole("ADMIN")
.mvcMatchers("/db/**").access("hasRole('ADMIN') and hasRole('DBA')")
.anyRequest().denyAll()
);
}
  1. 指定了多个授权规则。每条规则都是按照其声明的顺序考虑的。

  2. 我们指定了多个用户可以访问的 URL 模式。具体来说,如果 URL 以“/resources/”、等于“/signup”或等于“/about”开头,任何用户都可以访问请求。

  3. 任何以“/admin/”开头的 URL 将被限制为具有“ROLE_ADMIN”角色的用户。由于我们正在调用 hasRole 方法,所以不需要指定 “ROLE_” 前缀。

  4. 任何以“/db/”开头的 URL 都要求用户同时具有“ROLE_ADMIN”和“ROLE_DBA”。由于我们使用的是 hasRole 表达式,所以不需要指定“ROLE_”前缀。

  5. 任何尚未匹配的 URL 都将被拒绝访问。如果不想意外地忘记更新授权规则,这是一个很好的策略。

基于表达式的访问控制

Spring Security 3.0 引入了使用 Spring EL 表达式作为授权机制的能力,此外还简单使用了前面提到的配置属性和访问决策投票者。基于表达式的访问控制建立在同一体系结构上,但允许将复杂的布尔逻辑封装在单个表达式中。

概述

Spring Security 使用 Spring EL 来支持表达式。表达式使用“根对象”作为计算上下文的一部分进行计算。Spring Security 使用 web 的特定类和方法安全性作为根对象,以便提供内置表达式和对当前主体等值的访问。

常见的内置的表达式

表达式根对象的基类是 SecurityExpressionRoot。这提供了一些在 web 和方法安全性中都可用的公共表达式。

Expression Description
hasRole(String role) 如果当前主体具有指定的角色,则返回 true。
例如,hasRole(‘admin’)
默认情况下,如果提供的角色不是以 ‘ROLE_’ 开头,则将添加该角色。这可以通过修改 DefaultWebSecurityExpressionHandler 上的 defaultRolePrefix 进行自定义。
hasAnyRole(String…​ roles) 如果当前主体具有任何提供的角色(以逗号分隔的字符串列表形式给出),则返回 true。
例如,hasAnyRole(‘admin’,’user’)
默认情况下,如果提供的角色不是以 ‘ROLE_’ 开头,则将添加该角色。这可以通过修改 DefaultWebSecurityExpressionHandler 上的 defaultRolePrefix 进行自定义。
hasAuthority(String authority) 如果当前主体具有指定的权限,则返回 true。
例如,hasAuthority(‘read’)
hasAnyAuthority(String…​ authorities) 如果当前主体具有提供的任何权限(以逗号分隔的字符串列表形式给出),则返回 true
例如,hasAnyAuthority(‘read’,’write’)
principal 允许直接访问表示当前用户的主体对象
authentication 允许直接访问从 SecurityContext 获取的当前身份验证对象
permitAll 总是等于 true
denyAll 总是等于 false
isAnonymous() 如果当前主体是匿名用户,则返回 true
isRememberMe() 如果当前主体是 remember-me 用户,则返回 true
isAuthenticated() 如果用户不是匿名的,则返回 true
isFullyAuthenticated() 如果用户不是匿名用户或 remember-me 用户,则返回 true
hasPermission(Object target, Object permission) 如果用户有权访问给定权限的所提供目标,则返回 true。例如,hasPermission(domainObject,’read’)
hasPermission(Object targetId, String targetType, Object permission) 如果用户有权访问给定权限的所提供目标,则返回 true。例如, hasPermission(1, ‘com.example.domain.Message’, ‘read’)

Web 安全表达式

要使用表达式来保护单个 URL,首先需要将 元素中的 use-expressions 属性设置为 true。然后,Spring Security 将期望 元素的 access 属性包含 Spring EL 表达式。表达式的值应该是一个布尔值,定义是否允许访问。例如:

1
2
3
4
<http>
<intercept-url pattern="/admin*" access="hasRole('admin') and hasIpAddress('192.168.1.0/24')"/>
...
</http>

在这里,我们定义了应用程序的“admin”区域(由 URL 模式定义)应该只对具有授予的权限“admin”且其 IP 地址与本地子网匹配的用户可用。我们已经在前一节中看到了内置的 hasRole 表达式。表达式 hasIpAddress 是一个特定于 web 安全的附加内置表达式。它是由 WebSecurityExpressionRoot 类定义的,在计算 web 访问表达式时,该类的实例用作表达式根对象。该对象还直接在名称 request 下公开了 HttpServletRequest 对象,因此可以在表达式中直接调用请求。如果正在使用表达式,则将向命名空间使用的 AccessDecisionManager 中添加 WebExpressionVoter。因此,如果不使用命名空间并希望使用表达式,则必须将其中一个添加到配置中。

在 Web 安全表达式中引用 Beans

如果希望扩展可用的表达式,那么可以很容易地引用公开的任何 Spring Bean。例如,假设有一个名为 webSecurity 的 Bean,它包含以下方法签名:

1
2
3
4
5
public class WebSecurity {
public boolean check(Authentication authentication, HttpServletRequest request) {
...
}
}

可以参考以下方法:

1
2
3
4
5
http
.authorizeRequests(authorize -> authorize
.antMatchers("/user/**").access("@webSecurity.check(authentication,request)")
...
)

Web 安全表达式中的路径变量

有时能够引用 URL 中的路径变量是很好的。例如,考虑一个 RESTful 应用程序,它从格式为 /user/{userId} 的 URL 路径中查找用户的 id。

通过将路径变量放在模式中,可以很容易地引用它。例如,如果有一个名为 webSecurity 的 Bean,它包含以下方法签名:

1
2
3
4
5
public class WebSecurity {
public boolean checkUserId(Authentication authentication, int id) {
...
}
}

可以参考以下方法:

1
2
3
4
5
http
.authorizeRequests(authorize -> authorize
.antMatchers("/user/{userId}/**").access("@webSecurity.checkUserId(authentication,#userId)")
...
);

在这两种配置中,匹配的 URLs 都会将 path 变量(并将其转换)传递到 checkUserId 方法中。例如,如果 URL 是 /user/123/resource,那么传入的 id 将是 123。

方法安全表达式

方法安全性比简单的允许或拒绝规则稍微复杂一些。Spring Security 3.0 引入了一些新的注解,以便全面支持表达式的使用。

@Pre 和 @Post 注解

有四个注解支持表达式属性,以允许调用前和调用后的授权检查,还支持对提交的集合参数或返回值进行过滤。它们是 @PreAuthorize、@PreFilter、@PostAuthorize 和 @PostFilter。它们的使用是通过 global-method-security 命名空间元素启用的:

1
<global-method-security pre-post-annotations="enabled"/>
使用 @PreAuthorize 和 @PostAuthorize 进行访问控制

最明显有用的注解是 @PreAuthorize,它决定是否可以实际调用方法。例如(来自“Contacts”示例应用程序)

1
2
@PreAuthorize("hasRole('USER')")
public void create(Contact contact);

这意味着只允许具有“ROLE_USER”角色的用户访问。显然,使用传统配置和所需角色的简单配置属性也可以很容易地实现相同的功能。但:

1
2
@PreAuthorize("hasPermission(#contact, 'admin')")
public void deletePermission(Contact contact, Sid recipient, Permission permission);

在这里,我们实际使用一个方法参数作为表达式的一部分来决定当前用户是否具有给定联系人的“admin”权限。内置的 hasPermission() 表达式通过应用程序上下文链接到 Spring Security ACL 模块,如下所示。可以通过名称作为表达式变量访问任何方法参数。

Spring Security 可以通过多种方式解析方法参数。Spring Security 使用 DefaultSecurityParameterNameDiscoverer 来发现参数名称。默认情况下,将对整个方法尝试以下选项。

  • 如果 Spring Security 的 @P 注解出现在方法的单个参数上,那么将使用该值。这对于在 JDK 8 之前使用 JDK 编译的接口很有用,JDK 8 不包含任何有关参数名的信息。例如:
1
2
3
4
5
6
import org.springframework.security.access.method.P;

...

@PreAuthorize("#c.name == authentication.name")
public void doSomething(@P("c") Contact contact);

在幕后,这个使用是使用 AnnotationParameterNameDiscoverer 实现的,可以对其进行自定义以支持任何指定注解的 value 属性。

  • 如果 Spring Data 的 @Param 注解出现在该方法的至少一个参数上,则将使用该值。这对于在 JDK 8 之前使用 JDK 编译的接口很有用,JDK 8 不包含任何有关参数名的信息。例如:
1
2
3
4
5
6
import org.springframework.data.repository.query.Param;

...

@PreAuthorize("#n == authentication.name")
Contact findContactByName(@Param("n") String name);

在幕后,这种用法是使用 AnnotationParameterNameDiscoverer 实现的,可以对其进行自定义以支持任何指定注解的 value 属性。

  • 如果使用 JDK 8 编译带有 -parameters 参数的源代码,并且使用 Spring4+,则使用标准 JD K反射 API 来发现参数名。这对类和接口都有效。

  • 最后,如果代码是用调试符号编译的,那么将使用调试符号发现参数名。这对接口不起作用,因为它们没有关于参数名的调试信息。对于接口,必须使用注释或 JDK 8方法。

任何 Spring-EL 功能在表达式中都是可用的,因此还可以访问参数的属性。例如,如果希望某个特定方法只允许访问其用户名与联系人的用户名匹配的用户,可以编写

1
2
@PreAuthorize("#contact.name == authentication.name")
public void doSomething(Contact contact);

在这里,我们访问另一个内置表达式 authentication,它是存储在安全上下文中的 Authentication。还可以使用表达式 principal 直接访问其“principal”属性。该值通常是一个 UserDetails 实例,因此可以使用类似 principal.username 或 principal.enabled 这样的表达式。

不太常见的是,可能希望在调用方法之后执行访问控制检查。这可以使用 @PostAuthorize 注解来实现。要访问方法的返回值,在表达式中使用内置的名称 returnObject。

使用 @PreFilter 和 @PostFilter 过滤

我们可能已经知道,Spring Security 支持对集合和数组进行过滤,现在可以使用表达式来实现这一点。这通常是对方法的返回值执行的。例如:

1
2
3
@PreAuthorize("hasRole('USER')")
@PostFilter("hasPermission(filterObject, 'read') or hasPermission(filterObject, 'admin')")
public List<Contact> getAll();

当使用 @PostFilter 注解时,Spring Security 会遍历返回的集合,并删除所提供表达式为 false 的任何元素。名称 filterObject 引用集合中的当前对象。也可以在方法调用之前使用 @PreFilter 进行过滤,尽管这是一个不太常见的要求。语法是一样的,但是如果有多个集合类型的参数,则必须使用该注解的 filterTarget 属性按名称选择一个。

注意,过滤显然不能替代优化数据检索查询。如果过滤大型集合并删除许多项,那么这可能是低效的。

内置表达式

有一些特定于方法安全性的内置表达式,我们已经在上面的使用中看到了。filterTarget 和returnValue 值非常简单,但是 hasPermission() 表达式的使用值得仔细研究。

PermissionEvaluator

hasPermission() 表达式被委托给 PermissionEvaluator 的实例。它旨在在表达式系统和 Spring Security 的 ACL 系统之间建立桥梁,允许基于抽象权限在域对象上指定授权约束。它对 ACL 模块没有显式的依赖关系,因此如果需要,可以将其替换为另一个实现。该接口有两个方法:

1
2
3
boolean hasPermission(Authentication authentication, Object targetDomainObject, Object permission);
boolean hasPermission(Authentication authentication, Serializable targetId, String targetType, Object permission);
它直接映射到表达式的可用版本,但未提供第一个参数(Authentication 对象)除外。第一种方法用于已加载访问控制的域对象的情况。如果当前用户具有该对象的给定权限,那么表达式将返回 true。第二个版本用于没有加载对象,但知道其标识符的情况。还需要域对象的抽象“type”说明符,以便加载正确的 ACL 权限。这通常是对象的 Java 类,但只要与加载权限的方式一致,就不必是这样。
要使用 hasPermission() 表达式,必须在应用程序上下文中显式配置 PermissionEvaluator。看起来像这样:

1
2
3
4
5
6
7
8
9
<project>
<security:global-method-security pre-post-annotations="enabled">
<security:expression-handler ref="expressionHandler"/>
</security:global-method-security>

<bean id="expressionHandler" class="org.springframework.security.access.expression.method.DefaultMethodSecurityExpressionHandler">
<property name="permissionEvaluator" ref="myPermissionEvaluator"/>
</bean>
</project>

其中 myPermissionEvaluator 是实现 PermissionEvaluator 的 bean。通常这将是来自 ACL 模块的实现,该模块称为 AclPermissionEvaluator。

方法安全元注解

可以使用元注解实现方法安全性,从而使代码更具可读性。如果发现在整个代码库中重复使用相同的复杂表达式,那么这将特别方便。例如,考虑以下几点:

1
@PreAuthorize("#contact.name == authentication.name")

我们可以创建一个可以替代的元注解,而不是在任何地方重复此操作。

1
2
3
@Retention(RetentionPolicy.RUNTIME)
@PreAuthorize("#contact.name == authentication.name")
public @interface ContactPermission {}
元注解可以用于任何 Spring Security 方法的安全注解。为了保持与规范的兼容性,JSR-250 注解不支持元注解。

安全对象的实现

AOP Alliance (MethodInvocation) 安全拦截器

在 Spring Security 2.0 之前,保护 MethodInvocation 需要大量的公式化配置。现在推荐的方法安全方式是使用命名空间配置。通过这种方式,方法安全基础设施 beans 将自动配置,因此实际上不需要了解实现类。我们将简要介绍这里涉及的类。
方法安全是使用一个 MethodSecurityInterceptor 来实现的,它保护 MethodInvocation。根据配置方法,一个拦截器可能是特定于一个 bean 的,也可能是在多个 beans 之间共享的。拦截器使用一个 MethodSecurityMetadataSource 实例来获取应用于特定方法调用的配置属性。MapBasedMethodSecurityMetadataSource 用于存储由方法名(可以是通配符)键入的配置属性,当使用 元素在应用程序上下文中定义属性时,将在内部使用这些属性。其他实现将用于处理基于注解的配置。
显式 MethodSecurityInterceptor 配置

当然,可以在的应用程序上下文中直接配置一个 MethodSecurityIterceptor 来使用 Spring AOP 的代理机制:

1
2
3
4
5
6
7
8
9
10
11
12
13
<project>
<bean id="bankManagerSecurity" class="org.springframework.security.access.intercept.aopalliance.MethodSecurityInterceptor">
<property name="authenticationManager" ref="authenticationManager"/>
<property name="accessDecisionManager" ref="accessDecisionManager"/>
<property name="afterInvocationManager" ref="afterInvocationManager"/>
<property name="securityMetadataSource">
<sec:method-security-metadata-source>
<sec:protect method="com.mycompany.BankManager.delete*" access="ROLE_SUPERVISOR"/>
<sec:protect method="com.mycompany.BankManager.getBalance" access="ROLE_TELLER,ROLE_SUPERVISOR"/>
</sec:method-security-metadata-source>
</property>
</bean>
</project>

AspectJ (JoinPoint) 安全拦截器

AspectJ 安全拦截器与上一节讨论的 AOP Alliance 安全拦截器非常相似。实际上,我们只会在这一节中讨论差异。

AspectJ 拦截器被命名为 AspectJSecurityInterceptor。与 AOP Alliance 安全拦截器不同,AOP Alliance 安全拦截器依赖于 Spring 应用程序上下文通过代理编织在安全拦截器中,而 AspectJSecurityInterceptor 则是通过 AspectJ 编译器编织在安全拦截器中。在同一个应用程序中同时使用这两种类型的安全拦截器并不少见,AspectJSecurityInterceptor 用于域对象实例安全,而 AOP Alliance MethodSecurityInterceptor 用于服务层安全。

我们首先考虑如何在 Spring 应用程序上下文中配置 AspectJSecurityInterceptor:

1
2
3
4
5
6
7
8
9
10
11
12
13
<project>
<bean id="bankManagerSecurity" class="org.springframework.security.access.intercept.aspectj.AspectJMethodSecurityInterceptor">
<property name="authenticationManager" ref="authenticationManager"/>
<property name="accessDecisionManager" ref="accessDecisionManager"/>
<property name="afterInvocationManager" ref="afterInvocationManager"/>
<property name="securityMetadataSource">
<sec:method-security-metadata-source>
<sec:protect method="com.mycompany.BankManager.delete*" access="ROLE_SUPERVISOR"/>
<sec:protect method="com.mycompany.BankManager.getBalance" access="ROLE_TELLER,ROLE_SUPERVISOR"/>
</sec:method-security-metadata-source>
</property>
</bean>
</project>

可以看到,除了类名之外,AspectJSecurityInterceptor 与 AOP Alliance 安全拦截器完全相同。实际上,这两个拦截器可以共享同一个 securityMetadataSource,因为 SecurityMetadataSource 使用 java.lang.reflect 方法而不是特定于 AOP 库的类。当然,访问决策可以访问相关的AOP库特定的调用(比如 MethodInvocation或JoinPoint),因此在做出访问决策时可以考虑一系列附加条件(例如方法参数)。

接下来需要定义 AspectJ 方面。例如:

1
2
3
4
5
6
7
8
9
10
11
12
13
14
15
16
17
18
19
20
21
22
23
24
25
26
27
28
29
30
31
32
33
34
35
36
37
38
39
40
41
package org.springframework.security.samples.aspectj;

import org.springframework.security.access.intercept.aspectj.AspectJSecurityInterceptor;
import org.springframework.security.access.intercept.aspectj.AspectJCallback;
import org.springframework.beans.factory.InitializingBean;

public aspect DomainObjectInstanceSecurityAspect implements InitializingBean {

private AspectJSecurityInterceptor securityInterceptor;

pointcut domainObjectInstanceExecution(): target(PersistableEntity)
&& execution(public * *(..)) && !within(DomainObjectInstanceSecurityAspect);

Object around(): domainObjectInstanceExecution() {
if (this.securityInterceptor == null) {
return proceed();
}

AspectJCallback callback = new AspectJCallback() {
public Object proceedWithObject() {
return proceed();
}
};

return this.securityInterceptor.invoke(thisJoinPoint, callback);
}

public AspectJSecurityInterceptor getSecurityInterceptor() {
return securityInterceptor;
}

public void setSecurityInterceptor(AspectJSecurityInterceptor securityInterceptor) {
this.securityInterceptor = securityInterceptor;
}

public void afterPropertiesSet() throws Exception {
if (this.securityInterceptor == null)
throw new IllegalArgumentException("securityInterceptor required");
}
}
}

在上面的示例中,安全拦截器将应用于 PersistableEntity 的每个实例,PersistableEntity 是一个未显示的抽象类(可以使用任何其他喜欢的类或切入点表达式)。对于那些好奇的人来说,AspectJCallback 是必需的,因为 proceed(); 语句只有在 around() 主体中才有特殊意义。AspectJSecurityInterceptor 在希望目标对象继续时调用这个匿名的 AspectJCallback 类。

需要配置 Spring 来加载切面并将它与 AspectJSecurityInterceptor 连接起来。实现这一点的 bean 声明如下所示:

1
2
3
4
5
<bean id="domainObjectInstanceSecurityAspect"
class="security.samples.aspectj.DomainObjectInstanceSecurityAspect"
factory-method="aspectOf">
<property name="securityInterceptor" ref="bankManagerSecurity"/>
</bean>

就这样!现在,可以在应用程序中的任何地方创建 beans,使用我们认为合适的任何方法(例如 new Person();),它们将应用安全拦截器。

方法安全

从 2.0 版本开始,Spring Security 大大改进了对向服务层方法添加安全性的支持。它提供了对 JSR-250 注解安全性以及框架的原始 @Secured 注解的支持。从 3.0 开始,我们还可以使用新的基于表达式的注解。我们可以将安全性应用到单个 bean,使用 intercept-methods 元素来修饰 bean 声明,或者可以使用 AspectJ 风格的切入点来保护整个服务层的多个 beans。

EnableGlobalMethodSecurity

我们可以在任何 @Configuration 实例上使用 @EnableGlobalMethodSecurity 注解来启用基于注解的安全。例如,下面的代码将启用 Spring Security 的 @Secure 注解。

1
2
3
4
@EnableGlobalMethodSecurity(securedEnabled = true)
public class MethodSecurityConfig {
// ...
}

向方法(在类或接口上)添加注解将相应地限制对该方法的访问。Spring Security 的原生注解支持为该方法定义了一组属性。这些将被传递给 AccessDecisionManager,让它做出实际的决定:

1
2
3
4
5
6
7
8
9
10
11
public interface BankService {

@Secured("IS_AUTHENTICATED_ANONYMOUSLY")
public Account readAccount(Long id);

@Secured("IS_AUTHENTICATED_ANONYMOUSLY")
public Account[] findAccounts();

@Secured("ROLE_TELLER")
public Account post(Account account, double amount);
}

可以使用以下命令启用对 JSR-250 注解的支持:

1
2
3
4
@EnableGlobalMethodSecurity(jsr250Enabled = true)
public class MethodSecurityConfig {
// ...
}

这些都是基于标准的,允许应用简单的基于角色的约束,但是没有 Spring Security 的原生注解的能力。要使用新的基于表达式的语法,我们将使用:

1
2
3
4
@EnableGlobalMethodSecurity(prePostEnabled = true)
public class MethodSecurityConfig {
// ...
}

等价的 Java 代码是:

1
2
3
4
5
6
7
8
9
10
11
public interface BankService {

@PreAuthorize("isAnonymous()")
public Account readAccount(Long id);

@PreAuthorize("isAnonymous()")
public Account[] findAccounts();

@PreAuthorize("hasAuthority('ROLE_TELLER')")
public Account post(Account account, double amount);
}

GlobalMethodSecurityConfiguration

有时,我们可能需要执行比使用 @EnableGlobalMethodSecurity 注解所允许的更复杂的操作。对于这些实例,可以扩展 GlobalMethodSecurityConfiguration,以确保 @EnableGlobalMethodSecurity 注解出现在子类中。例如,如果我们想提供一个自定义的 MethodSecurityExpressionHandler,可以使用以下配置:

1
2
3
4
5
6
7
8
@EnableGlobalMethodSecurity(prePostEnabled = true)
public class MethodSecurityConfig extends GlobalMethodSecurityConfiguration {
@Override
protected MethodSecurityExpressionHandler createExpressionHandler() {
// ... create and return custom MethodSecurityExpressionHandler ...
return expressionHandler;
}
}

使用 protect-pointcut 添加安全切入点

protect-pointcut 的用途特别强大,因为它允许我们仅通过一个简单的声明就可以将安全性应用到许多 beans。考虑以下示例:

1
2
3
<global-method-security>
<protect-pointcut expression="execution(* com.mycompany.*Service.*(..))" access="ROLE_USER"/>
</global-method-security>

这将保护在应用程序上下文中声明的 beans 上的所有方法,这些 beans 的类位于 com.mycompany 包中,其类名以 “Service” 结尾。只有具有 ROLE_USER 角色的用户才能调用这些方法。与 URL 匹配一样,在切入点列表中,最具体的匹配必须排在第一位,因为将使用第一个匹配表达式。安全注解优先于切入点。

参考资料

  1. Authorization

Spring Security 为身份验证提供了全面的支持。本文讨论:

架构组件

本节描述了 Spring Security 用于 Servlet 身份验证的主要体系结构组件。

  • SecurityContextHolder - SecurityContextHolder 是 Spring Security 存储身份验证者详细信息的地方。
  • SecurityContext - 从 SecurityContextHolder 中获取,包含当前已验证用户的 Authentication。
  • Authentication - 可以是 AuthenticationManager 的输入,以提供用户提供的用于身份验证的凭据,也可以是 SecurityContext 中的当前用户。
  • GrantedAuthority - 在身份验证中授予主体的权限(即角色、作用域等)。
  • AuthenticationManager - 定义 Spring Security 过滤器如何执行身份验证的 API。
  • ProviderManager - AuthenticationManager 最常见的实现。
  • AuthenticationProvider - 由 ProviderManager 用于执行特定类型的身份验证。
  • 使用 AuthenticationEntryPoint 请求凭据 - 用于从客户端请求凭据(如重定向到登录页面,发送 WWW-Authenticate 响应,等等)。
  • AbstractAuthenticationProcessingFilter - 用于身份验证的基本过滤器。这也很好地说明了身份验证的高级流程以及各个部分是如何协同工作的。

身份验证机制

  • Username and Password - 如何使用用户名/密码进行身份验证。
  • OAuth 2.0 Login - OAuth 2.0 登录使用 OpenID Connect 和非标准 OAuth 2.0 登录(即GitHub)。
  • SAML 2.0 Login - SAML 2.0 登录。
  • Central Authentication Server (CAS) - 中央认证服务器(CAS)支持。
  • Remember Me - 如何记住用户超出会话过期时间。
  • JAAS Authentication - JAAS 身份验证。
  • OpenID - OpenID 身份验证(不要与 OpenID Connect 混淆)
  • Pre-Authentication Scenarios - 使用外部机制(如 SiteMinder 或 Java EE security)进行身份验证,但仍使用 Spring Security 进行授权和防止常见攻击。
  • X509 Authentication - X509 身份验证。

SecurityContextHolder

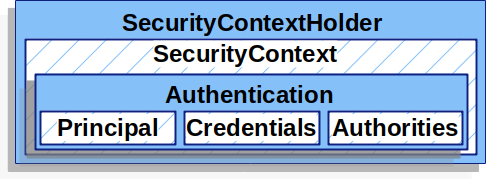
Spring Security 的身份验证模型的核心是 SecurityContextHolder。它包含 SecurityContext。

securitycontextholder

SecurityContextHolder 是 Spring Security 存储身份验证者详细信息的地方。Spring Security 并不关心 SecurityContext 如何填充。如果它包含一个值,那么它将被用作当前经过身份验证的用户。

指示用户已通过身份验证的最简单方法是直接设置 SecurityContextHolder。

1
2
3
4
5
6
SecurityContext context = SecurityContextHolder.createEmptyContext(); 
Authentication authentication =
new TestingAuthenticationToken("username", "password", "ROLE_USER");
context.setAuthentication(authentication);

SecurityContextHolder.setContext(context);
  1. 我们首先创建一个空的 SecurityContext。创建一个新的 SecurityContext 实例而不是使用 SecurityContextHolder.getContext().setAuthentication(authentication) 来避免多线程的竞争条件是很重要的。

  2. 接下来,我们创建一个新的 Authentication 对象。Spring Security 并不关心在 SecurityContext 上设置了什么类型的身份验证实现。这里我们使用 TestingAuthenticationToken,因为它非常简单。更常见的生产场景是 UsernamePasswordAuthenticationToken(userDetails, password, authorities)。

  3. 最后,我们在 SecurityContextHolder 上设置 SecurityContext。Spring Security 将使用这些信息进行授权。

如果希望获得关于经过身份验证的主体的信息,可以通过访问 SecurityContextHolder 来实现。

1
2
3
4
5
SecurityContext context = SecurityContextHolder.getContext();
Authentication authentication = context.getAuthentication();
String username = authentication.getName();
Object principal = authentication.getPrincipal();
Collection<? extends GrantedAuthority> authorities = authentication.getAuthorities();

默认情况下,SecurityContext 使用一个 ThreadLocal 来存储这些细节,这意味着 SecurityContext 始终对同一执行线程中的方法可用,即使 SecurityContext 没有作为参数显式地传递给这些方法。如果在当前主体的请求被处理后小心地清除线程,那么以这种方式使用 ThreadLocal 是非常安全的。Spring Security 的 FilterChainProxy 确保总是清除 SecurityContext。

有些应用程序并不完全适合使用 ThreadLocal,因为它们使用线程的特定方式。例如,Swing 客户端可能希望 Java 虚拟机中的所有线程使用相同的安全上下文。SecurityContext 可以在启动时配置一个策略来指定希望如何存储上下文。对于一个独立的应用程序,将使用 SecurityContextHolder.MODE_GLOBAL 策略。其他应用程序可能希望安全线程派生的线程也具有相同的安全标识。这是通过使用 SecurityContextHolder.MODE_INHERITABLETHREADLOCAL 来实现的。我们有两种方式可以从默认的 SecurityContextHolder.MODE_THREADLOCAL 中更改模式。第一种是设置一个系统属性,第二种是调用 SecurityContextHolder 中的一个静态方法。大多数应用程序不需要更改默认值。

SecurityContext

SecurityContext 是从 SecurityContextHolder 中获取的。SecurityContext 包含 Authentication 对象。

Authentication

在 Spring Security 中,Authentication 有两个主要目的:

  • AuthenticationManager 的输入,用于提供用户提供的用于身份验证的凭据。在此场景中使用时,isAuthenticated() 返回 false。
  • 表示当前经过身份验证的用户。可以从 SecurityContext 中获取当前身份验证。

Authentication 包含:

  • principal(主体) - 标识用户。在使用用户名/密码进行身份验证时,这通常是 UserDetails 的一个实例。
  • credentials(凭证) - 通常是密码。在许多情况下,在对用户进行身份验证以确保其不被泄漏之后,会清除此信息。
  • authorities(权限) - GrantedAuthoritys 是授予用户的高级权限。一些例子是 roles(角色) 或 scopes(范围)。

GrantedAuthority

GrantedAuthoritys 是授予用户的高级权限。一些例子是角色或范围。

可以通过 Authentication.getAuthorities() 方法获得 GrantedAuthoritys。此方法提供 GrantedAuthority 对象的集合。GrantedAuthority 是授予主体的权力,这并不奇怪。这些权限通常是“角色”,例如 ROLE_ADMINISTRATOR 或 ROLE_HR_SUPERVISOR。稍后将为 web 授权、方法授权和域对象授权配置这些角色。Spring Security 的其他部分能够解读这些权限,并期待它们的出现。当使用基于用户名/密码的身份验证时,GrantedAuthoritys 通常由 UserDetailsService 加载。

通常,GrantedAuthority 对象是应用程序范围的权限。它们并不特定于给定的域对象。因此,我们可能没有 GrantedAuthority 来表示对 Employee 对象编号 54 的权限,因为如果有成千上万个这样的权限,那么很快就会耗尽内存(或者,至少会导致应用程序需要很长时间来验证用户)。当然,Spring Security 是专门为处理这一常见需求而设计的,但是我们应该使用项目的域对象安全功能来实现这一目的。

AuthenticationManager

AuthenticationManager 是定义 Spring Security 过滤器如何执行身份验证的 API。然后,由调用 AuthenticationManager 的控制器(如 Spring Security的过滤器)在 SecurityContextHolder 上设置返回的 Authentication 。如果没有与 Spring Security 的过滤器集成,可以直接设置 SecurityContextHolder,不需要使用 AuthenticationManager。

虽然 AuthenticationManager 的实现可以是任何东西,但最常见的实现是 ProviderManager。

ProviderManager

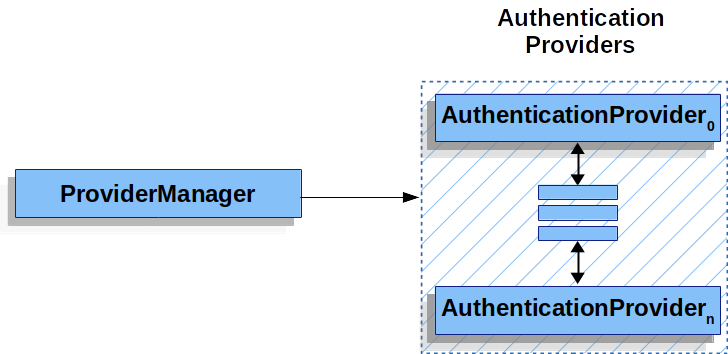
ProviderManager 是 AuthenticationManager 最常用的实现。ProviderManager 委托给 AuthenticationProviders 列表。每个 AuthenticationProvider 都有机会指示身份验证应成功、失败,或指示它无法做出决定,并允许下游的 AuthenticationProvider 做出决定。如果配置的 AuthenticationProvider 都不能进行身份验证,则身份验证将失败,并抛出 ProviderNotFoundException,这是一个特殊的 AuthenticationException,表示 ProviderManager 不支持传递给它的 Authentication 类型。

providermanager

实际上,每个 AuthenticationProvider 都知道如何执行特定类型的身份验证。例如,一个 AuthenticationProvider 可能能够验证用户名/密码,而另一个可能能够验证 SAML 断言。这允许每个 AuthenticationProvider 执行非常特定的身份验证类型,同时支持多种类型的身份验证,并且只公开一个 AuthenticationManager bean。

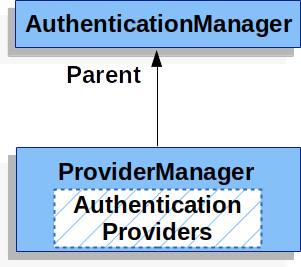
ProviderManager 还允许配置可选的父 AuthenticationManager,如果没有 AuthenticationProvider 可以执行身份验证,就会咨询它。父类可以是任何类型的 AuthenticationManager,但它通常是 ProviderManager 的实例。

providermanager-parent

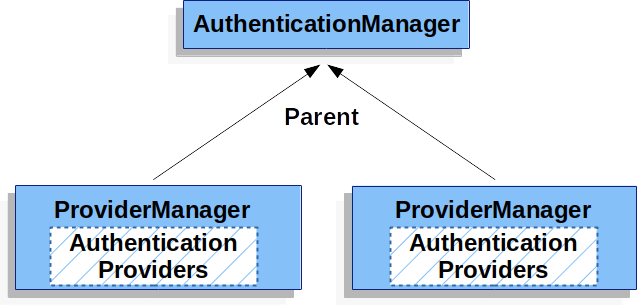
实际上,多个 ProviderManager 实例可能共享同一个父 AuthenticationManager。这在有多个 SecurityFilterChain 实例的场景中比较常见,这些实例有一些共同的身份验证(共享的父 AuthenticationManager),但也有不同的身份验证机制(不同的 ProviderManager实例)。

providermanagers-parent

默认情况下,ProviderManager 将尝试从成功的身份验证请求返回的 Authentication 对象中清除任何敏感的凭据信息。这可以防止密码等信息在 HttpSession 中保留的时间超过必要的时间。

当使用用户对象的缓存来提高无状态应用程序的性能时,这可能会导致问题。如果 Authentication 包含对缓存中某个对象的引用(例如 UserDetails 实例),并且该对象的凭据已被删除,那么将无法根据缓存的值进行身份验证。如果使用缓存,则需要考虑到这一点。一个明显的解决方案是,首先在缓存实现中或在创建返回的 Authentication 对象的 AuthenticationProvider 中创建对象的副本。或者,可以禁用 ProviderManager 的 eraseCredentialsAfterAuthentication 属性。

AuthenticationProvider

可以将多个 AuthenticationProvider 注入到 ProviderManager 中。每个 AuthenticationProvider 执行特定类型的身份验证。例如,DaoAuthenticationProvider 支持基于用户名/密码的身份验证,而 JwtAuthenticationProvider 支持对 JWT 令牌进行身份验证。

使用 AuthenticationEntryPoint 请求凭据

AuthenticationEntryPoint 用于发送从客户端请求凭据的 HTTP 响应。

有时,客户端会主动包含凭据,如用于请求资源的用户名/密码。在这些情况下,Spring Security 不需要提供一个HTTP响应来请求来自客户机的凭据,因为它们已经包含在内了。

在其他情况下,客户端将向未经授权访问的资源发出未经身份验证的请求。在这种情况下,AuthenticationEntryPoint 的实现用于从客户端请求凭据。AuthenticationEntryPoint 实现可以重定向到登录页面,使用 WWW-Authenticate header 响应,等等。

AbstractAuthenticationProcessingFilter

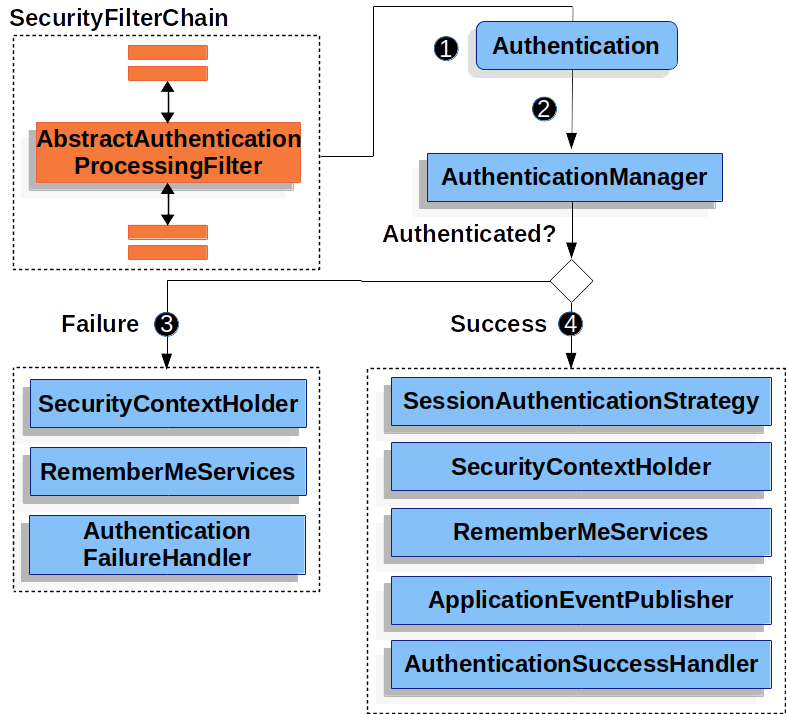
AbstractAuthenticationProcessingFilter 用作验证用户凭证的基本过滤器。在认证凭证之前,Spring Security 通常使用 AuthenticationEntryPoint 请求凭证。

接下来,AbstractAuthenticationProcessingFilter 可以对提交给它的任何身份验证请求进行身份验证。

abstractauthenticationprocessingfilter

  1. 当用户提交其凭据时,AbstractAuthenticationProcessingFilter 将从要进行身份验证的 HttpServletRequest 创建 Authentication。创建的 Authentication 的类型取决于 AbstractAuthenticationProcessingFilter 的子类。例如,UsernamePasswordAuthenticationFilter 根据在 HttpServletRequest 中提交的用户名和密码创建 UsernamePasswordAuthenticationToken。

  2. 接下来,将 Authentication 传递到 AuthenticationManager 以进行身份验证。

  3. 如果验证失败,则失败

    • SecurityContextHolder 清除。
    • RememberMeServices.loginFail 被调用。如果没有配置 remember me,这是一个 no-op。
    • AuthenticationFailureHandler 被调用。
  4. 如果认证成功,则成功。

    • SessionAuthenticationStrategy 收到新登录的通知。
    • 在 SecurityContextHolder 中设置 Authentication。稍后 SecurityContextPersistenceFilter 将 SecurityContext 保存到 HttpSession 中。
    • RememberMeServices.loginSuccess 被调用。如果没有配置 remember me,这是一个 no-op。
    • ApplicationEventPublisher 发布 InteractiveAuthenticationSuccessEvent。

用户名/密码身份验证

验证用户身份最常用的方法之一是验证用户名和密码。因此,Spring Security 为使用用户名和密码进行身份验证提供了全面的支持。

读取用户名和密码

Spring Security 提供了以下内置机制,用于从 HttpServletRequest 读取用户名和密码:

  • 表单登录
  • Basic 身份验证
  • Digest 身份验证

存储机制
每种支持的读取用户名和密码的机制都可以利用任何支持的存储机制:

  • 具有内存内身份验证的简单存储
  • 具有 JDBC 身份验证的关系数据库
  • 带有 UserDetailsService 的自定义数据存储
  • 具有 LDAP 身份验证的 LDAP 存储

表单登录

Spring Security 支持通过 html 表单提供用户名和密码。本节详细介绍了Spring Security中基于表单的身份验证的工作原理。

让我们看看在 Spring Security 中基于表单的登录是如何工作的。首先,我们将看到如何将用户重定向到登录表单。

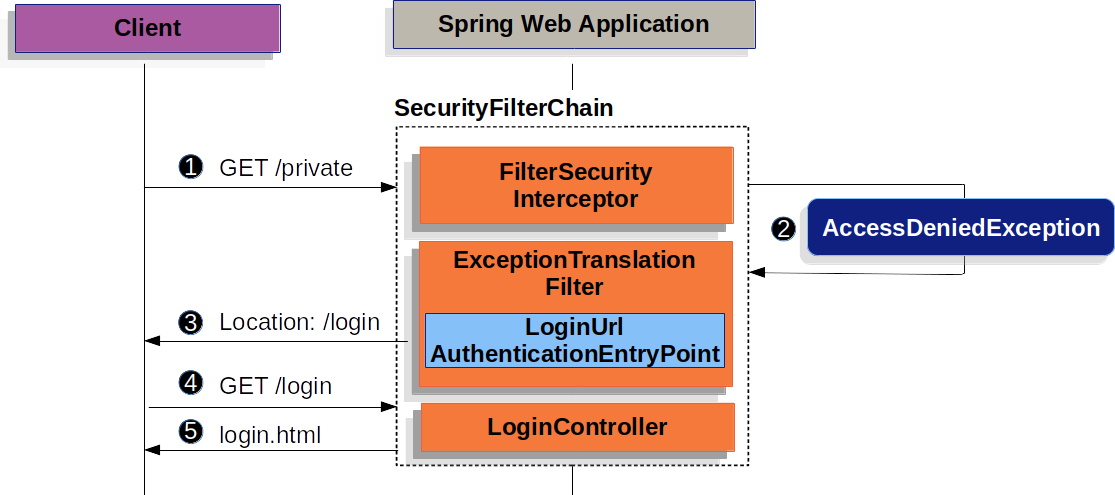
loginurlauthenticationentrypoint

  1. 首先,用户向未经授权的 resource /private 发出未经身份验证的请求。

  2. Spring Security 的 FilterSecurityInterceptor 表示通过抛出 AccessDeniedException 来拒绝未经身份验证的请求。

  3. 因为用户没有经过身份验证,ExceptionTranslationFilter 将启动身份验证,并使用配置的 AuthenticationEntryPoint 发送重定向到登录页。在大多数情况下,AuthenticationEntryPoint 是 LoginUrlAuthenticationEntryPoint 的实例。

  4. 然后浏览器将请求重定向到的登录页。

  5. 在应用程序中,必须呈现登录页面。

提交用户名和密码时,UsernamePasswordAuthenticationFilter 将验证用户名和密码。UsernamePasswordAuthenticationFilter 扩展了 AbstractAuthenticationProcessingFilter,所以这个关系图应该看起来非常类似。

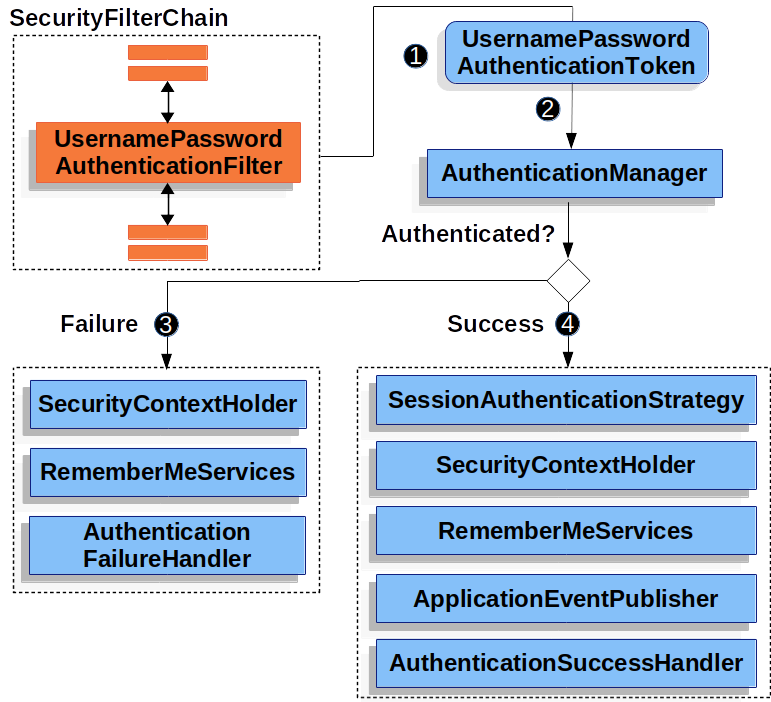
usernamepasswordauthenticationfilter

  1. 当用户提交用户名和密码时,UsernamePasswordAuthenticationFilter 将从 HttpServletRequest 中提取用户名和密码,从而创建一个 UsernamePasswordAuthenticationToken,它是一种 Authentication 类型。

  2. 接下来,将 UsernamePasswordAuthenticationToken 传递到 AuthenticationManager 进行身份验证。AuthenticationManager 的详细信息取决于用户信息的存储方式。

  3. 如果验证失败,则失败。

    • SecurityContextHolder 清除。
    • RememberMeServices.loginFail 被调用。如果没有配置 remember me,这是一个 no-op。
    • AuthenticationFailureHandler 被调用。
  4. 如果认证成功,则成功。

    • SessionAuthenticationStrategy 收到新登录的通知。
    • 在 SecurityContextHolder 中设置 Authentication。
    • RememberMeServices.loginSuccess 被调用。如果没有配置 remember me,这是一个 no-op。
    • ApplicationEventPublisher 发布 InteractiveAuthenticationSuccessEvent。
    • 调用 AuthenticationSuccessHandler。通常这是一个 SimpleUrlAuthenticationSuccessHandler,当我们重定向到登录页面时,它会重定向到 ExceptionTranslationFilter 保存的请求。

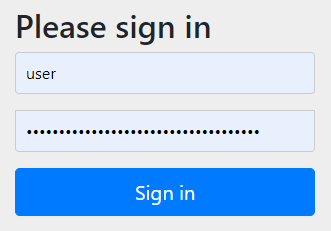
默认情况下启用了 Spring Security 表单登录。但是,一旦提供了任何基于 servlet 的配置,就必须显式地提供基于表单的登录。一个最小的、显式的 Java 配置可以在下面找到:

1
2
3
4
5
protected void configure(HttpSecurity http) {
http
// ...
.formLogin(withDefaults());
}

在这个配置中,Spring Security 将呈现一个默认的登录页面。大多数生产应用程序将需要自定义登录表单。

下面的配置演示如何提供自定义登录表单。

1
2
3
4
5
6
7
8
protected void configure(HttpSecurity http) throws Exception {
http
// ...
.formLogin(form -> form
.loginPage("/login")
.permitAll()
);
}

当在 Spring Security 配置中指定登录页面时,我们将负责呈现页面。下面是一个 Thymeleaf 模板,它生成一个符合 /login 登录页面的 HTML 登录表单。

1
2
3
4
5
6
7
8
9
10
11
12
13
14
15
16
17
18
19
20
<!DOCTYPE html>
<html xmlns="http://www.w3.org/1999/xhtml" xmlns:th="https://www.thymeleaf.org">
<head>
<title>Please Log In</title>
</head>
<body>
<h1>Please Log In</h1>
<div th:if="${param.error}">Invalid username and password.</div>
<div th:if="${param.logout}">You have been logged out.</div>
<form th:action="@{/login}" method="post">
<div>
<input type="text" name="username" placeholder="Username"/>
</div>
<div>
<input type="password" name="password" placeholder="Password"/>
</div>
<input type="submit" value="Log in" />
</form>
</body>
</html>

关于默认的 HTML 表单有以下几点要点:

  • 表单应该执行 post 到 /login
  • 该表单需要包含一个 CSRF 令牌,该令牌由 Thymeleaf 自动包含
  • 表单应该在名为 username 的参数中指定用户名
  • 表单应该在名为 password 的参数中指定密码
  • 如果发现 HTTP 参数错误,则表示用户未能提供有效的用户名/密码
  • 如果找到 HTTP 参数 logout,则表示用户已成功注销

许多用户只需要自定义登录页面即可。但是,如果需要,以上所有内容都可以通过附加配置进行定制。

如果正在使用Spring MVC,那么将需要一个将 GET /login 映射到我们创建的登录模板的 controller。LoginController 最小示例如下所示:

1
2
3
4
5
6
7
@Controller
class LoginController {
@GetMapping("/login")
String login() {
return "login";
}
}

Basic 身份验证

本节详细介绍 Spring Security 如何为基于 servlet 的应用程序提供对 Basic HTTP 身份验证的支持。

让我们看看 HTTP Basic 身份验证在 Spring Security 中是如何工作的。首先,我们看到 WWW-Authenticate header 被发送回未经身份验证的客户端。

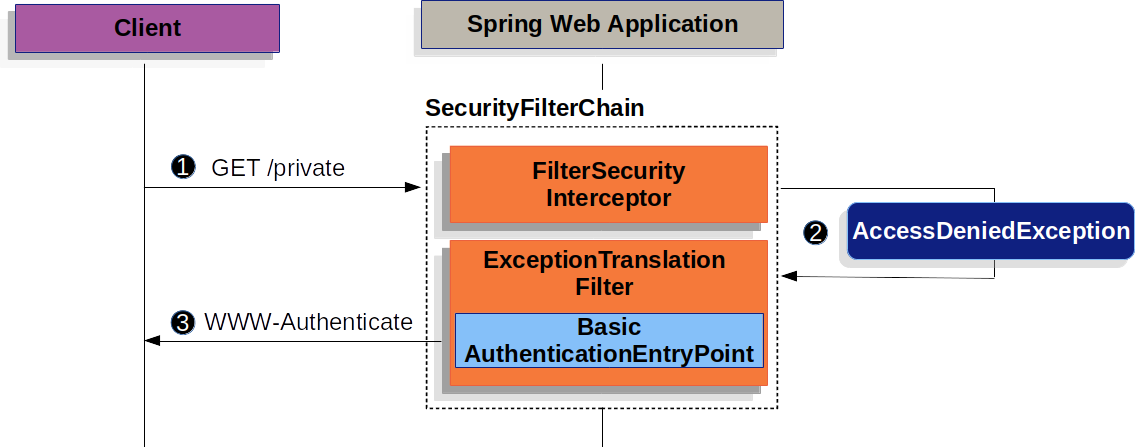
basicauthenticationentrypoint

  1. 首先,用户向未授权的 resource /private 发出未经身份验证的请求。

  2. Spring Security 的 FilterSecurityInterceptor 表示通过抛出 AccessDeniedException 来拒绝未经身份验证的请求。

  3. 因为用户没有经过身份验证,ExceptionTranslationFilter 将启动身份验证。配置的 AuthenticationEntryPoint 是一个 BasicAuthenticationEntryPoint 实例,它发送一个 WWW-Authenticate header。RequestCache 通常是一个 NullRequestCache,它不保存请求,因为客户端能够重放它最初请求的请求。

当客户端收到 WWW-Authenticate header 时,它知道应该使用用户名和密码重试。下面是正在处理的用户名和密码流程。

basicauthenticationentrypoint

  1. 当用户提交用户名和密码时,UsernamePasswordAuthenticationFilter 将从 HttpServletRequest 中提取用户名和密码,从而创建一个 UsernamePasswordAuthenticationToken,它是一种 Authentication 类型。

  2. 接下来,将 UsernamePasswordAuthenticationToken 传递到 AuthenticationManager 进行身份验证。AuthenticationManager 的详细信息取决于用户信息的存储方式。

  3. 如果验证失败,则失败。

    • SecurityContextHolder 清除。
    • RememberMeServices.loginFail 被调用。如果没有配置 remember me,这是一个 no-op。
    • 调用 AuthenticationEntryPoint 来触发再次发送 WWW-Authenticate。
  4. 如果认证成功,则成功。

    • 在 SecurityContextHolder 中设置 Authentication。
    • RememberMeServices.loginSuccess 被调用。如果没有配置 remember me,这是一个 no-op。
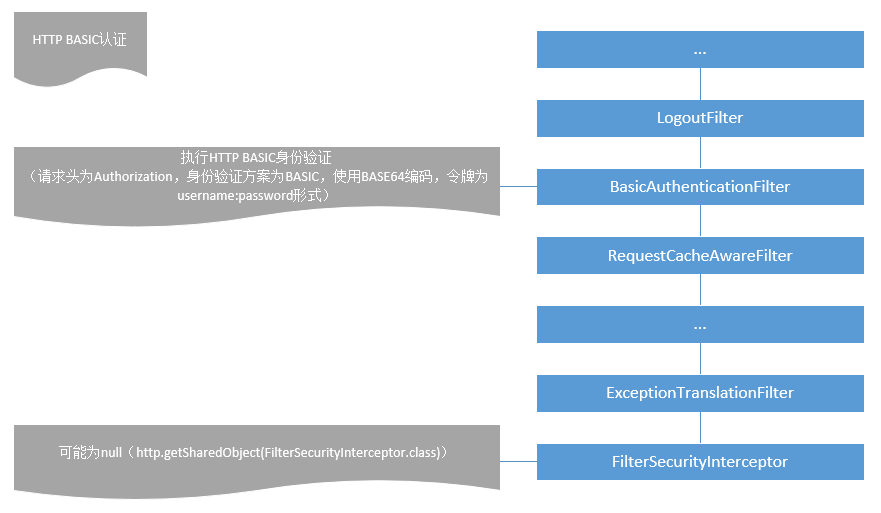
    • BasicAuthenticationFilter 调用 FilterChain.doFilter(request,response) 来继续应用程序逻辑的其余部分。

默认情况下,Spring Security 的 HTTP Basic 身份验证支持处于启用状态。但是,一旦提供了任何基于 servlet 的配置,就必须显式地提供 HTTP Basic。

可以在下面找到最小的显式配置:

1
2
3
4
5
protected void configure(HttpSecurity http) {
http
// ...
.httpBasic(withDefaults());
}

Digest 身份验证

不应该在现代应用程序中使用 Digest 身份验证,因为它被认为是不安全的。最明显的问题是,必须以明文、加密或 MD5 格式存储密码。所有这些存储格式都被认为是不安全的。相反,应该使用一种单向自适应密码散列(如 bCrypt、PBKDF2、SCrypt 等)来存储凭证,这种方式不受 Digest 身份验证的支持。

In-Memory 身份验证

Spring Security的 InMemoryUserDetailsManager 实现了UserDetailsService,以支持在内存中检索的基于用户名/密码的身份验证。InMemoryUserDetailsManager 通过实现 UserDetailsManager 接口提供对用户详细信息的管理。当 Spring Security 配置为接受用户名/密码进行身份验证时,它将使用基于 UserDetails 的身份验证。

在本例中,我们使用 Spring Boot CLI 对 password 的密码进行编码,得到的编码密码为 {bcrypt}$2a$10$GRLdNijSQMUvl/au9ofL.eDwmoohzzS7.rmNSJZ.0FxO/BTk76klW。

1
2
3
4
5
6
7
8
9
10
11
12
13
14
@Bean
public UserDetailsService users() {
UserDetails user = User.builder()
.username("user")
.password("{bcrypt}$2a$10$GRLdNijSQMUvl/au9ofL.eDwmoohzzS7.rmNSJZ.0FxO/BTk76klW")
.roles("USER")
.build();
UserDetails admin = User.builder()
.username("admin")
.password("{bcrypt}$2a$10$GRLdNijSQMUvl/au9ofL.eDwmoohzzS7.rmNSJZ.0FxO/BTk76klW")
.roles("USER", "ADMIN")
.build();
return new InMemoryUserDetailsManager(user, admin);
}

上面的示例以安全格式存储密码,但是在入门体验方面还有很多需要改进的地方。

在下面的示例中,我们利用 User.withDefaultPasswordEncoder 来确保存储在内存中的密码是受保护的。但是,它不能保护密码不被反编译源代码而获得密码。因此,User.withDefaultPasswordEncoder 应仅用于“入门”,而不用于生产。

1
2
3
4
5
6
7
8
9
10
11
12
13
14
15
16
@Bean
public UserDetailsService users() {
// The builder will ensure the passwords are encoded before saving in memory
UserBuilder users = User.withDefaultPasswordEncoder();
UserDetails user = users
.username("user")
.password("password")
.roles("USER")
.build();
UserDetails user = users
.username("admin")
.password("password")
.roles("USER", "ADMIN")
.build();
return new InMemoryUserDetailsManager(user, admin);
}

JDBC 身份验证

Spring Security 的 JdbcDaoImpl 实现了 UserDetailsService,为使用 JDBC 检索的基于用户名/密码的身份验证提供支持。JdbcUserDetailsManager 扩展了 JdbcDaoImpl,通过 UserDetailsManager 接口提供对用户详细信息的管理。当 Spring Security 配置为接受用户名/密码进行身份验证时,它将使用基于 UserDetails 的身份验证。

默认 Schema

Spring Security 为基于 JDBC 的身份验证提供默认查询。本节提供与默认查询一起使用的相应默认 schemas。我们将需要调整此 schema,使其与使用的任何自定义的查询和数据库方言匹配。

用户 Schema

JdbcDaoImpl 要求使用表来加载用户的密码、帐户状态(启用或禁用)和权限(角色)列表。下面可以找到所需的默认 schema。

1
2
3
4
5
6
7
8
9
10
11
12
13
14
15
16
17
create table users
(
username varchar(50) not null comment '用户名',
password varchar(100) not null comment '密码',
enabled bit(1) not null comment '是否启用',
PRIMARY KEY (`username`)
) ENGINE = InnoDB
DEFAULT CHARSET = utf8mb4
COLLATE = utf8mb4_0900_ai_ci;

create table authorities
(
username varchar(50) not null comment '用户名',
authority varchar(255) not null comment '权限'
) ENGINE = InnoDB
DEFAULT CHARSET = utf8mb4
COLLATE = utf8mb4_0900_ai_ci;

默认 schema 还公开为名为 org/springframework/security/core/userdetails/jdbc/users.ddl 的类路径资源。

用户组 Schema

如果应用程序正在使用用户组,则需要提供用户组 schema。可以在下面找到组的默认 schema。

1
2
3
4
5
6
7
8
9
10
11
12
13
14
15
16
17
18
19
20
21
22
23
24
25
26
create table `groups`
(
id bigint AUTO_INCREMENT not null comment '主键',
group_name varchar(50) not null comment '用户组名',
PRIMARY KEY (`id`)
) ENGINE = InnoDB
DEFAULT CHARSET = utf8mb4
COLLATE = utf8mb4_0900_ai_ci;

create table group_authorities
(
group_id bigint not null comment '用户组id',
authority varchar(255) not null comment '用户组权限'
) ENGINE = InnoDB
DEFAULT CHARSET = utf8mb4
COLLATE = utf8mb4_0900_ai_ci;

create table group_members
(
id bigint AUTO_INCREMENT not null comment '主键',
username varchar(50) not null comment '用户名',
group_id bigint not null comment '用户组id',
PRIMARY KEY (`id`)
) ENGINE = InnoDB
DEFAULT CHARSET = utf8mb4
COLLATE = utf8mb4_0900_ai_ci;

Setting up a DataSource

在配置 JdbcUserDetailsManager 之前,必须创建一个 DataSource。

JdbcUserDetailsManager Bean

在本例中,我们使用 Spring Boot CLI 对 password 的密码进行编码,得到的编码密码为 {bcrypt}$2a$10$GRLdNijSQMUvl/au9ofL.eDwmoohzzS7.rmNSJZ.0FxO/BTk76klW。

1
2
3
4
5
6
7
8
9
10
11
12
13
14
15
@Bean
UserDetailsManager users(DataSource dataSource) {
UserDetails user = User.builder()
.username("user")
.password("{bcrypt}$2a$10$GRLdNijSQMUvl/au9ofL.eDwmoohzzS7.rmNSJZ.0FxO/BTk76klW")
.roles("USER")
.build();
UserDetails admin = User.builder()
.username("admin")
.password("{bcrypt}$2a$10$GRLdNijSQMUvl/au9ofL.eDwmoohzzS7.rmNSJZ.0FxO/BTk76klW")
.roles("USER", "ADMIN")
.build();
JdbcUserDetailsManager users = new JdbcUserDetailsManager(dataSource);
users.createUser()
}

UserDetails

UserDetails 由 UserDetailsService 返回。DaoAuthenticationProvider 验证 UserDetails,然后返回一个 Authentication,该 Authentication 的主体是由已配置的 UserDetailsService 返回的 UserDetails。

UserDetailsService

DaoAuthenticationProvider 使用 UserDetailsService 检索用户名、密码和其他用于使用用户名和密码进行身份验证的属性。Spring Security 提供了 UserDetailsService 的内存和 JDBC 实现。

通过将自定义的 UserDetailsService 公开为 bean,可以定义自定义身份验证。例如,假设 CustomUserDetailsService 实现了 UserDetailsService,则以下内容将自定义身份验证:

1
2
3
4
@Bean
CustomUserDetailsService customUserDetailsService() {
return new CustomUserDetailsService();
}

注意: 仅当尚未填充 AuthenticationManagerBuilder 且未定义 AuthenticationProviderBean 时才使用此选项。

PasswordEncoder

Spring Security 的 servlet 通过与 PasswordEncoder 集成来支持安全存储密码。可以通过公开 PasswordEncoder Bean 来定制 Spring Security 使用的 PasswordEncoder 实现。

DaoAuthenticationProvider

DaoAuthenticationProvider 是一个 AuthenticationProvider 实现,它利用 UserDetailsService 和 PasswordEncoder 来验证用户名和密码。

让我们来看看 DaoAuthenticationProvider 在 Spring Security 中是如何工作的。该图详细解释了 AuthenticationManager 在读取用户名和密码时的工作方式。

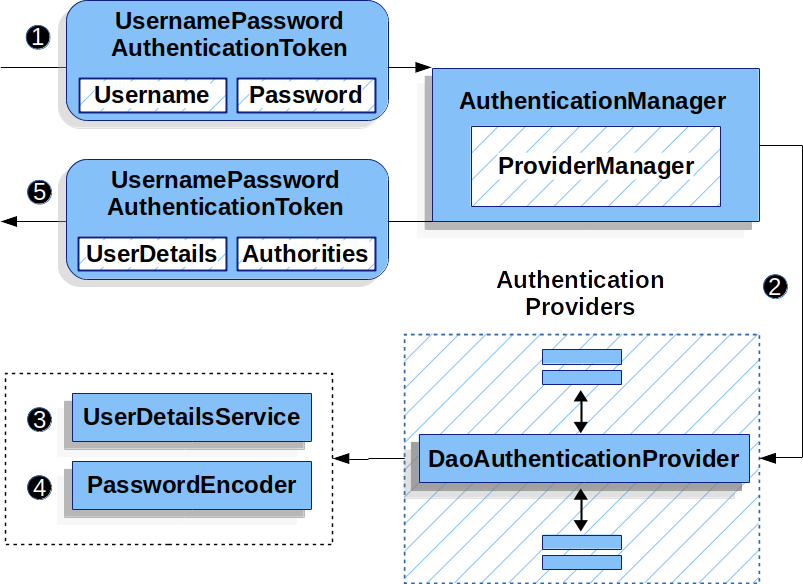
daoauthenticationprovider

  1. 读取用户名和密码的身份验证过滤器将 UsernamePasswordAuthenticationToken 传递给 AuthenticationManager,后者由 ProviderManager 实现。

  2. ProviderManager 被配置为使用 DaoAuthenticationProvider 类型的 AuthenticationProvider。

  3. DaoAuthenticationProvider 从 UserDetailsService 中查找 UserDetails。

  4. DaoAuthenticationProvider 使用 PasswordEncoder 验证上一步返回的用户详细信息上的密码。

  5. 当身份验证成功时,返回的身份验证是 UsernamePasswordAuthenticationToken 类型,其主体是配置的 UserDetailsService 返回的 UserDetails。最终,身份验证过滤器将在 SecurityContextHolder 中设置返回的 UsernamePasswordAuthenticationToken。

会话管理

与 HTTP 会话相关的功能由 SessionManagementFilter 和 SessionAuthenticationStrategy 接口的组合来处理,而 SessionAuthenticationStrategy 接口是由过滤器委托给它的。典型的用法包括会话固定攻击保护、检测会话超时和限制一个经过身份验证的用户可以同时打开多少会话。

检测超时

可以配置 Spring Security 来检测无效会话 ID 的提交,并将用户重定向到适当的 URL。这是通过 session-management 元素实现的:

1
2
3
4
<http>
...
<session-management invalid-session-url="/invalidSession.htm" />
</http>

请注意,如果使用此机制检测会话超时,则如果用户注销然后在不关闭浏览器的情况下重新登录,则可能会错误地报告错误。这是因为当使会话无效时,会话 cookie 未被清除,即使用户已注销,也将重新提交。可以在注销时显式删除 JSESSIONID cookie,例如在注销处理程序中使用以下语法:

1
2
3
<http>
<logout delete-cookies="JSESSIONID" />
</http>

不幸的是,这不能保证对每个 servlet 容器都有效,因此需要在环境中测试它。

并发会话控制

如果希望对单个用户登录应用程序的能力进行限制,Spring Security 通过以下简单的附加功能来提供开箱即用的支持。首先,需要将以下监听器添加到 web.xml 文件中,以保持 Spring Security 更新会话生命周期事件:

1
2
3
4
5
<listener>
<listener-class>
org.springframework.security.web.session.HttpSessionEventPublisher
</listener-class>
</listener>

然后将以下行添加到应用程序上下文中:

1
2
3
4
5
6
<http>
...
<session-management>
<concurrency-control max-sessions="1" />
</session-management>
</http>

这将防止用户多次登录-第二次登录将导致第一次无效。通常,我们希望防止再次登录,在这种情况下,可以使用

1
2
3
4
5
6
<http>
...
<session-management>
<concurrency-control max-sessions="1" error-if-maximum-exceeded="true" />
</session-management>
</http>

第二次登录将被拒绝。“拒绝”是指如果使用基于表单的登录,则用户将被发送到 authentication-failure-url。如果第二次身份验证通过另一个非交互机制(如“remember-me”)进行,则会向客户端发送“unauthorized”(401)错误。如果希望使用错误页面,则可以将属性 session-authentication-error-url 添加到 session-management 元素中。

如果对基于表单的登录使用自定义身份验证过滤器,则必须显式配置并发会话控制支持。

会话固定攻击保护

会话固定攻击是一种潜在的风险,恶意攻击者可能通过访问站点来创建会话,然后说服另一个用户使用相同的会话进行登录(例如,通过向他们发送包含会话标识符作为参数的链接)。Spring Security 通过创建新会话或在用户登录时更改会话 ID 来自动防止这种情况。如果不需要这种保护,或者它与其他一些需求相冲突,可以使用 上的 session-fixation-protection 属性来控制行为,该属性有四个选项:

  • none - 什么都不要做。原始会话将被保留。
  • newSession - 创建一个新的“干净”的会话,而不复制现有会话数据(仍将复制与 Spring Security-related 属性)。
  • migrateSession - 创建新会话,并将所有现有会话属性复制到新会话。这是 Servlet3.0 或更早版本容器中的默认设置。
  • changeSessionId - 不创建新会话。相反,使用 Servlet 容器(HttpServletRequest#changeSessionId())提供的会话固定保护。此选项仅在 Servlet 3.1 (Java EE 7) 和更新的容器中可用。在旧的容器中指定它将导致异常。这是 Servlet 3.1 和更新的容器中的默认值。

当会话固定保护发生时,它将导致在应用程序上下文中发布 SessionFixationProtectionEvent。如果使用 changeSessionId,此保护还将导致任何 javax.servlet.http.HttpSessionIdListener 将被通知,因此如果代码同时监听这两个事件,需谨慎使用。

SessionManagementFilter

SessionManagementFilter 根据 SecurityContextHolder 的当前内容检查 SecurityContextRepository 的内容,以确定用户在当前请求期间是否已通过身份验证,通常是通过非交互式身份验证机制,如 pre-authentication 或 remember-me。如果存储库包含安全上下文,则过滤器不执行任何操作。如果没有,并且线程本地 SecurityContext 包含一个(非匿名)身份验证对象,则过滤器假定它们已由堆栈中的前一个过滤器验证过。然后,它将调用已配置的 SessionAuthenticationStrategy。

如果用户当前未通过身份验证,则过滤器将检查是否请求了无效的会话 ID(例如,由于超时),并将调用配置的 InvalidSessionStrategy(如果已设置)。最常见的行为只是重定向到一个固定的 URL,它被封装在标准实现 SimpleRedirectInvalidSessionStrategy 中。如前所述,在通过命名空间配置无效会话 URL 时也使用后者。

SessionAuthenticationStrategy

SessionAuthenticationStrategy 由 SessionManagementFilter 和 AbstractAuthenticationProcessingFilter 共同使用,因此,如果使用自定义的表单登录类,例如,需要将它注入到这两个类中。在本例中,将命名空间和自定义 beans 组合在一起的典型配置可能如下所示:

1
2
3
4
5
6
7
8
9
10
11
12
13
<project>
<http>
<custom-filter position="FORM_LOGIN_FILTER" ref="myAuthFilter" />
<session-management session-authentication-strategy-ref="sas"/>
</http>

<beans:bean id="myAuthFilter" class="org.springframework.security.web.authentication.UsernamePasswordAuthenticationFilter">
<beans:property name="sessionAuthenticationStrategy" ref="sas" />
...
</beans:bean>

<beans:bean id="sas" class="org.springframework.security.web.authentication.session.SessionFixationProtectionStrategy" />
</project>

注意,如果在实现 HttpSessionBindingListener 的会话中存储 beans(包括 Spring session-scoped beans),则使用默认的 SessionFixationProtectionStrategy 可能会导致问题。

并发控制

Spring Security 能够防止主体对同一个应用程序同时进行身份验证的次数超过指定的次数。许多 ISVs 利用这一点来加强授权,而网络管理员喜欢这个特性,因为它有助于防止人们共享登录名。例如,我们可以阻止用户“Batman”从两个不同的会话登录到 web 应用程序。我们可以终止他们以前的登录,也可以在他们再次尝试登录时报告错误,以阻止第二次登录。注意,如果使用第二种方法,未显式注销(例如,刚刚关闭浏览器的用户)的用户将无法再次登录,直到其原始会话过期。

命名空间支持并发控制。

该实现使用 SessionAuthenticationStrategy 的专用版本,称为 ConcurrentSessionControlAuthenticationStrategy。

要启用并发会话支持,需要将以下内容添加到 web.xml:

1
2
3
4
5
<listener>
<listener-class>
org.springframework.security.web.session.HttpSessionEventPublisher
</listener-class>
</listener>

此外,还需要将 ConcurrentSessionFilter 添加到 FilterChainProxy 中。ConcurrentSessionFilter
需要两个构造函数参数 sessionRegistry(通常指向 SessionRegistryImpl 的实例) 和 sessionInformationExpiredStrategy(定义会话过期时要应用的策略)。
使用命名空间创建 FilterChainProxy 和其他默认 beans 的配置可能如下所示:

1
2
3
4
5
6
7
8
9
10
11
12
13
14
15
16
17
18
19
20
21
22
23
24
25
26
27
28
29
30
31
32
33
34
35
36
37
38
39
40
41
<project>
<http>
<custom-filter position="CONCURRENT_SESSION_FILTER" ref="concurrencyFilter" />
<custom-filter position="FORM_LOGIN_FILTER" ref="myAuthFilter" />

<session-management session-authentication-strategy-ref="sas"/>
</http>

<beans:bean id="redirectSessionInformationExpiredStrategy" class="org.springframework.security.web.session.SimpleRedirectSessionInformationExpiredStrategy">
<beans:constructor-arg name="invalidSessionUrl" value="/session-expired.htm" />
</beans:bean>

<beans:bean id="concurrencyFilter" class="org.springframework.security.web.session.ConcurrentSessionFilter">
<beans:constructor-arg name="sessionRegistry" ref="sessionRegistry" />
<beans:constructor-arg name="sessionInformationExpiredStrategy" ref="redirectSessionInformationExpiredStrategy" />
</beans:bean>

<beans:bean id="myAuthFilter" class="org.springframework.security.web.authentication.UsernamePasswordAuthenticationFilter">
<beans:property name="sessionAuthenticationStrategy" ref="sas" />
<beans:property name="authenticationManager" ref="authenticationManager" />
</beans:bean>

<beans:bean id="sas" class="org.springframework.security.web.authentication.session.CompositeSessionAuthenticationStrategy">
<beans:constructor-arg>
<beans:list>
<beans:bean class="org.springframework.security.web.authentication.session.ConcurrentSessionControlAuthenticationStrategy">
<beans:constructor-arg ref="sessionRegistry"/>
<beans:property name="maximumSessions" value="1" />
<beans:property name="exceptionIfMaximumExceeded" value="true" />
</beans:bean>
<beans:bean class="org.springframework.security.web.authentication.session.SessionFixationProtectionStrategy">
</beans:bean>
<beans:bean class="org.springframework.security.web.authentication.session.RegisterSessionAuthenticationStrategy">
<beans:constructor-arg ref="sessionRegistry"/>
</beans:bean>
</beans:list>
</beans:constructor-arg>
</beans:bean>

<beans:bean id="sessionRegistry" class="org.springframework.security.core.session.SessionRegistryImpl" />
</project>

将监听器添加到 web.xml 会导致每次 HttpSession 开始或终止时,ApplicationEvent 都被发布到 Spring ApplicationContext。这是至关重要的,因为它允许在会话结束时通知 SessionRegistryImpl。没有它,即使用户退出了另一个会话或会话超时,一旦他们超出了会话限额,也将无法再次登录。

在 SessionRegistry 中查询当前经过身份验证的用户及其会话

通过命名空间或使用纯bean设置并发控制有一个有用的副作用,即为您提供对SessionRegistry的引用,您可以直接在应用程序中使用该引用,因此即使您不想限制用户可能拥有的会话数,无论如何,建立基础设施可能是值得的。您可以将maximumSession属性设置为-1以允许无限会话。如果您使用的是命名空间,那么可以使用session registry alias属性为内部创建的SessionRegistry设置别名,提供一个可以注入到您自己的bean中的引用。

getAllPrincipals() 方法提供当前已验证用户的列表。我们可以通过调用 getAllSessions(Object principal, boolean includeExpiredSessions) 方法来列出用户的会话,该方法返回 SessionInformation 对象的列表。还可以通过在 SessionInformation 实例上调用 expireNow() 来终止用户的会话。当用户返回到应用程序时,将阻止他们继续操作。例如,我们可能会发现这些方法在管理应用程序中非常有用。

Remember-Me 身份验证

概述

Remember-me 或 persistent-login 身份验证是指网站能够记住会话之间主体的身份。这通常是通过将 cookie 发送到浏览器来完成的,cookie 将在以后的会话中被检测,并导致自动登录。Spring Security 为这些操作提供了必要的钩子,并且有两个具体的 remember-me 实现。一种使用散列来保护基于 cookie 的令牌的安全性,另一种使用数据库或其他持久存储机制来存储生成的令牌。

注意,这两个实现都需要一个 UserDetailsService。如果我们使用的身份验证提供程序不使用 UserDetailsService(例如,LDAP提供程序),那么除非应用程序上下文中也有 UserDetailsService bean,否则它将无法工作。

基于简单哈希的令牌方法

这种方法使用哈希来实现有用的“remember-me”策略。本质上,cookie 在成功的交互身份验证后发送到浏览器,cookie 的组成如下:

1
2
3
4
5
6
7
base64(username + ":" + expirationTime + ":" +
md5Hex(username + ":" + expirationTime + ":" password + ":" + key))

username: As identifiable to the UserDetailsService
password: That matches the one in the retrieved UserDetails
expirationTime: The date and time when the remember-me token expires, expressed in milliseconds
key: A private key to prevent modification of the remember-me token

因此,remember-me 令牌仅在指定的时间段内有效,前提是用户名、密码和密钥不会更改。值得注意的是,这有一个潜在的安全问题,因为在令牌过期之前,从任何用户代理捕获的 remember-me 令牌都是可用的。这与 digest 身份验证的问题相同。如果主体知道某个令牌已被捕获,则可以轻松更改其密码,并在出现问题时立即使所有“remember-me”令牌失效。如果需要更重要的安全性,则应使用下一节中描述的方法。或者,remember-me 服务根本不应该使用。

如果我们熟悉名称空间配置,只需添加 元素即可启用 remember-me 身份验证:

1
2
3
4
<http>
...
<remember-me key="myAppKey"/>
</http>

通常会自动选择 UserDetailsService。如果应用程序上下文中有多个,则需要指定哪个应该与 user-service-ref 属性一起使用,其值是 UserDetailsService bean 的名称。

持久令牌方法

这种方法基于文章,并做了一些小的修改。若要将此方法用于命名空间配置,需要提供一个数据源引用:

1
2
3
4
<http>
...
<remember-me data-source-ref="someDataSource"/>
</http>

数据库应包含使用以下 SQL(或等效 SQL)创建的持久登录表:

1
2
3
4
create table persistent_logins (username varchar(64) not null,
series varchar(64) primary key,
token varchar(64) not null,
last_used timestamp not null)

Remember-Me 接口和实现

Remember-Me 与 UsernamePasswordAuthenticationFilter 一起使用,并通过 AbstractAuthenticationProcessingFilter 超类中的钩子实现。它也用于 BasicAuthenticationFilter 中。钩子将在适当的时间调用具体的 RememberMeServices。接口如下所示:

1
2
3
4
5
Authentication autoLogin(HttpServletRequest request, HttpServletResponse response);

void loginFail(HttpServletRequest request, HttpServletResponse response);

void loginSuccess(HttpServletRequest request, HttpServletResponse response, Authentication successfulAuthentication);

注意,在这个阶段,AbstractAuthenticationProcessingFilter 只调用 loginFail() 和 loginSuccess() 方法。每当 SecurityContextHolder 不包含身份验证时,RememberAuthenticationFilter 就会调用 autoLogin() 方法。因此,这个接口为底层的 remember-me 实现提供与身份验证相关事件的充分通知,并在候选 web 请求可能包含 cookie 并希望被记住时将其委托给实现。这种设计允许任意数量的“remember-me”实现策略。我们在上面已经看到,Spring Security 提供了两个实现。我们将依次研究这些。

TokenBasedRememberMeServices

这个实现支持基于简单哈希的令牌方法中描述的简单方法。TokenBasedRememberMeServices 生成 RememberAuthenticationToken,由 RememberAuthenticationProvider 处理。此身份验证提供程序和 TokenBasedRememberMeServices 之间共享密钥。此外,TokenBasedRememberMeServices 需要一个 UserDetailsService,它可以从中检索用户名和密码以进行签名比较,并生成 RememberAuthenticationToken 以包含正确的 GrantedAuthority。应用程序应该提供某种注销命令,如果用户请求,该命令将使 cookie 无效。TokenBasedRememberMeServices 还实现了 Spring Security 的 LogoutHandler 接口,因此可以与LogoutFilter一起使用以自动清除 cookie。

应用程序上下文中启用 remember-me 服务所需的 beans 如下:

1
2
3
4
5
6
7
8
9
10
11
12
13
14
15
<project>
<bean id="rememberMeFilter" class="org.springframework.security.web.authentication.rememberme.RememberMeAuthenticationFilter">
<property name="rememberMeServices" ref="rememberMeServices"/>
<property name="authenticationManager" ref="theAuthenticationManager" />
</bean>

<bean id="rememberMeServices" class="org.springframework.security.web.authentication.rememberme.TokenBasedRememberMeServices">
<property name="userDetailsService" ref="myUserDetailsService"/>
<property name="key" value="springRocks"/>
</bean>

<bean id="rememberMeAuthenticationProvider" class="org.springframework.security.authentication.RememberMeAuthenticationProvider">
<property name="key" value="springRocks"/>
</bean>
</project>

不要忘记将 RememberMeServices 实现添加到 UsernamePasswordAuthenticationFilter.setRememberMeServices() 属性中,包括在 AuthenticationManager.setProviders() 列表中添加 RememberMeAuthenticationProvider,并将 RememberMeAuthenticationFilter 添加到 FilterChainProxy 中(通常紧跟在 UsernamePasswordAuthenticationFilter 之后)。

PersistentTokenBasedRememberMeServices

这个类可以与 TokenBasedRememberMeServices 以相同的方式使用,但是它还需要配置一个 PersistentTokenRepository 来存储令牌。有两种标准实现。

  • InMemoryTokenRepositoryImpl 仅用于测试。

  • JdbcTokenRepositoryImpl 它将令牌存储在数据库中。

上面用持久令牌方法描述了数据库模式。

匿名身份验证

概述

采用“deny-by-default”通常被认为是一种良好的安全实践,在这种情况下,可以明确指定允许的内容,而不允许其他任何内容。定义未经身份验证的用户可以访问的内容也是类似的情况,特别是对于 web 应用程序。许多站点要求用户必须对除少数 URLs(例如主页和登录页面)以外的任何内容进行身份验证。在这种情况下,为这些特定的 URLs 定义访问配置属性比为每个受保护的资源定义访问配置属性更容易。换句话说,有时在默认情况下,ROLE_SOMETHING 是必需的,并且只允许此规则的某些例外情况,比如应用程序的登录、注销和主页。也可以完全从过滤器链中忽略这些页面,从而绕过访问控制检查,但是由于其他原因,这可能是不可取的,特别是对于经过身份验证的用户,页面的行为可能有所不同。

这就是我们所说的匿名身份验证。注意,“anonymously authenticated””的用户和未经身份验证的用户之间并没有真正的概念上的区别。Spring Security 的匿名身份验证为我们配置访问控制属性提供了更方便的方法。例如,对诸如 getCallerPrincipal 之类的 servlet API 的调用仍将返回 null,即使 SecurityContextHolder 中实际上有一个匿名身份验证对象。

在其他情况下,匿名身份验证是有用的,例如当审计拦截器查询 SecurityContextHolder 以确定哪个主体负责给定的操作时。如果类知道 SecurityContextHolder 始终包含一个 Authentication 对象,并且从不为 null,那么它们可以更健壮地编写。

配置

使用 HTTP 配置 Spring Security 3.0 时,会自动提供匿名身份验证支持,并且可以使用 元素自定义(或禁用)。除非使用传统的 bean 配置,否则不需要配置这里描述的 beans。

三个类一起提供匿名身份验证功能。AnonymousAuthenticationToken 是 Authentication 的一种实现,它存储应用于匿名主体的授权。
有一个对应的 AnonymousAuthenticationProvider,它被链接到 ProviderManager中,以便接受 AnonymousAuthenticationToken。
最后,还有一个 AnonymousAuthenticationFilter,它在正常的身份验证机制之后被链接起来,如果没有现有的 Authentication,
它会自动将 AnonymousAuthenticationToken 添加到 SecurityContextHolder。过滤器和身份验证提供程序的定义如下所示:

1
2
3
4
5
6
7
8
9
10
<project>
<bean id="anonymousAuthFilter" class="org.springframework.security.web.authentication.AnonymousAuthenticationFilter">
<property name="key" value="foobar"/>
<property name="userAttribute" value="anonymousUser,ROLE_ANONYMOUS"/>
</bean>

<bean id="anonymousAuthenticationProvider" class="org.springframework.security.authentication.AnonymousAuthenticationProvider">
<property name="key" value="foobar"/>
</bean>
</project>

密钥在过滤器和身份验证提供程序之间共享,以便前者创建的令牌被后者接受。userAttribute 以 usernameInTheAuthenticationToken、grantedAuthority 的形式表示。这与 InMemoryDaoImpl 的 userMap 属性的等号后面使用的语法相同。

如前所述,匿名身份验证的好处是,所有 URI 模式都可以对其应用安全性。例如:

1
2
3
4
5
6
7
8
9
10
11
12
13
<bean id="filterSecurityInterceptor" class="org.springframework.security.web.access.intercept.FilterSecurityInterceptor">
<property name="authenticationManager" ref="authenticationManager"/>
<property name="accessDecisionManager" ref="httpRequestAccessDecisionManager"/>
<property name="securityMetadata">
<security:filter-security-metadata-source>
<security:intercept-url pattern='/index.jsp' access='ROLE_ANONYMOUS,ROLE_USER'/>
<security:intercept-url pattern='/hello.htm' access='ROLE_ANONYMOUS,ROLE_USER'/>
<security:intercept-url pattern='/logoff.jsp' access='ROLE_ANONYMOUS,ROLE_USER'/>
<security:intercept-url pattern='/login.jsp' access='ROLE_ANONYMOUS,ROLE_USER'/>
<security:intercept-url pattern='/**' access='ROLE_USER'/>
</security:filter-security-metadata-source>" +
</property>
</bean>

AuthenticationTrustResolver

完成匿名身份验证讨论的是 AuthenticationTrustResolver 接口及其相应的 AuthenticationTrustResolverImpl 实现。这个接口提供了一个 isAnonymous(身份验证)方法,它允许感兴趣的类考虑这种特殊类型的身份验证状态。ExceptionTranslationFilter 在处理 AccessDeniedException 时使用此接口。如果引发 AccessDeniedException,并且身份验证是匿名类型,则过滤器将启动 AuthenticationEntryPoint,以便主体能够正确进行身份验证,而不是引发403(禁止)响应。这是一个必要的区别,否则主体将始终被视为“经过身份验证”,并且永远不会有机会通过表单、basic、digest 或其他一些常规身份验证机制登录。

我们经常会看到上述拦截器配置中的 ROLE_ANONYMOUS 属性被替换为 IS_AUTHENTICATED_ANONYMOUSLY,这实际上与定义访问控制时的情况相同。这是一个使用 AuthenticatedVoter 的示例,我们将在授权一章中看到。它使用 AuthenticationTrustResolver 来处理这个特定的配置属性并将访问权授予匿名用户。AuthenticatedVoter 方式更强大,因为它允许我们区分 anonymous、remember-me 和 fully-authenticated 的用户。如果我们不需要这个功能,那么可以使用ROLE_ANONYMOUS,它将由 Spring Security 的标准 RoleVoter 处理。

预认证场景

在某些情况下,我们希望使用 Spring Security 进行授权,但是用户在访问应用程序之前已经通过了某些外部系统的可靠身份验证。我们将这些情况称为“预认证”场景。示例包括 X.509、Siteminder 和运行应用程序的 Java EE 容器的身份验证。当使用预认证时,Spring Security 必须

  • 确定提出请求的用户。
  • 获取用户的权限。

详细信息将取决于外部身份验证机制。对于 X.509,用户可以通过其证书信息进行标识,对于 Siteminder,可以通过 HTTP 请求头进行标识。如果依赖容器身份验证,则将通过对传入的 HTTP 请求调用 getUserPrincipal() 方法来标识用户。在某些情况下,外部机制可能为用户提供角色/权限信息,但在其他情况下,必须从单独的源(如 UserDetailsService)获取权限。

预认证框架类

因为大多数预认证机制都遵循相同的模式,所以 Spring Security 有一组类,它们为实现预认证认证提供者提供了一个内部框架。这消除了重复,并允许以结构化的方式添加新的实现,而不必从头开始编写所有内容。如果我们想使用像 X.509 身份验证这样的东西,我们不需要知道这些类,因为它已经有一个名称空间配置选项,使用起来更简单。如果我们需要使用显式 bean 配置,或者正在计划编写自己的实现,那么了解所提供的实现是如何工作的将非常有用。我们将在 org.springframework.security.web.authentication.preauth 包下找到类。我们只是在这里提供一个概要。

AbstractPreAuthenticatedProcessingFilter

这个类将检查安全上下文的当前内容,如果为空,则将尝试从 HTTP 请求中提取用户信息并将其提交给 AuthenticationManager。子类重写以下方法以获取此信息:

1
2
3
protected abstract Object getPreAuthenticatedPrincipal(HttpServletRequest request);

protected abstract Object getPreAuthenticatedCredentials(HttpServletRequest request);

调用这些之后,过滤器将创建一个包含返回数据的 PreAuthenticatedAuthenticationToken,并将其提交进行身份验证。这里的“authentication”实际上是指进一步的处理,以加载用户的权限,但是遵循了标准的 Spring Security 身份验证体系结构。

与其他 Spring Security 身份验证过滤器一样,预身份验证过滤器具有 authenticationDetailsSource 属性,默认情况下,该属性将创建一个 WebAuthenticationDetails 对象来存储更多的信息,比如会话标识符和原始IP地址等附加信息。如果用户角色信息可以从预认证机制中获得,则数据也存储在此属性中,详细信息实现 GrantedAuthoritiesContainer 接口。这使身份验证提供者能够读取外部分配给用户的权限。接下来我们会看一个具体的例子。

J2eeBasedPreAuthenticatedWebAuthenticationDetailsSource

如果过滤器配置了 authenticationDetailsSource,而 authenticationDetailsSource 是此类的实例,则通过为每个预定义的“mappable roles”集合调用 isUserInRole(String role) 方法来获取权限信息。类从已配置的 MappableAttributesRetriever 获取这些。可能的实现包括在应用程序上下文中硬编码列表和从 web.xml 文件中的 信息读取角色信息。预认证示例应用程序使用后一种方法。

还有一个额外的阶段,角色(或属性)使用配置的 Attributes2GrantedAuthoritiesMapper 映射到 Spring Security GrantedAuthority 对象。默认设置只是在名称中添加普通的 ROLE_ 前缀,但它可以让我们完全控制行为。

PreAuthenticatedAuthenticationProvider

预验证的提供程序只需为用户加载 UserDetails 对象。它通过委托给 AuthenticationUserDetailsService 来实现这一点。后者类似于标准的 UserDetailsService,但采用 Authentication 对象而不仅仅是用户名:

1
2
3
public interface AuthenticationUserDetailsService {
UserDetails loadUserDetails(Authentication token) throws UsernameNotFoundException;
}

这个接口可能还有其他用途,但是通过预身份验证,它允许访问打包在 Authentication 对象中的权限,正如我们在上一节中看到的那样。PreAuthenticatedGrantedAuthoritiesUserDetailsService 类执行此操作。或者,它可以通过 UserDetailsByNameServiceWrapper 实现委托给标准的 UserDetailsService。

Http403ForbiddenEntryPoint

AuthenticationEntryPoint 负责启动未经身份验证的用户的身份验证过程(当他们试图访问受保护的资源时),但在预身份验证的情况下不适用。如果未将预身份验证与其他身份验证机制结合使用,则只能使用此类的实例配置 ExceptionTranslationFilter。如果用户被 AbstractPreAuthenticatedProcessingFilter 拒绝,导致身份验证为 null,则将调用此方法。如果调用,它总是返回 403 禁止的响应码。

具体实现

X.509 身份验证在其自己的章节中有介绍。在这里,我们将研究一些类,它们为其他预认证场景提供支持。

请求头身份验证(Siteminder)

外部身份验证系统可以通过在 HTTP 请求上设置特定的头向应用程序提供信息。一个著名的例子是 Siteminder,它在一个名为 SM_USER 的 header 中传递用户名。类 RequestHeaderAuthenticationFilter 支持这种机制,它只是从 header 中提取用户名。默认使用名称 SM_USER 作为标题名。

注意: 当使用这样的系统时,框架根本不执行任何身份验证检查,正确配置外部系统并保护对应用程序的所有访问是非常重要的。如果攻击者能够在其原始请求中伪造 headers 而不被检测到,那么他们可以选择任何他们想要的用户名。

Siteminder 示例配置

使用此过滤器的典型配置如下所示:

1
2
3
4
5
6
7
8
9
10
11
12
13
14
15
16
17
18
19
20
21
22
23
<project>
<security:http>
<!-- Additional http configuration omitted -->
<security:custom-filter position="PRE_AUTH_FILTER" ref="siteminderFilter" />
</security:http>

<bean id="siteminderFilter" class="org.springframework.security.web.authentication.preauth.RequestHeaderAuthenticationFilter">
<property name="principalRequestHeader" value="SM_USER"/>
<property name="authenticationManager" ref="authenticationManager" />
</bean>

<bean id="preauthAuthProvider" class="org.springframework.security.web.authentication.preauth.PreAuthenticatedAuthenticationProvider">
<property name="preAuthenticatedUserDetailsService">
<bean id="userDetailsServiceWrapper" class="org.springframework.security.core.userdetails.UserDetailsByNameServiceWrapper">
<property name="userDetailsService" ref="userDetailsService"/>
</bean>
</property>
</bean>

<security:authentication-manager alias="authenticationManager">
<security:authentication-provider ref="preauthAuthProvider" />
</security:authentication-manager>
</project>

我们在这里假设安全命名空间用于配置。还假设已经向配置中添加了一个 UserDetailsService(称为“userDetailsService”),以加载用户的角色。

Java EE 容器身份验证

类 J2eePreAuthenticatedProcessingFilter 将从 HttpServletRequest的userPrincipal 属性中提取用户名。这个过滤器的使用通常与前面在 J2eeBasedPreAuthenticatedWebAuthenticationDetailsSource 中描述的 Java EE 角色的使用相结合。

代码库中有一个使用这种方法的示例应用程序,因此,如果感兴趣,可以从 github 获取代码并查看应用程序上下文文件。代码在 samples/xml/preauth 目录中。

Run-As 身份验证替换

概述

AbstractSecurityInterceptor 能够在安全对象回调阶段临时替换 SecurityContext 和 SecurityContextHolder 中的身份验证对象。只有当 AuthenticationManager 和 AccessDecisionManager 成功地处理了原始身份验证对象时,才会发生这种情况。RunAsManager 将指示应该在 SecurityInterceptorCallback 期间使用的替换 Authentication 对象(如果有的话)。

通过在安全对象回调阶段临时替换 Authentication 对象,受保护的调用将能够调用需要不同身份验证和授权凭据的其他对象。它还可以对特定的 GrantedAuthority 执行任何内部安全检查。由于 Spring Security 提供了大量的帮助类,这些帮助类根据 SecurityContextHolder 的内容自动配置远程处理协议,因此在调用远程 web 服务时,这些作为 run-as 替换特别有用。

配置

Spring Security 提供了 RunAsManager 接口:

1
2
3
4
5
Authentication buildRunAs(Authentication authentication, Object object, List<ConfigAttribute> config);

boolean supports(ConfigAttribute attribute);

boolean supports(Class clazz);

第一个方法返回 Authentication 对象,该对象应该在方法调用期间替换现有的 Authentication 对象。如果该方法返回 null,则表示不应进行替换。AbstractSecurityInterceptor 使用第二个方法作为其配置属性启动验证的一部分。安全拦截器实现调用 supports(Class) 方法,以确保配置的RunAsManager支持安全侦听器将提供的安全对象类型。

Spring Security 提供了 RunAsManager 的一个具体实现。如果任何 ConfigAttribute 以 RUN_AS_ 开头,则 RunAsManagerImpl 类返回替换的 RunAsUserToken。如果找到任何这样的 ConfigAttribute,则替换的 RunAsUserToken 将包含与原始 Authentication 对象相同的主体、凭据和授予的权限,并为每个 RUN_AS_ ConfigAttribute 提供一个新的 SimpleGrantedAuthority。每个新的 SimpleGrantedAuthority 都将以 ROLE_ 作为前缀,然后是 RUN_AS ConfigAttribute。例如,RUN_AS_SERVER 将导致替换 RunAsUserToken,其中包含授予的 ROLE_RUN_AS_SERVER 权限。

替换的 RunAsUserToken 与任何其他 Authentication 对象一样。它需要通过 AuthenticationManager 进行身份验证,可能需要将其委托给合适的 AuthenticationProvider。RunAsImplAuthenticationProvider 执行这种身份验证。它只是接受,任何 RunAsUserToken 都是有效的。

为了确保恶意代码不会创建 RunAsUserToken 并将其提供给 RunAsImplAuthenticationProvider,密钥的哈希将存储在所有生成的令牌中。RunAsManagerImpl 和 RunAsImplAuthenticationProvider 是在 bean 上下文中使用相同的密钥创建的:

1
2
3
4
5
6
7
<bean id="runAsManager" class="org.springframework.security.access.intercept.RunAsManagerImpl">
<property name="key" value="my_run_as_password"/>
</bean>

<bean id="runAsAuthenticationProvider" class="org.springframework.security.access.intercept.RunAsImplAuthenticationProvider">
<property name="key" value="my_run_as_password"/>
</bean>

通过使用相同的密钥,可以验证每个 RunAsUserToken 是否由已批准的 RunAsManagerImpl 创建。出于安全原因,RunAsUserToken 在创建后是不可变的。

处理注销

注销 Java 配置

当使用 WebSecurityConfigurerAdapter 时,会自动应用注销功能。默认情况下,访问 URL /logout 将通过以下方式将用户注销:

  • 使 HTTP Session 无效
  • 清除任何已配置的 RememberMe 身份验证
  • 清理 SecurityContextHolder
  • 重定向到 /login?logout

然而,与配置登录功能类似,我们也有各种选项来进一步定制的注销要求:

1
2
3
4
5
6
7
8
9
10
11
12
protected void configure(HttpSecurity http) throws Exception {
http
.logout(logout -> logout
.logoutUrl("/my/logout")
.logoutSuccessUrl("/my/index")
.logoutSuccessHandler(logoutSuccessHandler)
.invalidateHttpSession(true)
.addLogoutHandler(logoutHandler)
.deleteCookies(cookieNamesToClear)
)
...
}
  1. 提供注销的支持。使用 WebSecurityConfigurerAdapter 时会自动应用此选项。

  2. 触发登出的 URL(默认为 /logout)。如果启用了 CSRF 保护(默认),那么请求也必须是POST。

  3. 注销后要重定向到的 URL。默认是 /login?logout。

  4. 让我们指定一个自定义 LogoutSuccessHandler。如果指定了这个参数,logoutSuccessUrl() 将被忽略。

  5. 指定在注销时是否使 HttpSession 无效。默认情况下这是正确的。在幕后配置 SecurityContextLogoutHandler。

  6. 添加一个 LogoutHandler。SecurityContextLogoutHandler 被默认添加为最后一个 LogoutHandler。

  7. 允许指定要在注销成功时删除的 cookie 的名称。这是显式添加 CookieClearingLogoutHandler 的快捷方式。

通常,为了定制注销功能,我们可以添加 LogoutHandler 和/或 LogoutSuccessHandler 实现。对于许多常见的场景,这些处理程序在使用 fluent API 时是在后台应用的。

LogoutHandler

通常,LogoutHandler 实现表示能够参与注销处理的类。它们将被调用来执行必要的清理。因此,它们不应该抛出异常。提供了各种实现:

  • PersistentTokenBasedRememberMeServices
  • TokenBasedRememberMeServices
  • CookieClearingLogoutHandler
  • CsrfLogoutHandler
  • SecurityContextLogoutHandler
  • HeaderWriterLogoutHandler

fluent API 并没有直接提供 LogoutHandler 实现,而是提供了快捷方式,在幕后提供了相应的 LogoutHandler 实现。例如,deleteCookies() 允许指定注销成功时要删除的一个或多个 Cookie 的名称。与添加 CookieClearingLogoAuthandler 相比,这是一个快捷方式。

LogoutSuccessHandler

LogoutSuccessHandler 在 LogoutFilter 成功注销后调用,以处理重定向或转发到适当的目标。请注意,接口几乎与 LogoutHandler 相同,但可能会引发异常。

提供了以下实现:

  • SimpleUrlLogoutSuccessHandler
  • HttpStatusReturningLogoutSuccessHandler

如上所述,不需要直接指定 SimpleUrlLogoutSuccessHandler 。相反,fluent API 通过设置 logoutSuccessUrl() 提供了一个快捷方式。将在幕后设置 SimpleUrlLogoutSuccessHandler。所提供的 URL 将在注销后重定向到。默认值是 /login?logout。

HttpStatusReturningLogoutSuccessHandler 在 REST API 类型的场景中可能很有趣。此 LogoutSuccessHandler 允许我们提供要返回的纯 HTTP 状态代码,而不是在成功注销时重定向到 URL。如果未配置,默认情况下将返回状态代码 200。

参考资料

  1. Authentication

本文讨论 Spring Security 在基于 Servlet 的应用程序中的高级体系结构。

过滤器综述

Spring Security 对 Servlet 的支持是基于 Servlet过滤器的,因此通常首先查看过滤器的角色是有帮助的。下图显示了单个 HTTP 请求的处理程序的典型分层。

filterchain

客户端向应用程序发送请求,然后容器创建一个 FilterChain,其中包含应该基于请求 URI 的路径处理 HttpServletRequest 的过滤器和 Servlet。在 Spring MVC 应用程序中,Servlet 是 DispatcherServlet 的一个实例。最多一个 Servlet 可以处理一个 HttpServletRequest 和 HttpServletResponse。但是,可以使用多个过滤器:

  • 防止下游过滤器或 Servlet 被调用。在这种情况下,过滤器通常会编写 HttpServletResponse。
  • 修改下游过滤器和 Servlet 使用的 HttpServletRequest 或 HttpServletResponse。

过滤器的能力来自于传递给它的 FilterChain。

FilterChain 使用示例:

1
2
3
4
5
public void doFilter(ServletRequest request, ServletResponse response, FilterChain chain) {
// do something before the rest of the application
chain.doFilter(request, response); // invoke the rest of the application
// do something after the rest of the application
}

由于过滤器只影响下游的过滤器和 Servlet,因此调用每个过滤器的顺序非常重要。

DelegatingFilterProxy

Spring 提供了一个名为 DelegatingFilterProxy 的过滤器实现,它允许在 Servlet 容器的生命周期和 Spring 的 ApplicationContext 之间建立桥接。Servlet 容器允许使用自己的标准注册过滤器,但它不知道 Spring 定义的 Beans。DelegatingFilterProxy 可以通过标准的 Servlet 容器机制注册,但是将所有工作委托给实现过滤器的 Spring Bean。

下图演示了 DelegatingFilterProxy 如何融入过滤器和 FilterChain。

delegatingfilterproxy

DelegatingFilterProxy 从 ApplicationContext 中查找 Bean Filter0,然后调用 Bean Filter0。下面是 DelegatingFilterProxy 的伪代码。

1
2
3
4
5
6
7
public void doFilter(ServletRequest request, ServletResponse response, FilterChain chain) {
// Lazily get Filter that was registered as a Spring Bean
// For the example in DelegatingFilterProxy delegate is an instance of Bean Filter0
Filter delegate = getFilterBean(someBeanName);
// delegate work to the Spring Bean
delegate.doFilter(request, response);
}

DelegatingFilterProxy 的另一个好处是,它允许延迟查找过滤器 bean 实例。这很重要,因为容器需要在启动之前注册过滤器实例。然而,Spring 通常使用 ContextLoaderListener 来加载 Spring Beans,直到需要注册过滤器实例之后才会这样做。

FilterChainProxy

Spring Security 的 Servlet 支持包含在 FilterChainProxy 中。FilterChainProxy 是 Spring Security 提供的一个特殊过滤器,它允许通过 SecurityFilterChain 将多个过滤器实例委托给它。由于 FilterChainProxy 是一个 Bean,它通常被包装在一个 DelegatingFilterProxy 中。

filterchainproxy

SecurityFilterChain

FilterChainProxy 使用 SecurityFilterChain 来确定应该为这个请求调用哪些 Spring Security 过滤器。

securityfilterchain

SecurityFilterChain 中的 Security 过滤器通常是 Beans,但是它们是在 FilterChainProxy 中注册的,而不是 DelegatingFilterProxy。FilterChainProxy 为直接向 Servlet 容器或 DelegatingFilterProxy 注册提供了许多优势。首先,它为所有 Spring Security 的 Servlet 支持提供了一个起点。出于这个原因,如果我们试图排除 Spring Security 的 Servlet 支持的故障,那么在 FilterChainProxy 中添加一个调试点是一个很好的开始。

其次,由于 FilterChainProxy 是 Spring Security 使用的核心,它可以执行非可选的任务。例如,它清除 SecurityContext 以避免内存泄漏。它还应用 Spring Security 的 HttpFirewall 来保护应用程序免受某些类型的攻击。

此外,它在确定何时应调用 SecurityFilterChain 时提供了更大的灵活性。在 Servlet 容器中,仅根据 URL 调用过滤器。但是,FilterChainProxy 可以利用 RequestMatcher 接口根据 HttpServletRequest 中的任何内容确定调用

事实上,FilterChainProxy 可以用来决定应该使用哪个 SecurityFilterChain。这允许在应用程序中为不同的片提供完全独立的配置

multi-securityfilterchain

在 Multiple SecurityFilterChain 中,FilterChainProxy 决定应该使用哪个 SecurityFilterChain。只有第一个匹配的 SecurityFilterChain 才会被调用。如果请求一个 /api/messages/ 的 URL,它将首先匹配 SecurityFilterChain0 的 /api/** 模式,所以只有 SecurityFilterChain0 将被调用,即使它也匹配 SecurityFilterChainn。如果请求一个 /messages/ 的 URL,它将与 SecurityFilterChain0的/api/** 模式不匹配,因此 FilterChainProxy 将继续尝试每个 SecurityFilterChain。假设没有其他的,与 SecurityFilterChainn 相匹配的 SecurityFilterChain 实例将被调用。

注意 SecurityFilterChain0 只配置了三个安全过滤器实例。但是,SecurityFilterChainn 配置了四个安全过滤器。需要注意的是,每个 SecurityFilterChain 都可以是唯一的,并且可以单独配置。事实上,如果应用程序希望 Spring Security 忽略某些请求,SecurityFilterChain 可能没有安全过滤器。

Security Filters

使用 SecurityFilterChain API 将 Security 过滤器插入到 FilterChainProxy中。过滤器的顺序很重要。通常不需要知道 Spring Security 过滤器的顺序。然而,有时了解顺序是有益的:

以下是 Spring Security Filter ordering 的一个全面的清单:

  • ChannelProcessingFilter
  • ConcurrentSessionFilter
  • WebAsyncManagerIntegrationFilter
  • SecurityContextPersistenceFilter
  • HeaderWriterFilter
  • CorsFilter
  • CsrfFilter
  • LogoutFilter
  • OAuth2AuthorizationRequestRedirectFilter
  • Saml2WebSsoAuthenticationRequestFilter
  • X509AuthenticationFilter
  • AbstractPreAuthenticatedProcessingFilter
  • CasAuthenticationFilter
  • OAuth2LoginAuthenticationFilter
  • Saml2WebSsoAuthenticationFilter
  • UsernamePasswordAuthenticationFilter
  • ConcurrentSessionFilter
  • OpenIDAuthenticationFilter
  • DefaultLoginPageGeneratingFilter
  • DefaultLogoutPageGeneratingFilter
  • DigestAuthenticationFilter
  • BearerTokenAuthenticationFilter
  • BasicAuthenticationFilter
  • RequestCacheAwareFilter
  • SecurityContextHolderAwareRequestFilter
  • JaasApiIntegrationFilter
  • RememberMeAuthenticationFilter
  • AnonymousAuthenticationFilter
  • OAuth2AuthorizationCodeGrantFilter
  • SessionManagementFilter
  • ExceptionTranslationFilter
  • FilterSecurityInterceptor
  • SwitchUserFilter

处理安全异常

ExceptionTranslationFilter 允许将 AccessDeniedException 和 AuthenticationException 转换为 HTTP 响应。

ExceptionTranslationFilter 作为 Security 过滤器之一插入到 FilterChainProxy 中。

exceptiontranslationfilter

  1. 首先,ExceptionTranslationFilter 调用 FilterChain.doFilter(request, response) 来调用应用程序的其余部分。
  2. 如果用户没有通过身份验证,或者是 AuthenticationException,那么启动身份验证。
    • SecurityContextHolder 删除。
    • HttpServletRequest 保存在 RequestCache 中。当用户成功进行身份验证时,将使用 RequestCache 重放原始请求。
    • AuthenticationEntryPoint 用于从客户端请求凭据。例如,它可能会重定向到一个登录页面或发送一个 WWW-Authenticate header。
  3. 否则,如果是 AccessDeniedException,则 Access Denied。调用 AccessDeniedHandler 来处理拒绝的访问。

如果应用程序没有抛出 AccessDeniedException 或 AuthenticationException,则 ExceptionTranslationFilter不执行任何操作。

ExceptionTranslationFilter 的伪代码如下所示:

1
2
3
4
5
6
7
8
9
try {
filterChain.doFilter(request, response);
} catch (AccessDeniedException | AuthenticationException e) {
if (!authenticated || e instanceof AuthenticationException) {
startAuthentication();
} else {
accessDenied();
}
}
  • 回顾一下过滤器,会发现调用 FilterChain.doFilter(request, response) 相当于调用应用程序的其余部分。这意味着,如果应用程序的另一部分(即 FilterSecurityInterceptor 或 method security)抛出 AuthenticationException 或 AccessDeniedException,它将在这里捕获并处理。
  • 如果用户没有通过身份验证,或者是 AuthenticationException,则启动身份验证。
  • 否则,拒绝访问。

补充

Spring Security 过滤器链

UML 类图

Spring Security 过滤器链 UML

默认过滤器链

表单认证:
Spring Security过滤器链-表单认证

Http Basic 认证:
Spring Security过滤器链-Http Basic 认证

参考资料

  1. Servlet Security: The Big Picture

Maven 依赖

1
2
3
4
<dependency>
<groupId>org.springframework.boot</groupId>
<artifactId>spring-boot-starter-security</artifactId>
</dependency>

基本安全验证

因为 spring-boot-starter-security 是开箱即用的,所以当项目中添加了该依赖之后,便具备了基本安全验证能力。示例:

基本安全验证

如上,未登录访问项目时,会自动跳转到一个简易的登录页面,用户名默认是 user,密码会在控制台输出。

配置用户

内存配置

1
2
3
4
5
6
7
8
9
@Bean
public UserDetailsService userDetailsService() {
// ensure the passwords are encoded properly
User.UserBuilder users = User.withDefaultPasswordEncoder();
InMemoryUserDetailsManager manager = new InMemoryUserDetailsManager();
manager.createUser(users.username("user").password("password").roles("USER").build());
manager.createUser(users.username("admin").password("password").roles("USER","ADMIN").build());
return manager;
}

数据库配置

HSQLDB

Maven 依赖:

1
2
3
4
5
<dependency>
<groupId>org.hsqldb</groupId>
<artifactId>hsqldb</artifactId>
<scope>runtime</scope>
</dependency>

Java 代码:

1
2
3
4
5
6
7
8
9
10
11
12
13
@Autowired
public void configureGlobal(AuthenticationManagerBuilder auth) throws Exception {
// ensure the passwords are encoded properly
User.UserBuilder users = User.withDefaultPasswordEncoder();
auth
.jdbcAuthentication()
.dataSource(dataSource)
// 使用 "org/springframework/security/core/userdetails/jdbc/users.ddl" 自动建表
.withDefaultSchema()
// 往 users 表中插入数据
.withUser(users.username("user").password("password").roles("USER"))
.withUser(users.username("admin").password("password").roles("USER","ADMIN"));
}

MySQL

Maven 依赖:

1
2
3
4
<dependency>
<groupId>mysql</groupId>
<artifactId>mysql-connector-java</artifactId>
</dependency>

配置属性:

1
2
3
4
5
6
7
8
9
10
11
12
13
14
spring:
datasource:
# always:始终执行初始化;embedded:内存数据库时才执行初始化;never:不执行初始化
initialization-mode: always
# 表初始化,默认值 classpath:schema.sql
schema: classpath:schema.sql
# 数据初始化,默认值 classpath:data.sql
data: classpath:data.sql
# 默认加载 data.sql 或 data-${platform}.sql,默认值 all
platform: all
driverClassName: com.mysql.cj.jdbc.Driver
url: jdbc:mysql://localhost:3306/demo?useUnicode=true&characterEncoding=utf-8&autoReconnect=true&failOverReadOnly=false&useSSL=true&serverTimezone=Asia/Shanghai
username: root
password: admin123

注意:

  • schema.sql 中不能带有注释。
  • 如果表名/字段名为 MySQL 关键字,则需要添加 `` 符号。
  • 用户登录密码指定加密算法,如 bcrypt、PBKDF2、scrypt、Argon2 等。指定方式为在密码前添加 {${algorithm}} 前缀,${algorithm} 为加密算法的名称。如果确实要明文存储密码,也可以添加前缀 {noop}。

Java 配置:

1
2
3
4
@Bean
public UserDetailsService userDetailsService() {
return new JdbcUserDetailsManager(dataSource);
}

密码加密

1
2
3
4
5
6
7
8
@Bean
public PasswordEncoder passwordEncoder() {
// 如果不考虑兼容 Spring Security 5.0 之前的版本,可以直接返回 new BCryptPasswordEncoder()
DelegatingPasswordEncoder passwordEncoder = (DelegatingPasswordEncoder) PasswordEncoderFactories
.createDelegatingPasswordEncoder();
passwordEncoder.setDefaultPasswordEncoderForMatches(new BCryptPasswordEncoder());
return passwordEncoder;
}

注意: 在 passwordEncoder() 方法中,也可以直接 return new BCryptPasswordEncoder(),之所以这里要使用 DelegatingPasswordEncoder 并将 BCryptPasswordEncoder 作为默认值给其赋值,是为了兼容 Spring Security 5.0 之前的版本。(在 Spring Security 5.0 之前,密码是明文存储的,而现在要求密码前面都要带加密算法前缀。)

会话管理

检测超时

1
2
3
4
5
6
7
8
9
10
11
12
13
14
15
16
17
@Configuration
public class SecurityConfiguration extends WebSecurityConfigurerAdapter {

@Override
protected void configure(HttpSecurity http) throws Exception {
http.authorizeRequests()
.antMatchers("/invalidSession").permitAll()
.anyRequest().authenticated().and()
.formLogin().and()
// session 超时后,跳转到 /invalidSession
.sessionManagement().invalidSessionUrl("/invalidSession")
.and()
// 由于配置了 session 超时检测,因此需要保证用户退出时清理掉 JSESSIONID cookie,
// 不然在用户注销后重新登录时可能会错误地报告错误(测试并未出现该问题)
.logout().deleteCookies("JSESSIONID");
}
}

session 默认超时时间为 30m,可以通过配置 server.servlet.session.timeout 属性来修改超时时间。

注意: 这不能保证与每个 servlet 容器一起工作,所以需要在环境中测试它。

并发会话控制

1
2
3
4
5
6
7
8
9
10
11
12
13
14
@Configuration
public class SecurityConfiguration extends WebSecurityConfigurerAdapter {

@Override
protected void configure(HttpSecurity http) throws Exception {
http.authorizeRequests()
.antMatchers("/invalidSession").permitAll()
.anyRequest().authenticated().and()
.formLogin().and()
.sessionManagement()
// 一个用户只能同时在一处登陆。如果存在用户在多处重复登录,前面登录的用户再访问系统时会被重定向到 /invalidSession
.maximumSessions(1).expiredUrl("/invalidSession");
}
}

当用户在另一处重复登录后,之前登录的用户再访问系统时,默认会收到 “This session has been expired (possibly due to multiple concurrent logins being attempted as the same user).” 错误提示。在上例中,我们是通过设置 expiredSessionStrategy 来将用户重定向到 /invalidSession。

我们也可以通过设置 sessionManagement().maxSessionsPreventsLogin(true) 来阻止用户重复登录。

会话固定攻击保护

会话固定攻击是一种潜在的风险,恶意攻击者可能通过访问站点来创建会话,然后说服另一个用户使用相同的会话进行登录(例如,通过将包含会话标识符的链接作为参数发送给他们)。

Spring Security 通过创建一个新会话或在用户登录时更改会话 ID 来自动防止这种情况。

默认情况下,Spring Security 启用了此保护,我们可以通过设置 sessionManagement().sessionFixation().xx 来禁用此保护或调整相关行为。

  • sessionFixation().none() 什么都不要做,将保留原来的会议。
  • sessionFixation().newSession() 创建一个新的“干净”的会话,而不复制现有的会话数据(Spring 安全相关的属性仍然会被复制)。
  • sessionFixation().migrateSession() 创建一个新会话,并将所有现有的会话属性复制到新会话中。这是 Servlet 3.0 或更旧的容器中的默认值。
  • sessionFixation().changeSessionId() 不创建新会话。相反,使用 Servlet 容器提供的会话固定保护(HttpServletRequest#changeSessionId())。此选项仅在 Servlet 3.1 (Java EE 7) 和更新的容器中可用。在旧的容器中指定它将导致异常。这是 Servlet 3.1 和更新的容器中的默认值。

Remember-me 身份验证

Remember-me 或 persistent-login 身份验证是指 web 站点能够记住不同会话间的主体身份。这通常是通过向浏览器发送 cookie 来完成的,在以后的会话中检测到 cookie 并进行自动登录。

Spring Security 提供了两种具体的 remember-me 实现:

  • 使用哈希来保持基于 cookie 的令牌的安全性
  • 使用数据库或其他持久存储机制来存储生成的令牌(同样需要使用 cookie)

注意: 以上两种实现都需要上下文中存在 UserDetailsService bean。

基于哈希的令牌

1
2
3
4
5
6
7
8
9
10
11
12
@Configuration
public class SecurityConfiguration extends WebSecurityConfigurerAdapter {

@Override
protected void configure(HttpSecurity http) throws Exception {
http.authorizeRequests()
.anyRequest().authenticated().and()
.formLogin().and()
// 使用哈希来保持基于 cookie 的令牌的安全性
.rememberMe().key("secret");
}
}

cookie 示例:
cookie 示例

这种方式有个弊端,浏览器端要携带的这个 cookie 值在服务端是存放在内存中的,并没有进行持久化,所以如果服务重启后服务器端存储的这个值就会丢失,浏览器端的 remember-me 就会失效。为了解决这个问题就需要将服务器端生成的这个 cookie 值持久化到数据库中。

注意: Remember-me 令牌仅在指定的时间段内有效,前提是用户名、密码和密钥不变。值得注意的是,这有一个潜在的安全问题,即捕获的“记住我”令牌在令牌到期之前可以从任何用户代理使用。这与 digest 身份验证的问题相同。如果 principal 知道捕获了令牌,则可以轻松地更改其密码并立即使所有有关问题的“记住我”令牌无效。如果需要更重要的安全性,则应该使用下一节中描述的方法。或者,记住“我”服务根本不应该被使用。

持久化令牌

内存存储

1
2
3
4
5
6
7
8
9
10
11
12
@Configuration
public class SecurityConfiguration extends WebSecurityConfigurerAdapter {

@Override
protected void configure(HttpSecurity http) throws Exception {
http.authorizeRequests()
.anyRequest().authenticated().and()
.formLogin().and()
// 使用内存数据库来存储生成的令牌
.rememberMe().tokenRepository(new InMemoryTokenRepositoryImpl());
}
}

数据库存储

1
2
3
4
5
6
7
8
9
10
11
12
13
14
15
16
17
18
19
20
21
22
23
24
25
26
@Configuration
public class SecurityConfiguration extends WebSecurityConfigurerAdapter {
private final DataSource dataSource;

public SecurityConfiguration(DataSource dataSource) {
this.dataSource = dataSource;
}

@Override
protected void configure(HttpSecurity http) throws Exception {
http.authorizeRequests()
.anyRequest().authenticated().and()
.formLogin().and()
// 使用数据库来存储生成的令牌
.rememberMe().tokenRepository(tokenRepository());
}

@Bean
public PersistentTokenRepository tokenRepository() {
JdbcTokenRepositoryImpl tokenRepository = new JdbcTokenRepositoryImpl();
tokenRepository.setDataSource(dataSource);
// 自动创建表,仅在首次启动时开启
tokenRepository.setCreateTableOnStartup(true);
return tokenRepository;
}
}

在上例中,我们采用了首次启动时自动建表的方式,也可以手动建表,sql 脚本如下:

1
2
3
4
5
6
7
8
9
10
create table persistent_logins
(
series varchar(64) not null comment '主键',
username varchar(64) not null comment '用户名',
token varchar(64) not null comment '访问令牌',
last_used timestamp not null comment '最后使用时间',
PRIMARY KEY (`series`)
) ENGINE = InnoDB
DEFAULT CHARSET = utf8mb4
COLLATE = utf8mb4_0900_ai_ci;

持久化 token 示例:
持久化 token 示例

CSRF 保护

CSRF 就是诱导已登录过的用户在不知情的情况下,使用自己的登录凭据来完成一些不可告人之事。比如利用 img 标签或者 script 标签的 src 属性自动访问一些敏感 api,或者是伪造一个 form 标签,action 写的是一些敏感 api,通过 js 自动提交表单等。

CSRF 攻击之所以成为可能,是因为来自受害者网站的 HTTP 请求与来自攻击者网站的请求完全相同。这意味着无法拒绝来自邪恶网站的请求,也无法允许来自银行网站的请求。为了防止 CSRF 攻击,我们需要确保在请求中存在邪恶站点无法提供的内容,以便区分这两个请求。

Spring 提供了两种机制来抵御 CSRF 攻击:

  • 同步器令牌模式(默认方式)
  • SameSite 属性

注意:为了使任何一种针对 CSRF 的保护起作用,应用程序必须确保“安全的” HTTP 方法是幂等的。这意味着使用 HTTP 方法 GET、HEAD、OPTIONS 和 TRACE 的请求不应该改变应用程序的状态。

默认情况下,Spring Security 启用了此保护,我们可以通过设置 http.csrf().xx 来禁用此保护或调整相关行为。

csrf示例

1
2
3
4
5
6
7
8
9
10
11
12
@Configuration
public class SecurityConfiguration extends WebSecurityConfigurerAdapter {

@Override
protected void configure(HttpSecurity http) throws Exception {
http.authorizeRequests()
.anyRequest().authenticated().and()
.formLogin().and()
// 默认已启用 CSRF 保护,并将 csrf token 存储在 session 中
http.csrf().csrfTokenRepository(new LazyCsrfTokenRepository(new HttpSessionCsrfTokenRepository()));
}
}

匿名登录

匿名登录,即用户尚未登录系统,系统会为所有未登录的用户分配一个匿名用户,这个用户也拥有自己的权限,不过他是不能访问任何被保护资源的。

设置一个匿名用户的好处是,我们在进行权限判断时,可以保证 SecurityContext 中永远是存在着一个权限主体的,启用了匿名登录功能之后,我们所需要做的工作就是从 SecurityContext 中取出权限主体,然后对其拥有的权限进行校验,不需要每次去检验这个权限主体是否为空了。这样做的好处是我们永远认为请求的主体是拥有权限的,即便他没有登录,系统也会自动为他赋予未登录系统角色的权限,这样后面所有的安全组件都只需要在当前权限主体上进行处理,不用一次一次的判断当前权限主体是否存在。这就更容易保证系统中操作的一致性。

默认情况下,匿名用户的用户名为 anonymousUser,拥有的权限是 ROLE_ANONYMOUS。

1
2
3
4
5
6
7
8
9
10
11
12
@Configuration
public class SecurityConfiguration extends WebSecurityConfigurerAdapter {

@Override
protected void configure(HttpSecurity http) throws Exception {
http.authorizeRequests()
.anyRequest().authenticated().and()
.formLogin().and()
// 配置匿名用户的用户名和权限
.anonymous().principal("游客").authorities("ROLE_VISITOR");
}
}

表单登录

Spring Security 默认就是表单登录,我们可以通过调用 http.formLogin().xx 方法来调整相关行为。

  • formLogin().loginPage(loginPage) 登录页面地址,默认会自动创建。
  • formLogin().loginProcessingUrl(loginProcessingUrl) 登录验证地址,默认为 /login。
  • formLogin().usernameParameter(usernameParameter) 用户名参数名,默认为 username。
  • formLogin().passwordParameter(passwordParameter) 密码参数名,默认为 password。
  • formLogin().successForwardUrl(forwardUrl) 登录验证成功后 forward 地址,默认为 /。注意:自定义跳转地址请求方法需为 POST。
  • formLogin().defaultSuccessUrl(defaultSuccessUrl,alwaysUse) 登录验证成功后 redirect 地址。如果在身份验证之前未访问受保护的页面,则跳转到登录页面,否则跳转到之前访问的受保护的页面。如果 alwaysUse 为 true(默认为 false),则始终跳转到登录页面。
  • formLogin().successHandler(successHandler) 登录验证成功后处理器,默认重定向到 /。(前两个方法调用的都是该方法,只是处理器不同而已。)
  • formLogin().failureForwardUrl(authenticationFailureUrl) 登录验证失败时 forward 地址,默认为 /login?error。
  • formLogin().failureUrl(authenticationFailureUrl) 登录验证失败时 redirect 地址,默认重定向到 /login?error。
  • formLogin().failureHandler(authenticationFailureHandler) 登录验证失败时处理器,默认重定向到 /login?error。(前两个方法调用的都是该方法,只是处理器不同而已。)

处理注销

当使用 WebSecurityConfigurerAdapter 时,会自动应用注销功能。默认情况下,访问 URL /logout 将通过以下方式将用户注销:

  • 使 HTTP 会话无效
  • 清除任何已配置的 RememberMe 身份验证
  • 清理 SecurityContextHolder
  • 重定向到 /login?logout

与表单登录功能类似,我们也可以通过各种选项来进一步定制注销要求。

  • logout().logoutUrl(logoutUrl) 触发注销操作的 URL,默认为 /logout。(测试不生效 >_<)
  • logout().logoutSuccessUrl(logoutUrl) 注销成功后 redirect 地址,默认为 /login?logout。
  • logout().logoutSuccessHandler(logoutUrl) 注销成功后处理器,如果设置了该选项,logoutSuccessUrl 就会失效。
  • logout().defaultLogoutSuccessHandlerFor(handler,preferredMatcher) 配置 logout ur 与 LogoutSuccessHandler 的映射,
  • logout().addLogoutHandler(logoutUrl) 添加注销处理器,通常用于清理一些会话相关的。默认 SecurityContextLogoutHandler 会被添加为最后一个 logoutHandler。
  • logout().invalidateHttpSession(invalidateHttpSession) 注销时让 HttpSession 无效,默认为 true。
  • logout().deleteCookies(cookieNamesToClear) 注销成功后要移除的 cookies。

参考资料

  1. Spring-Security的Password Encoding
  2. spring security 4.0 教程 步步深入 6
  3. spring security 匿名登录
  4. 浅谈CSRF攻击方式

概述

微服务架构下服务实例具有动态分配的网络地址,随着服务的自动扩展、故障和发布升级,导致服务实例的网络地址发生动态变更。因此,需要一种机制,支持服务消费者在服务提供者实例地址发生变更时,能够及时感知获取实例最新的地址,即服务发现机制

服务发现的概念是随着计算机体系结构的发展而演变的旧概念。网络时代初期,不同的计算机需要相互定位,这是通过一个全球文本文件 HOSTS.TXT 完成的。因为不经常添加新主机,所以手动维护文件的地址列表。随着互联网的发展,主机的增加速度越来越快,需要一个自动化,可扩展性的更强系统,从而导致了 DNS 的发明和广泛采用。

现在,微服务架构正在推动服务发现的不断发展。随着容器化平台或云平台的不断普及,基于平台的微服务架构部署,服务的生命周期以秒和分钟来衡量。同时,因为微服务的自动扩展、故障和发布升级,导致微服务具有动态变化的地址列表,微服务的灵活性再次推动了服务发现技术的发展。现代基于容器化平台或云平台的微服务应用程序,需要解决服务地址动态变化的问题。

服务地址动态变化示例

如上图所示,服务实例的地址动态变化,对于客户端而言,手工维护服务实例地址列表的方式已经不能满足需求,而使用服务发现模式动态更新维护服务实例地址列表是目前微服务架构下使用的必备技术。

服务发现机制角色

目前微服务的服务发现机制主要包含三个角色:服务提供者、服务消费者和服务注册表。

  • 服务提供者(Service Provider): 服务启动时将服务信息注册到服务注册表,服务退出时将服务注册表的服务信息删除掉。

  • 服务消费者(Service Consumer): 从服务注册表获取服务提供者的最新网络位置等服务信息,维护与服务提供者之间的通信。

  • 服务注册表(Service Registry): 联系服务提供者和服务消费者的桥梁,维护服务提供者的最新网络位置等服务信息。

服务发现角色

服务发现机制的关键部分是服务注册表(Service Registry)。服务注册表提供管理和查询服务注册信息的 API。当服务提供者的实例发生变更时(新增/删除服务),服务注册表需要通知服务消费者同步最新的服务实例地址列表。目前大多数的微服务框架使用 Netflix Eureka、Etcd、Consul 或 Apache Zookeeper 等作为服务注册表。

服务发现模式

为了说明服务发现模式是如何解决微服务实例地址动态变化的问题,下面介绍两种主要的服务发现模式:客户端发现模式和服务端发现模式。

客户端发现模式

使用客户端发现模式,客户端负责确定服务提供者的可用实例地址列表和负载均衡策略。客户端访问服务注册表,定时同步目标服务的实例地址列表,然后基于负载均衡算法选择目标服务的一个可用实例地址发送请求。

客户端服务发现模式

上图所示客户端服务发现包含自注册和客户端发现两个部分:

  • 自注册: 服务实例调用服务注册表的注册接口进行实例地址注册。服务实例还可以提供服务运行状况检查接口,服务注册表定期访问接口检查服务实例是否健康和处理请求。服务注册表可能要求服务实例定期调用“心跳” API 以防止服务实例注册过期。

  • 客户端发现: 当服务客户端调用目标服务时,它会查询服务注册表以获取服务实例地址列表。为了提高性能,客户端缓存服务实例地址列表。然后,服务客户端使用负载均衡算法(如循环或随机)来选择服务实例发送请求。

微保的第 2 代微服务框架(MSF)的服务发现实现就是客户端发现模式的一个例子。其中 Etcd 是一个服务注册表,它是一个强一致性键值数据存储的分布式系统,它提供了 REST APIs,用于管理服务实例注册和查询服务实例地址列表。MSF SDK 是一个微服务 SDK,它提供了服务注册功能,支持定期续租服务注册信息。它提供了服务发现功能,访问服务注册表同步并缓存目标服务的实例地址列表,支持基于负载均衡策略选择可用的目标服务并发送请求。

优点:

  • 通常是服务客户端查询目标服务的实例地址列表之后,执行负载均衡算法选择可用的目标服务。优点是服务客户端可以灵活、智能地制定负载均衡策略,包括轮询、加权轮询、一致性哈希等策略。

  • 可以实现点对点的网状通讯,即去中心化的通讯。可以有效避开单点造成的性能瓶颈和可靠性下降等问题。

  • 服务客户端通常以 SDK 的方式直接引入到项目,这种方式语言的整合程度最佳,程序执行性能最佳,程序错误排查更加容易。

缺点:

  • 服务客户端与服务注册表耦合。需要为服务客户端使用的每种编程语言和框架实现客户端服务发现逻辑。

  • 服务客户端通常以 SDK 方式使用服务发现功能。这种侵入式方案存在于应用程序的所有客户端,如果客户端服务发现功能需要进行更新,要求所有的应用程序重新编译,部署服务。微服务的规模越大,服务更新越困难,这在一定程度上违背了微服务架构提倡的技术独立性。

服务端发现模式

使用服务端发现模式,服务客户端通过路由器(或者负载均衡器)访问目标服务。路由器负责查询服务注册表,获取目标服务实例的地址列表转发请求。

服务端服务发现模式

上图所示服务端服务发现包含第三方注册和服务端发现两个部分:

  • 第三方注册: 这种方式不是服务客户端向服务注册表注册服务,而是通过一个注册处理器处理服务注册(通常是部署平台的一部分)。

  • 服务端发现: 这种方式不是服务客户端查询服务注册表,而是发送请求给路由器(或者负载均衡器),路由器查询服务注册表获取目标服务的实例地址列表,使用负载均衡算法(如循环或随机)选择可用的服务实例转发请求。

现代容器化部署平台(如 Docker 和 Kubernetes)就是服务端服务发现模式的一个例子,这些部署平台都具有内置的服务注册表和服务发现机制。容器化部署平台为每个服务提供路由请求的能力。服务客户端向路由器(或者负载均衡器)发出请求,容器化部署平台自动将请求路由到目标服务一个可用的服务实例。因此,服务注册,服务发现和请求路由完全由容器化部署平台处理。

优点:

  • 部署平台提供服务发现功能,负责处理服务发现的所有方面。因此,无论使用任何语言,所有的服务提供者和消费者都可以轻松地使用服务发现机制。

  • 服务发现功能对于服务客户端而言是透明的,因此,服务发现功能的相关更新对于服务客户端是无感知的。

缺点:

  • 部署平台的服务发现功能仅支持发现使用该平台部署的服务。例如,基于 Kubernetes 的服务发现仅适应于在 Kubernetes 上部署运行的服务。

  • 服务的架构增加了一次转发,延迟时间会增加。整个系统增加了一个故障点,系统的运维难度增加。最关键的是负责转发请求的路由器或者负载均衡器可能变成性能的瓶颈。

  • 微服务的一个目标是故障隔离,将整个系统切割为多个服务共同运行,如果某服务无法正常运行,只会影响到整个系统的相关部分功能,其它功能能够正常运行,即去中心化。然而,服务端发现模式实际上是集中式的做法,如果路由器或者负载均衡器无法提供服务,那么将导致整个系统瘫痪。

Service Mesh 服务发现

Service Mesh 介绍

Service Mesh 服务网格是服务于微服务应用程序的可配置基础设施层,旨在处理服务之间的大量基于网络的进程间通信。服务网络确保服务之间的通信灵活、可靠、快速和安全。服务网格提供的关键功能包括服务发现、负载平衡、加密、可观察性、可追溯性、熔断、身份验证和授权等。

服务网格通过为每个服务实例提供称为 sidecar 的代理实例来实现。Sidecars 负责处理服务间通信、监控和安全相关等所有从各个服务抽象出来的功能。这样,开发人员负责业务服务的开发、支持和维护,运营团队负责维护服务网格并运行业务服务。

Service Mesh服务发现

客户端发现模式

服务网格提供的服务发现功能是客户端服务发现模式的一种升级实现,该功能基于 sidecar 和 pilot 实现。Sidecars,即数据面板(Data Plane),负责发现目标服务实例地址列表并转发请求。Pilots,即控制面板(Control Plane),负责管理服务注册表的所有服务注册信息。

Service Mesh客户端发现模式

上图所示客户端服务发现包含自注册和客户端发现两个部分:

  • 自注册: Sidecar 实例,而不是服务本身,负责调用服务注册表的注册接口进行实例地址注册;负责定期调用“心跳” API 以续租服务实例注册信息。

  • 客户端发现: Sidecar 实例负责与控制面板之间基于双向流式实时同步服务数据。当服务客户端发送请求时,负责转发请求的 Sidecar 实例查询本地缓存的目标服务实例地址列表,基于负载均衡算法选择一个可用的实例地址转发请求。

微保的第 3 代微服务框架的服务发现实现就是 Service Mesh 微服务架构下服务发现模式的一个例子。其中 Pilots 负责对接服务注册表,缓存所有注册的服务信息,实时感知服务注册信息的变更,更新本地缓存,实时推送变更数据给所有订阅的 Sidecars。Sidecars 负责对接服务注册表提供服务注册功能,负责对接 Pilots 提供服务发现功能。

Service Mesh微服务架构下服务发现模式是客户端发现模式的一种升级模式,它保持了常规客户端发现模式的优点,解决了客户端发现模式的缺点:

  • Sidecars 可以灵活、智能地制定负载均衡策略,包括轮询、加权轮询、一致性哈希等策略。实现点对点的去中心化的通讯,可以有效避开单点造成的性能瓶颈和可靠性下降问题。

  • 通过 Sidecars,业务服务不需要关注服务注册、服务发现功能,不需要关注服务之间的通讯以及微服务治理等基本能力。通过 Pilots,服务消费者的客户端与服务注册表解耦,支持对接不同的服务注册表。两者的组合真正意义上实现了跨语言能力,解耦了业务代码和微服务基础框架,而且能够实现业务无感知的情况下升级微服务新特性。

总结

微服务架构模式下,服务实例具有动态分配的网络地址,为了满足服务客户端向服务提供者发送请求,必须使用服务发现机制。

服务发现的关键部分是服务注册表。服务注册表提供管理和查询服务注册信息的 API。可以使用 Netflix Eureka、Etcd、Consul 或 Apache Zookeeper 等服务注册表搭建服务发现基础设施。

微服务架构主要包括两种服务发现模式:客户端发现和服务端发现。客户端发现模式,客户端负责查询服务注册表,选择可用的实例地址转发请求。服务端发现模式,客户端通过路由器或者负载均衡器转发请求,路由器负责查询服务注册表,选择可用的实例地址转发请求。基于 Service Mesh 架构的服务发现模式是客户端发现模式的一种升级,它解决了客户端发现模式的缺点。

这个世界没有完美的架构和模式,不同的场景都有适合的解决方案。我们在调研决策的时候,一定要根据实际情况去权衡对比,选择最适合当前阶段的方案,然后通过渐进迭代的方式不断完善优化方案。

主流开源服务发现概览

Nacos Eureka Consul CoreDNS Zookeeper
一致性协议 CP + AP AP CP CP
健康检查 TCP/HTTP/MYSQL/Client Beat Client Beat TCP/HTTP/gRPC/Cmd Keep Alive
负载均衡策略 权重/metadata/Selector Ribbon Fabio RoundRobin
雪崩保护
自动注销实例 支持 支持 不支持 不支持 支持
访问协议 HTTP/DNS HTTP HTTP/DNS DNS TCP
监听支持 支持 支持 支持 不支持 支持
多数据中心 支持 支持 支持 不支持 不支持
跨注册中心同步 支持 不支持 支持 不支持 不支持
Spring Cloud 集成 支持 支持 支持 不支持 支持
Dubbo 集成 支持 不支持 不支持 不支持 支持
K8S 集成 支持 不支持 支持 支持 不支持

参考资料

  1. 聊一聊微服务架构下的服务发现模式
  2. 微服务体系结构中的服务发现
  3. 微服务:注册中心ZooKeeper、Eureka、Consul 、Nacos对比

  1. 创建 network

    1
    docker network create --driver bridge --subnet 172.22.0.0/16 --gateway 172.22.0.1  op_net
  2. 创建 consul.yml

    1
    2
    3
    4
    5
    6
    7
    8
    9
    10
    11
    12
    13
    14
    15
    16
    17
    18
    19
    20
    21
    22
    23
    24
    25
    26
    27
    28
    29
    30
    31
    32
    33
    34
    35
    36
    37
    38
    39
    40
    41
    42
    43
    44
    45
    46
    47
    48
    49
    50
    51
    52
    53
    54
    55
    56
    version: '3.6'

    services:
    consul-1:
    image: consul
    restart: always
    hostname: consul-1
    container_name: consul-1
    command: agent -server -bootstrap-expect=3 -node=consul-1 -bind=0.0.0.0 -client=0.0.0.0 -datacenter=dc1
    networks:
    default:
    ipv4_address: 172.22.0.31

    consul-2:
    image: consul
    restart: always
    hostname: consul-2
    container_name: consul-2
    command: agent -server -retry-join=consul-1 -node=consul-2 -bind=0.0.0.0 -client=0.0.0.0 -datacenter=dc1
    depends_on:
    - consul-1
    networks:
    default:
    ipv4_address: 172.22.0.32

    consul-3:
    image: consul
    restart: always
    hostname: consul-3
    container_name: consul-3
    command: agent -server -retry-join=consul-1 -node=consul-3 -bind=0.0.0.0 -client=0.0.0.0 -datacenter=dc1
    depends_on:
    - consul-1
    networks:
    default:
    ipv4_address: 172.22.0.33

    consul-4:
    image: consul
    restart: always
    hostname: consul-4
    container_name: consul-4
    ports:
    - 8500:8500
    command: agent -retry-join=consul-1 -node=consul-4 -bind=0.0.0.0 -client=0.0.0.0 -datacenter=dc1 -ui
    depends_on:
    - consul-2
    - consul-3
    networks:
    default:
    ipv4_address: 172.22.0.34

    networks:
    default:
    external:
    name: op_net
  3. 启动 Consul 集群

    1
    docker-compose -f consul.yml up -d
  4. 访问 localhost:8500/

概述

负载均衡,英文名称为 Load Balance,指由多台服务器以对称的方式组成一个服务器集合,每台服务器都具有等价的地位,都可以单独对外提供服务而无须其他服务器的辅助。通过某种负载分担技术,将外部发送来的请求均匀分配到对称结构中的某一台服务器上,而接收到请求的服务器独立地回应客户的请求。负载均衡能够平均分配客户请求到服务器阵列,借此提供快速获取重要数据,解决大量并发访问服务问题,这种集群技术可以用最少的投资获得接近于大型主机的性能。

分类

  • 硬件负载均衡:比如 F5、Array。

  • 软件负载均衡:比如 LVS、Nginx。

  • 服务端负载均衡:比如 Nginx。

  • 客户端负载均衡:比如 Ribbon、Spring Cloud LoadBalancer。

服务端负载均衡

我们所说的负载均衡通常都是指服务端负载均衡,服务端负载均衡又分为两种,一种是硬件负载均衡,还有一种是软件负载均衡。
硬件负载均衡主要通过在服务器节点之间安装专门用于负载均衡的设备,常见的如 F5。
软件负载均衡则主要是在服务器上安装一些具有负载均衡功能的软件来完成请求分发进而实现负载均衡,常见的就是 Nginx。
无论是硬件负载均衡还是软件负载均衡,它的工作原理都不外乎下面这张图:

负载均衡示例

常用的服务端负载均有以下几种:

  • DNS域名解析负载均衡
    假设我们的域名指向了多个 IP 地址,当一个域名请求来时,DNS 服务器机进行域名解析将域名转换为 IP 地址是,在 1:N 的映射转换中实现负载均衡。DNS 服务器提供简单的负载均衡算法,但当其中某台服务器出现故障时,通知 DNS 服务器移除当前故障 IP。

  • 反向代理负载均衡
    反向代理只值对服务器的代理,代理服务器接受请求,通过负载均衡算法,将请求转发给后端服务器,后端服务返回给代理服务器然后代理服务器返回到客户端。反向代理服务器的优点是隔离后端服务器和客户端,使用双网卡屏蔽真实服务器网络,安全性更好,相比较于 DNS 域名解决负载均衡,反向代理在故障处理方面更灵活,支持负载均衡算法的横向扩展。目前使用非常广泛。当然反向代理也需要考虑很多问题,比如单点故障,集群部署等。

  • IP负载均衡
    我们都知道反向代理工作到 HTTP 层,本身开销相对大一些,对性能有一定影响,LVS-NAT 是一种卫浴传输层的负载均衡,它通过修改接受的数据包目标地址的方式实现负载均衡。Linux2.6.x以后版本内置了 IPVS,专注用于实现 IP 负载均衡,故而在 Linux 上 IP 负载均衡使用非常广泛。
    LVS-DR 工作在数据链路层,比 LVS-NAT 更霸道的时候它直接修改数据包的 MAC 地址。LVS-TUN 基于 IP 隧道的请求转发机制,将调度器收到的 IP 数据包进行封装,转交给服务器,然后服务器返回数据,通过调度器实现负载均衡。这种方式支持跨网段调度。
    总结一下,LVS-DR 和 LVS-TUN 都适合响应和请求不对称的 Web 服务器,如何从它们中做出选择,取决于你的网络部署需要,因为 LVS-TUN 可具有跨地域性,有类似这种需求的,就应该选择 LVS-TUN。

客户端负载均衡

客户端负载均衡是在 Spring Cloud 分布式框架组件 Ribbon 中定义的。我们在使用 Spring Cloud 分布式框架时,同一个 service 大概率同时启动多个,当一个请求到来时,Ribbon 通过策略决定本次请求使用哪个 service 的方式就是客户端负载均衡。

负载均衡:服务端 VS 客户端

无论是硬件负载均衡还是软件负载均衡都会维护一个可用的服务端清单,然后通过心跳机制来删除故障的服务端节点以保证清单中都是可以正常访问的服务端节点,此时当客户端的请求到达负载均衡服务器时,负载均衡服务器按照某种配置好的规则从可用服务端清单中选出一台服务器去处理客户端的请求。
客户端负载均衡和服务器负载均衡的核心差异在服务列表本身,客户端负载均衡服务列表在通过客户端维护,服务器负载均衡服务列表由中间服务单独维护。

常见负载均衡算法

  • 轮询:轮流访问。
  • 加权轮询:在轮流访问的基础上,可以给每台服务器配置加权值。
  • 随机:就是随机访问。
  • 最小连接数:把请求发送给当前连接最少的服务器上。
  • IP 哈希算法:根据客户端的 IP 计算,可保证一个客户端总访问到一个服务器上,避免了 session 不同步的问题。
  • URL 散列:可保证同一 URL 总访问同一个服务器。

参考资料

  1. 什么是客户端负载均衡
  2. 终于把服务器负载均衡和客户端负载均衡讲清楚了