人的知识就好比一个圆圈,圆圈里面是已知的,圆圈外面是未知的。你知道得越多,圆圈也就越大,你不知道的也就越多。

0%

队列同步器(AbstractQueuedSynchronizer),是用来构建锁或其它同步组件的基础框架。它既支持独占式的获取同步状态,也支持共享式的获取同步状态,像可重入锁(ReentrantLock)、可重入读写锁(ReentrantReadWriteLock)、计数器闭锁(CountDownLatch)、信号量(Semaphore)等常用同步组件都是基于队列同步器实现的。
队列同步器是基于模板方法模式设计的,也就是说,使用者需要继承同步器并重写指定的方法,随后将同步器聚合在自定义的同步组件中,并调用同步器提供的模板方法,而这些模板方法将会调用使用者重写的方法。

重写同步器指定的方法时,需要使用同步器提供的3个方法来访问或修改同步状态。

  • getState(): 获取同步状态
  • setState(int newState): 设置当前同步状态
  • compareAndSetState(int expect, int update): 使用CAS设置当前状态,该方法能够保证状态设置的原子性

同步器提供了以下5个可重写的方法:

  • boolean tryAcquire(int arg)
    独占式获取同步状态,实现该方法需要查询当前状态并判断同步状态是否符合预期,然后再及进行CAS设置同步状态
  • boolean tryRelease(int arg)
    独占式释放同步状态,等待获取同步状态的线程将有机会获取同步状态
  • int tryAcquireShared(int arg)
    共享式获取同步状态,返回大于等于0的值,表示获取成功,反之,获取失败
  • boolean tryReleaseShared(int arg)
    共享式释放同步状态
  • boolean isHeldExclusively()
    当前同步器是否在独占模式下被线程占用,一般该方法表示是否被当前线程所独占

实现自定义同步组件时,将会调用以下同步器提供的模板方法:

  • void acquire(int arg)
  • void acquireInterruptibly(int arg)
  • boolean tryAcquireNanos(int arg, long nanos)
  • void acquireShared(int arg)
  • void acquireSharedInterruptibly(int arg)
  • boolean tryAcquireSharedNanos(int arg, long nanos)
  • boolean release(int arg)
  • boolean releaseShared(int arg)
  • Collection getQueuedThreads()

下面通过实现一个独占锁和一个同步工具类TwinsLock:同一时刻只允许至多两个线程的访问,来演示如何使用队列同步器。

独占锁:

1
2
3
4
5
6
7
8
9
10
11
12
13
14
15
16
17
18
19
20
21
22
23
24
25
26
27
28
29
30
31
32
33
34
35
36
37
38
39
40
41
42
43
44
45
46
47
48
49
50
51
52
53
54
55
56
57
58
59
60
61
62
63
64
65
66
67
68
69
70
71
72
73
74
75
76
77
78
79
80
81
82
83
84
85
86
87
88
89
90
91
92
93
94
95
96
97
98
99
100
101
102
103
104
105
106
107
108
109
public class Mutex implements Lock, java.io.Serializable {
private final Sync sync;

public Mutex() {
sync = new Sync();
}

private static class Sync extends AbstractQueuedSynchronizer {

/**
* 获取锁
*/
@Override
protected boolean tryAcquire(int arg) {
assert arg == 1; // Otherwise unused
if (compareAndSetState(0, 1)) {
setExclusiveOwnerThread(Thread.currentThread());
return true;
}
return false;
}

/**
* 释放锁
*/
@Override
protected boolean tryRelease(int arg) {
assert arg == 1; // Otherwise unused
if (getState() == 0) {
throw new IllegalMonitorStateException();
}
setExclusiveOwnerThread(null);
setState(0);
return true;
}

/**
* 是否处于独占状态
*/
@Override
protected boolean isHeldExclusively() {
return getState() == 1;
}

/**
* 返回一个条件对象,每个条件对象都包含一个等待队列
*/
final ConditionObject newCondition() {
return new ConditionObject();
}

/**
* 反序列化时,重置state为未锁定状态
*/
private void readObject(ObjectInputStream s) throws IOException, ClassNotFoundException {
s.defaultReadObject();
setState(0); // reset to unlocked state
}
}

@Override
public void lock() {
sync.acquire(1);
}

@Override
public void lockInterruptibly() throws InterruptedException {
sync.acquireInterruptibly(1);
}

@Override
public boolean tryLock() {
return sync.tryAcquire(1);
}

@Override
public boolean tryLock(long time, TimeUnit unit) throws InterruptedException {
return sync.tryAcquireNanos(1, unit.toNanos(time));
}

@Override
public void unlock() {
sync.release(1);
}

@Override
public Condition newCondition() {
return sync.newCondition();
}

public boolean isLocked() {
return sync.isHeldExclusively();
}

public boolean hasQueuedThreads() {
return sync.hasQueuedThreads();
}

public static void main(String[] args) {
Mutex mutex = new Mutex();
mutex.lock();

try {
// TODO
} finally {
mutex.unlock();
}
}
}

TwinsLock:

1
2
3
4
5
6
7
8
9
10
11
12
13
14
15
16
17
18
19
20
21
22
23
24
25
26
27
28
29
30
31
32
33
34
35
36
37
38
39
40
41
42
43
44
45
46
47
48
49
50
51
52
53
54
55
56
57
58
59
60
61
62
63
64
65
66
67
68
69
70
71
72
73
74
75
76
77
78
79
public class TwinsLock implements Lock, java.io.Serializable {
private final Sync sync;

public TwinsLock() {
sync = new Sync(2);
}

private static class Sync extends AbstractQueuedSynchronizer {
public Sync(int count) {
setState(count);
}

/**
* 获取锁
*/
@Override
protected int tryAcquireShared(int arg) {
for (; ; ) {
int c = getState();
int nextc = c - arg;
// 小于0时直接返回,表示获取锁失败;大于0则调用CAS
if (nextc < 0 || compareAndSetState(c, nextc)) {
return nextc;
}
}
}

/**
* 释放锁
*/
@Override
protected boolean tryReleaseShared(int arg) {
for (; ; ) {
int c = getState();
int nextc = c + arg;
if (compareAndSetState(c, nextc)) {
return true;
}
}
}

/**
* 返回一个条件对象,每个条件对象都包含一个等待队列
*/
final ConditionObject newCondition() {
return new ConditionObject();
}
}

@Override
public void lock() {
sync.acquireShared(1);
}

@Override
public void lockInterruptibly() throws InterruptedException {
sync.acquireSharedInterruptibly(1);
}

@Override
public boolean tryLock() {
return sync.tryAcquireShared(1) > 0;
}

@Override
public boolean tryLock(long time, TimeUnit unit) throws InterruptedException {
return sync.tryAcquireSharedNanos(1, unit.toNanos(time));
}

@Override
public void unlock() {
sync.releaseShared(1);
}

@Override
public Condition newCondition() {
return sync.newCondition();
}
}

队列同步器的实现原理可概括为:
在获取同步状态时,同步器维护一个同步队列,获取状态失败的线程都会被加入到队列中并在队列中进行自旋;移除队列(或停止自旋)的条件是前驱节点为头节点且成功获取了同步状态。
在释放同步状态时,同步器调用tryRelease(int arg)方法释放同步状态,然后唤醒头节点中的后继节点。
同步状态的获取与释放都会同步更新状态变量state的值,该值是volatile类型,利用了volatile相关的Happens-Before规则

概念

线程的创建方式中有两种,一种是实现Runnable接口,另一种是继承Thread,但是这两种方式都有个缺点,那就是在任务执行完成之后无法获取返回结果,于是就有了Callable接口,而Future接口与FutureTask类就是用来配合取得返回的结果。

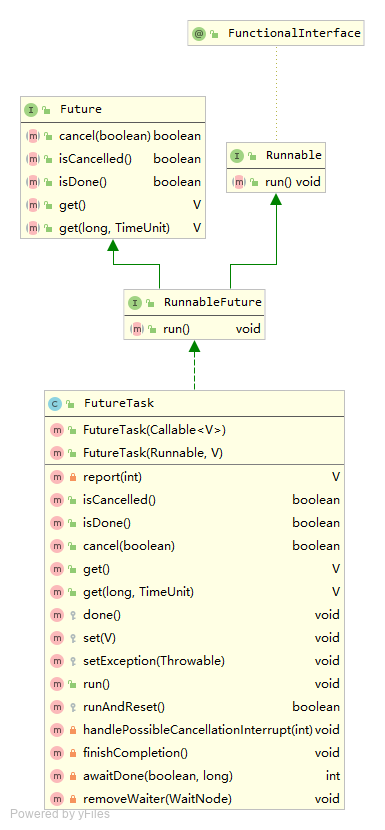
UML

Future UML

  • Callable:具有返回值的异步任务
  • Future: 表示异步计算的结果
  • FutureTask:同时实现了Callable与Future接口

Future

Future表示异步计算的结果,它提供了以下接口:

  • V get()
    获取异步执行的结果,如果没有结果可用,此方法会阻塞直到异步计算完成。
  • V get(Long timeout , TimeUnit unit)
    获取异步执行结果,如果没有结果可用,此方法会阻塞,但是会有时间限制,如果阻塞时间超过设定的timeout时间,该方法将抛出异常。
  • boolean isDone()
    如果任务执行结束,无论是正常结束或是中途取消还是发生异常,都返回true。
  • boolean isCancelled()
    如果任务完成前被取消,则返回true。
  • boolean cancel(boolean mayInterruptRunning)
    如果任务还没开始,执行cancel(...)方法将返回false;如果任务已经启动,执行cancel(true)方法将以中断执行此任务线程的方式来试图停止任务,如果停止成功,返回true;当任务已经启动,执行cancel(false)方法将不会对正在执行的任务线程产生影响(让线程正常执行到完成),此时返回false;当任务已经完成,执行cancel(...)方法将返回false。mayInterruptRunning参数表示是否中断执行中的线程。

通过方法分析我们也知道实际上Future提供了3种功能:

  • 能够中断执行中的任务
  • 判断任务是否执行完成
  • 获取任务执行完成后的结果
    但是我们必须明白Future只是一个接口,我们无法直接创建对象,因此就需要其实现类FutureTask

FutureTask

FutureTask表示一个可取消的异步计算。它是Future接口的基本实现,提供了启动、取消计算、查询计算是否完成以及检索计算结果的方法。只有在计算完成后才能检索到结果,否则get方法将阻塞当前线程。一旦计算完成,就不能重新启动或取消计算(除非使用runAndReset调用计算)。
FutureTask可以用来包装CallableRunnable对象。因为FutureTask实现了Runnable,所以可以将FutureTask提交给Executor执行。
除了作为一个独立的类之外,这个类还提供了protected功能,这在创建定制的任务类时可能很有用。

使用示例

1
2
3
4
5
6
7
8
9
10
11
12
13
14
15
16
17
18
19
20
21
22
23
24
25
26
27
28
29
30
31
32
33
34
35
36
37
38
39
40
41
42
43
44
45
/**
* 模拟并发任务
*/
@Test
public void test1() throws ExecutionException, InterruptedException {
// 创建线程池
ExecutorService executor = Executors.newFixedThreadPool(10);

// 模拟任务1
FutureTask<String> task1 = new FutureTask<>(() -> {
System.out.println(Thread.currentThread().getName() + ": task1");
Thread.sleep(200);
return "result1";
});
// 模拟任务2
FutureTask<String> task2 = new FutureTask<>(() -> {
System.out.println(Thread.currentThread().getName() + ": task2");
Thread.sleep(200);
return "result2";
});
// 模拟任务3
FutureTask<String> task3 = new FutureTask<>(() -> {
System.out.println(Thread.currentThread().getName() + ": task3");
Thread.sleep(200);
return "result3";
});

// 提交任务1
executor.submit(task1);
// 提交任务2
executor.submit(task2);
// 提交任务3
executor.submit(task3);

// 获取任务1的执行结果
String result1 = task1.get();
// 获取任务2的执行结果
String result2 = task2.get();
// 获取任务3的执行结果
String result3 = task3.get();

System.out.println(result1);
System.out.println(result2);
System.out.println(result3);
}
1
2
3
4
5
6
pool-1-thread-2: task2
pool-1-thread-1: task1
pool-1-thread-3: task3
result1
result2
result3

实现原理

状态流转

FutureTask类中,定义了状态变量state,它有7个可能的状态,不同的状态决定了FutureTask的不同的行为。

1
2
3
4
5
6
7
8
9
10
11
12
13
14
15
16
17
18
19
20
21
22
23
24
25
26
27
28
29
30
31
32
/**
* 状态变量
*/
private volatile int state;
/**
* 新建的
*/
private static final int NEW = 0;
/**
* 完成的中间状态
*/
private static final int COMPLETING = 1;
/**
* 已正常完成
*/
private static final int NORMAL = 2;
/**
* 异常终止
*/
private static final int EXCEPTIONAL = 3;
/**
* 已取消
*/
private static final int CANCELLED = 4;
/**
* 中断时的中间状态
*/
private static final int INTERRUPTING = 5;
/**
* 已中断
*/
private static final int INTERRUPTED = 6;

状态间可能的流转如下图:
![FutureTask State](/images/java/FutureTask State.png)

构造函数

即接受Callable,又接受Runnable,如果是Runnable,会将其适配为Callable

1
2
3
4
5
6
7
8
9
10
11
12
public FutureTask(Callable<V> callable) {
if (callable == null)
throw new NullPointerException();
this.callable = callable;
this.state = NEW;
}

public FutureTask(Runnable runnable, V result) {
// 适配Runnable对象
this.callable = Executors.callable(runnable, result);
this.state = NEW;
}

成员

1
2
3
4
5
6
7
8
9
10
11
12
13
14
15
16
17
18
19
/** 
* 任务对象
*/
private Callable<V> callable;

/**
* 任务执行结果
*/
private Object outcome;

/**
* 当前执行的的线程
*/
private volatile Thread runner;

/**
* 被阻塞的线程链
*/
private volatile WaitNode waiters;

核心方法

run

1
2
3
4
5
6
7
8
9
10
11
12
13
14
15
16
17
18
19
20
21
22
23
24
25
26
27
28
29
30
31
32
33
34
35
36
37
38
39
40
41
42
43
44
45
46
47
48
49
50
51
52
53
54
55
56
57
58
59
60
61
62
63
64
65
66
67
68
69
70
71
72
73
74
75
76
77
78
79
80
81
82
83
84
85
86
87
88
89
90
91
92
93
94
95
96
97
98
99
100
101
102
103
104
105
106
107
108
109
110
public void run() {
// 避免多个线程同时执行任务
// 当第一个线程抢占任务成功后,后面的线程就什么也不做
if (state != NEW ||
!UNSAFE.compareAndSwapObject(this, runnerOffset,
null, Thread.currentThread()))
return;
try {
Callable<V> c = callable;
if (c != null && state == NEW) {
V result;
boolean ran;
try {
result = c.call();
ran = true;
} catch (Throwable ex) {
result = null;
ran = false;
// 设置异常值
setException(ex);
}
if (ran)
// 设置正常返回值
set(result);
}
} finally {
// runner must be non-null until state is settled to
// prevent concurrent calls to run()
// 重置runner
runner = null;
// state must be re-read after nulling runner to prevent
// leaked interrupts
int s = state;
// 任务处于中断中的状态,则进行中断操作
if (s >= INTERRUPTING)
handlePossibleCancellationInterrupt(s);
}
}

protected void setException(Throwable t) {
// 将状态位设置成中间状态COMPLETING
if (UNSAFE.compareAndSwapInt(this, stateOffset, NEW, COMPLETING)) {
// 设置任务执行结果为异常对象
outcome = t;
// 将状态更为最终状态EXCEPTIO
UNSAFE.putOrderedInt(this, stateOffset, EXCEPTIONAL);
// 唤醒所有等待的线程,并调用done
finishCompletion();
}
}

protected void set(V v) {
// 将状态位设置成中间状态COMPLETING
if (UNSAFE.compareAndSwapInt(this, stateOffset, NEW, COMPLETING)) {
// 设置任务执行结果为正常返回值
outcome = v;
// 将状态更为最终状态NORMAL
UNSAFE.putOrderedInt(this, stateOffset, NORMAL);
// 唤醒所有等待的线程,并调用done
finishCompletion();
}
}

private void finishCompletion() {
// assert state > COMPLETING;
// 断言此时state > COMPLETING
for (WaitNode q; (q = waiters) != null;) {
// 尝试将waiters全部置为null
if (UNSAFE.compareAndSwapObject(this, waitersOffset, q, null)) {
for (;;) {
Thread t = q.thread;
if (t != null) {
q.thread = null;
// 唤醒线程
LockSupport.unpark(t);
}
WaitNode next = q.next;
if (next == null)
break;
q.next = null; // unlink to help gc
q = next;
}
break;
}
}

done();

// 减少内存占用
callable = null;
}

private void handlePossibleCancellationInterrupt(int s) {
// It is possible for our interrupter to stall before getting a
// chance to interrupt us. Let's spin-wait patiently.
if (s == INTERRUPTING)
while (state == INTERRUPTING)
// 让出cpu时间片,等待cancel(true)执行完成,此时INTERRUPTING必然能更成INTERRUPTED
Thread.yield(); // wait out pending interrupt

// assert state == INTERRUPTED;

// We want to clear any interrupt we may have received from
// cancel(true). However, it is permissible to use interrupts
// as an independent mechanism for a task to communicate with
// its caller, and there is no way to clear only the
// cancellation interrupt.
//
// Thread.interrupted();
}

get

1
2
3
4
5
6
7
8
9
10
11
12
13
14
15
16
17
18
19
20
21
22
23
24
25
26
27
28
29
30
31
32
33
34
35
36
37
38
39
40
41
42
43
44
45
46
47
48
49
50
51
52
public V get() throws InterruptedException, ExecutionException {
int s = state;
// 如果是新建或完成的中间状态,则等待任务执行完
if (s <= COMPLETING)
s = awaitDone(false, 0L);
// 返回已完成任务的结果或抛出异常
return report(s);
}

private int awaitDone(boolean timed, long nanos)
throws InterruptedException {
final long deadline = timed ? System.nanoTime() + nanos : 0L;
WaitNode q = null;
boolean queued = false;
for (;;) {
// 如果线程已中断,则直接将当前节点q从waiters中移出
if (Thread.interrupted()) {
removeWaiter(q);
throw new InterruptedException();
}

int s = state;
// 最终状态,返回任务执行结果
if (s > COMPLETING) {
if (q != null)
q.thread = null;
return s;
}
// 中间状态,则等待任务执行完
else if (s == COMPLETING) // cannot time out yet
Thread.yield();
// 如果发现尚未有节点,则创建节点
else if (q == null)
q = new WaitNode();
// 如果当前节点尚未入队,则将当前节点放到waiters中
else if (!queued)
queued = UNSAFE.compareAndSwapObject(this, waitersOffset,
q.next = waiters, q);
// 线程被阻塞指定时间后再唤醒
else if (timed) {
nanos = deadline - System.nanoTime();
if (nanos <= 0L) {
removeWaiter(q);
return state;
}
LockSupport.parkNanos(this, nanos);
}
// 线程一直被阻塞直到被其他线程唤醒
else
LockSupport.park(this);
}
}

cancel

1
2
3
4
5
6
7
8
9
10
11
12
13
14
15
16
17
18
19
20
21
22
23
24
public boolean cancel(boolean mayInterruptIfRunning) {
// 如果状态不为NEW,且无法将状态更新为INTERRUPTING或CANCELLED,则直接返回取消失败
if (!(state == NEW &&
UNSAFE.compareAndSwapInt(this, stateOffset, NEW,
mayInterruptIfRunning ? INTERRUPTING : CANCELLED)))
return false;
try { // in case call to interrupt throws exception
// 允许运行中进行中断操作
if (mayInterruptIfRunning) {
try {
Thread t = runner;
if (t != null)
t.interrupt();
} finally { // final state
// 中断成功,则置为最终状态
UNSAFE.putOrderedInt(this, stateOffset, INTERRUPTED);
}
}
} finally {
// 唤醒所有等待的线程,并调用done
finishCompletion();
}
return true;
}

日常开发中,可能会遇到某个业务方法中需要调用多个 rpc 接口,这时就可以考虑利用多线程技术提高执行效率。

Thread.join

其作用是调用线程等待子线程完成后,才能继续用下运行。

示例:

1
2
3
4
5
6
7
8
9
10
11
12
13
14
15
16
17
18
19
20
21
22
23
24
25
26
27
28
29
30
31
32
33
34
35
36
37
38
39
40
41
42
43
44
45
46
47
48
49
50
51
52
53
54
55
56
@Test
public void joinTest() throws InterruptedException {
// 存放任务及其执行结果映射
Map<String, String> taskResults = new HashMap<>();

// 模拟任务1
Runnable task1 = () -> {
// 模拟任务执行
try {
System.out.println("任务1执行中");
Thread.sleep(200);
taskResults.put("task1", "result1");
} catch (InterruptedException e) {
e.printStackTrace();
}
};

// 模拟任务2
Runnable task2 = () -> {
// 模拟任务执行
try {
System.out.println("任务2执行中");
Thread.sleep(200);
taskResults.put("task2", "result2");
} catch (InterruptedException e) {
e.printStackTrace();
}
};

// 模拟任务3
Runnable task3 = () -> {
// 模拟任务执行
try {
System.out.println("任务3执行中");
Thread.sleep(200);
taskResults.put("task3", "result3");
} catch (InterruptedException e) {
e.printStackTrace();
}
};

Thread thread1 = new Thread(task1);
Thread thread2 = new Thread(task2);
Thread thread3 = new Thread(task3);

thread1.start();
thread2.start();
thread3.start();

// 主线程等待子线程执行完毕
thread1.join();
thread2.join();
thread3.join();

System.out.println("所有任务已执行结束,任务结果:" + taskResults.toString());
}

输出:

1
2
3
4
任务2执行中
任务1执行中
任务3执行中
所有任务已执行结束,任务结果:{task1=result1, task2=result2, task3=result3}

缺点:
要调用 Thread.join() 方法,就得显示创建线程,从而不能利用线程池以减少资源的消耗。

Thread.invokeAll

其作用是触发执行任务列表,返回的结果顺序与任务在任务列表中的顺序一致。所有线程执行完任务后才返回结果。如果设置了超时时间,未超时完成则正常返回结果,如果超时未完成则报异常。

示例:

1
2
3
4
5
6
7
8
9
10
11
12
13
14
15
16
17
18
19
20
21
22
23
24
25
26
27
28
29
30
31
32
33
34
35
@Test
public void invokeAllTest() throws InterruptedException, ExecutionException {
ExecutorService executor = Executors.newFixedThreadPool(5);

// 模拟任务1
Callable<String> task1 = () -> {
// 模拟任务执行
System.out.println("任务1执行中");
Thread.sleep(200);
return "result1";
};

// 模拟任务2
Callable<String> task2 = () -> {
// 模拟任务执行
System.out.println("任务2执行中");
Thread.sleep(200);
return "result2";
};

// 模拟任务3
Callable<String> task3 = () -> {
// 模拟任务执行
System.out.println("任务3执行中");
Thread.sleep(200);
return "result3";
};

// 同时提交多个任务,并等任务都执行完毕后返回
List<Future<String>> futures = executor.invokeAll(Arrays.asList(task1, task2, task3));

for (Future future : futures) {
System.out.println(future.get());
}
}

输出:

1
2
3
4
5
6
任务2执行中
任务1执行中
任务3执行中
result1
result2
result3

观察”do work”输出可知线程是并行执行的,观察”result”输出可知future结果是顺序序输出的。虽然输出与前面的FutureTask方式一样,但效率它会高些,因为FutureTaskget方法会阻塞后面的操作。

FutureTask

FutureTask适用于异步获取执行结果或取消执行任务的场景。
由于它同时实现了RunnableFuture接口,因此它既可以作为Runnable被线程执行,又可以作为Future得到Callable的返回值。

示例:

1
2
3
4
5
6
7
8
9
10
11
12
13
14
15
16
17
18
19
20
21
22
23
24
25
26
27
28
29
30
31
32
33
34
35
36
37
38
39
40
41
42
@Test
public void test1() throws ExecutionException, InterruptedException {
// 创建线程池
ExecutorService executor = Executors.newFixedThreadPool(10);

// 模拟任务1
FutureTask<String> task1 = new FutureTask<>(() -> {
System.out.println(Thread.currentThread().getName() + ": task1");
Thread.sleep(200);
return "result1";
});
// 模拟任务2
FutureTask<String> task2 = new FutureTask<>(() -> {
System.out.println(Thread.currentThread().getName() + ": task2");
Thread.sleep(200);
return "result2";
});
// 模拟任务3
FutureTask<String> task3 = new FutureTask<>(() -> {
System.out.println(Thread.currentThread().getName() + ": task3");
Thread.sleep(200);
return "result3";
});

// 提交任务1
executor.submit(task1);
// 提交任务2
executor.submit(task2);
// 提交任务3
executor.submit(task3);

// 获取任务1的执行结果
String result1 = task1.get();
// 获取任务2的执行结果
String result2 = task2.get();
// 获取任务3的执行结果
String result3 = task3.get();

System.out.println(result1);
System.out.println(result2);
System.out.println(result3);
}

输出:

1
2
3
4
5
6
任务2执行中
任务1执行中
任务3执行中
result1
result2
result3

缺点:
由于调用 Future.get() 操作会阻塞当前线程,这样假如 task1 任务执行的时间很长,那么即使其他 tasks 都已执行完毕,我们也得等待 task 执行完,从而不能优先处理最先完成的任务结果。

CountDownLatch

CountDownLatch,通常称之为闭锁,它允许一个或多个线程等待,直到在其他线程中执行的一组操作完成。

示例:

1
2
3
4
5
6
7
8
9
10
11
12
13
14
15
16
17
18
19
20
21
22
23
24
25
26
27
28
29
30
31
32
33
34
35
36
37
38
39
40
41
42
43
44
45
46
47
48
49
50
51
52
53
54
55
56
57
58
59
60
61
62
63
64
65
@Test
public void countDownLatchTest() throws InterruptedException {
// 创建线程池
ExecutorService executor = Executors.newFixedThreadPool(5);

// 存放任务及其执行结果映射
Map<String, String> taskResults = new HashMap<>();

// 创建闭锁:当count减为0时,线程才会继续往下执行
CountDownLatch countDownLatch = new CountDownLatch(3);

// 模拟任务1
Runnable task1 = () -> {
// 模拟任务执行
try {
System.out.println("任务1执行中");
Thread.sleep(200);
taskResults.put("task1", "result1");
} catch (InterruptedException e) {
e.printStackTrace();
}

countDownLatch.countDown();
};

// 模拟任务2
Runnable task2 = () -> {
// 模拟任务执行
try {
System.out.println("任务2执行中");
Thread.sleep(200);
taskResults.put("task2", "result2");
} catch (InterruptedException e) {
e.printStackTrace();
}

countDownLatch.countDown();
};

// 模拟任务3
Runnable task3 = () -> {
// 模拟任务执行
try {
System.out.println("任务3执行中");
Thread.sleep(200);
taskResults.put("task3", "result3");
} catch (InterruptedException e) {
e.printStackTrace();
}

countDownLatch.countDown();
};

// 提交任务1
executor.execute(task1);
// 提交任务2
executor.execute(task2);
// 提交任务3
executor.execute(task3);

// 等待所有任务执行完毕
countDownLatch.await();

System.out.println("所有任务已执行结束,任务结果:" + taskResults.toString());
}

输出:

1
2
3
4
任务2执行中
任务1执行中
任务3执行中
所有任务已执行结束,任务结果:{task1=result1, task2=result2, task3=result3}

CyclicBarrier

CyclicBarrier,即可重用屏障/栅栏,它允许一组线程彼此等待到达一个共同的障碍点,并可以设置线程都到达障碍点后要执行的命令。

示例:

1
2
3
4
5
6
7
8
9
10
11
12
13
14
15
16
17
18
19
20
21
22
23
24
25
26
27
28
29
30
31
32
33
34
35
36
37
38
39
40
41
42
43
44
45
46
47
48
49
50
51
52
53
54
55
56
57
58
59
60
61
62
63
64
65
66
67
68
69
70
71
72
73
74
75
76
77
@Test
public void cyclicBarrierTest() throws InterruptedException, BrokenBarrierException {
// 存放任务及其执行结果映射
Map<String, String> taskResults = new HashMap<>();

// 创建栅栏:等待指定数目的任务都执行完后,输出所有任务执行结果
CyclicBarrier barrier = new CyclicBarrier(4, () -> {
System.out.println("所有任务已执行结束,任务结果:" + taskResults.toString());
});

// 模拟任务1
Runnable task1 = () -> {
// 模拟任务执行
try {
System.out.println("任务1执行中");
Thread.sleep(200);
taskResults.put("task1", "result1");
} catch (InterruptedException e) {
e.printStackTrace();
}

try {
// 执行完成,等待屏障
barrier.await();
} catch (InterruptedException | BrokenBarrierException e) {
e.printStackTrace();
}
};

// 模拟任务2
Runnable task2 = () -> {
// 模拟任务执行
try {
System.out.println("任务2执行中");
Thread.sleep(200);
taskResults.put("task2", "result2");
} catch (InterruptedException e) {
e.printStackTrace();
}

try {
// 执行完成,等待屏障
barrier.await();
} catch (InterruptedException | BrokenBarrierException e) {
e.printStackTrace();
}
};

// 模拟任务3
Runnable task3 = () -> {
// 模拟任务执行
try {
System.out.println("任务3执行中");
Thread.sleep(200);
taskResults.put("task3", "result3");
} catch (InterruptedException e) {
e.printStackTrace();
}

try {
// 执行完成,等待屏障
barrier.await();
} catch (InterruptedException | BrokenBarrierException e) {
e.printStackTrace();
}
};

// 提交任务1
new Thread(task1).start();
// 提交任务2
new Thread(task2).start();
// 提交任务3
new Thread(task3).start();

// 主线程等待屏障
barrier.await();
}

输出:

1
2
3
4
任务2执行中
任务1执行中
任务3执行中
所有任务已执行结束,任务结果:{task1=result1, task2=result2, task3=result3}

CompletionService

CompletionService适用于异步获取并行任务执行结果。
使用FutureCallable可以获取线程执行结果,但获取方式确是阻塞的,根据添加到线程池中的线程顺序,依次获取,获取不到就阻塞。CompletionService采用轮询的方式,可以做到异步非阻塞获取执行结果。

示例:

1
2
3
4
5
6
7
8
9
10
11
12
13
14
15
16
17
18
19
20
21
22
23
24
25
26
27
28
29
30
31
32
33
34
35
36
37
38
39
40
41
42
43
44
45
46
47
@Test
public void completionServiceTest() {
ExecutorService executor = Executors.newFixedThreadPool(5);
CompletionService<String> completionService = new ExecutorCompletionService<>(executor);

// 模拟任务1
Callable<String> task1 = () -> {
// 模拟任务执行
System.out.println("任务1执行中");
Thread.sleep(200);
return "result1";
};

// 模拟任务2
Callable<String> task2 = () -> {
// 模拟任务执行
System.out.println("任务2执行中");
Thread.sleep(200);
return "result2";
};

// 模拟任务3
Callable<String> task3 = () -> {
// 模拟任务执行
System.out.println("任务3执行中");
Thread.sleep(200);
return "result3";
};

// 提交任务1
completionService.submit(task1);
// 提交任务2
completionService.submit(task2);
// 提交任务3
completionService.submit(task3);

// 获取任务结果
IntStream.range(0, 3).forEach(index -> {
try {
// 按任务执行完毕的顺序,获取任务结果
Future<String> future = completionService.take();
System.out.println(future.get());
} catch (InterruptedException | ExecutionException e) {
e.printStackTrace();
}
});
}

输出:

1
2
3
4
5
6
任务3执行中
任务1执行中
任务2执行中
result3
result2
result1

CompletableFuture

在Java8中,CompletableFuture提供了非常强大的Future的扩展功能,可以帮助我们简化异步编程的复杂性,并且提供了函数式编程的能力,可以通过回调的方式处理计算结果,也提供了转换和组合CompletableFuture的方法。

示例:

1
2
3
4
5
6
7
8
9
10
11
12
13
14
15
16
17
18
19
20
21
22
23
24
25
26
27
28
29
30
31
32
33
34
35
36
37
38
39
40
41
42
43
44
45
46
47
48
49
50
51
52
53
54
55
56
57
58
59
60
61
62
63
64
65
66
67
68
69
70
71
72
73
74
75
76
77
78
79
80
81
82
83
84
85
86
87
88
89
90
91
92
93
94
95
96
97
98
99
100
101
102
103
@Test
public void completableFutureTest() {
/*// 创建线程池
ExecutorService executor = Executors.newFixedThreadPool(10);

// 模拟任务1
CompletableFuture<String> future1 = CompletableFuture.supplyAsync(() -> {
// 模拟任务执行
try {
System.out.println("任务1执行中");
Thread.sleep(200);
System.out.println("任务1执行完毕");
} catch (InterruptedException e) {
e.printStackTrace();
}
return "result1";
}, executor
);

// 模拟任务2
CompletableFuture<String> future2 = CompletableFuture.supplyAsync(() -> {
// 模拟任务执行
try {
System.out.println("任务2执行中");
Thread.sleep(200);
System.out.println("任务2执行完毕");
} catch (InterruptedException e) {
e.printStackTrace();
}
return "result2";
}, executor
);

// 模拟任务3
CompletableFuture<String> future3 = CompletableFuture.supplyAsync(() -> {
// 模拟任务执行
try {
System.out.println("任务3执行中");
Thread.sleep(200);
System.out.println("任务3执行完毕");
} catch (InterruptedException e) {
e.printStackTrace();
}
return "result3";
}, executor
);

List<String> results = Stream.of(future1, future2, future3)
.map(CompletableFuture::join)
.collect(Collectors.toList());
System.out.println("所有任务已执行结束,任务结果:" + results.toString());*/

// 创建线程池
ExecutorService executor = Executors.newFixedThreadPool(10);

Map<String, String> results = new HashMap<>();

// 模拟任务1
CompletableFuture<String> future1 = CompletableFuture.supplyAsync(() -> {
// 模拟任务执行
try {
System.out.println("任务1执行中");
Thread.sleep(200);
System.out.println("任务1执行完毕");
} catch (InterruptedException e) {
e.printStackTrace();
}
return "result1";
}, executor
).whenComplete((v, e) -> results.put("task1", v));

// 模拟任务2
CompletableFuture<String> future2 = CompletableFuture.supplyAsync(() -> {
// 模拟任务执行
try {
System.out.println("任务2执行中");
Thread.sleep(200);
System.out.println("任务2执行完毕");
} catch (InterruptedException e) {
e.printStackTrace();
}
return "result2";
}, executor
).whenComplete((v, e) -> results.put("task2", v));

// 模拟任务3
CompletableFuture<String> future3 = CompletableFuture.supplyAsync(() -> {
// 模拟任务执行
try {
System.out.println("任务3执行中");
Thread.sleep(200);
System.out.println("任务3执行完毕");
} catch (InterruptedException e) {
e.printStackTrace();
}
return "result3";
}, executor
).whenComplete((v, e) -> results.put("task3", v));

CompletableFuture.allOf(future1, future2, future3)
.thenRun(() -> System.out.println("所有任务已执行结束,任务结果:" + results.toString()))
.join();
}

输出:

1
2
3
4
5
6
7
任务2执行中
任务1执行中
任务3执行中
任务2执行完毕
任务1执行完毕
任务3执行完毕
所有任务已执行结束,任务结果:[result1, result2, result3]

ParallelStream

对于计算密集型任务,可以使用ParallelStream,其底层使用Fork/Join框架实现。

示例:

1
2
3
4
5
6
7
8
9
10
11
12
@Test
public void forkJoinTest() {
IntStream.range(0, 10).parallel().forEach((index) -> System.out.println(String.format("任务%s执行中", index)));

List<String> results = IntStream.range(0, 10).parallel()
.mapToObj((index) -> {
System.out.println(String.format("任务%s执行中", index));
return String.format("result%s", index);
}).collect(Collectors.toList());

System.out.println("所有任务已执行结束,任务结果:" + results.toString());
}

输出:

1
2
3
4
5
6
7
8
9
10
11
12
13
14
15
16
17
18
19
20
21
任务6执行中
任务5执行中
任务2执行中
任务4执行中
任务1执行中
任务3执行中
任务0执行中
任务8执行中
任务7执行中
任务9执行中
任务6执行中
任务1执行中
任务2执行中
任务4执行中
任务3执行中
任务8执行中
任务0执行中
任务7执行中
任务5执行中
任务9执行中
所有任务已执行结束,任务结果:[result0, result1, result2, result3, result4, result5, result6, result7, result8, result9]

缺点:
默认情况下所有的并行流计算都共享一个 ForkJoinPool,这个共享的 ForkJoinPool 默认的线程数是 CPU 的核数;如果所有的并行流计算都是 CPU 密集型计算的话,完全没有问题,但是如果存在 I/O 密集型的并行流计算,那么很可能会因为一个很慢的 I/O 计算而拖慢整个系统的性能。所以建议用不同的 ForkJoinPool 执行不同类型的计算任务。

使用Mybatis注解进行开发时,dao的定义和引用都很简单,比如下面这样:

1
2
3
4
5
6
7
8
9
10
11
12
13
14
15
16
17
18
19
20
21
22
23
24
@Repository
@Mapper
public interface CityMapper {

@Select("SELECT * FROM city WHERE state = #{state}")
City findByState(@Param("state") String state);
}

@SpringBootApplication
public class DemoApplication implements CommandLineRunner {
private final CityMapper cityMapper;

public DemoApplication(CityMapper cityMapper) {
this.cityMapper = cityMapper;
}
public static void main(String[] args) {
SpringApplication.run(DemoApplication.class, args);
}

@Override
public void run(String... args) {
System.out.println(this.cityMapper.findByState("CA"));
}
}

那么Mapper接口的实现原理是什么呢?为什么配合使用Mybatis相关注解,只需要定义一个接口,就能实现bean的注册与依赖注入?

其实现原理可以简单概括为:

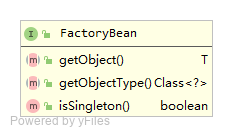
  • Spring IoC容器在注册bean “cityMapper”时,其实际类型是 FactoryBean
  • 从Spring IoC容器中获取bean “cityMapper”时,获取的不是FactoryBean本身,而是FactoryBeangetObject方法返回的对象
  • 该对象是CityMapper接口的实现类,基于jdk动态代理技术实现

大概了解了原理之后,就开始分析源码吧。

注册

MybatisAutoConfiguration

Spring Boot应用启动后,会扫描Mybatis自动装配类MybatisAutoConfiguration,该类中定义了内部类AutoConfiguredMapperScannerRegistrarMapperScannerRegistrarNotFoundConfiguration,其中MapperScannerRegistrarNotFoundConfiguration是一个配置类(添加了@Configuration),同时它导入(@Import)了内部类AutoConfiguredMapperScannerRegistrar,而内部类AutoConfiguredMapperScannerRegistrar又实现了ImportBeanDefinitionRegistrar接口,于是在装配AutoConfiguredMapperScannerRegistrar的时候,AutoConfiguredMapperScannerRegistrar会调用方法registerBeanDefinitions往Spring IoC容器中注册自定义bean definitions,这里的bean是MapperScannerConfigurer

1
2
3
4
5
6
7
8
9
10
11
12
13
14
15
16
17
18
19
20
21
22
23
24
25
26
27
28
29
30
31
32
33
34
35
36
37
38
39
40
41
42
43
44
45
46
47
48
49
50
51
52
53
54
55
56
57
58
59
60
61
62
63
64
65
@org.springframework.context.annotation.Configuration
@ConditionalOnClass({ SqlSessionFactory.class, SqlSessionFactoryBean.class })
@ConditionalOnSingleCandidate(DataSource.class)
@EnableConfigurationProperties(MybatisProperties.class)
@AutoConfigureAfter({ DataSourceAutoConfiguration.class, MybatisLanguageDriverAutoConfiguration.class })
public class MybatisAutoConfiguration implements InitializingBean {


/**
* This will just scan the same base package as Spring Boot does. If you want more power, you can explicitly use
* {@link org.mybatis.spring.annotation.MapperScan} but this will get typed mappers working correctly, out-of-the-box,
* similar to using Spring Data JPA repositories.
*/
public static class AutoConfiguredMapperScannerRegistrar implements BeanFactoryAware, ImportBeanDefinitionRegistrar {

private BeanFactory beanFactory;

@Override
public void registerBeanDefinitions(AnnotationMetadata importingClassMetadata, BeanDefinitionRegistry registry) {

if (!AutoConfigurationPackages.has(this.beanFactory)) {
logger.debug("Could not determine auto-configuration package, automatic mapper scanning disabled.");
return;
}

logger.debug("Searching for mappers annotated with @Mapper");

List<String> packages = AutoConfigurationPackages.get(this.beanFactory);
if (logger.isDebugEnabled()) {
packages.forEach(pkg -> logger.debug("Using auto-configuration base package '{}'", pkg));
}

BeanDefinitionBuilder builder = BeanDefinitionBuilder.genericBeanDefinition(MapperScannerConfigurer.class);
builder.addPropertyValue("processPropertyPlaceHolders", true);
builder.addPropertyValue("annotationClass", Mapper.class);
builder.addPropertyValue("basePackage", StringUtils.collectionToCommaDelimitedString(packages));
BeanWrapper beanWrapper = new BeanWrapperImpl(MapperScannerConfigurer.class);
Stream.of(beanWrapper.getPropertyDescriptors())
// Need to mybatis-spring 2.0.2+
.filter(x -> x.getName().equals("lazyInitialization")).findAny()
.ifPresent(x -> builder.addPropertyValue("lazyInitialization", "${mybatis.lazy-initialization:false}"));
registry.registerBeanDefinition(MapperScannerConfigurer.class.getName(), builder.getBeanDefinition());
}
}

...

/**
* If mapper registering configuration or mapper scanning configuration not present, this configuration allow to scan
* mappers based on the same component-scanning path as Spring Boot itself.
*/
@org.springframework.context.annotation.Configuration
@Import(AutoConfiguredMapperScannerRegistrar.class)
@ConditionalOnMissingBean({ MapperFactoryBean.class, MapperScannerConfigurer.class })
public static class MapperScannerRegistrarNotFoundConfiguration implements InitializingBean {

@Override
public void afterPropertiesSet() {
logger.debug(
"Not found configuration for registering mapper bean using @MapperScan, MapperFactoryBean and MapperScannerConfigurer.");
}

}

}

MapperScannerConfigurer

MapperScannerConfigurer实现了BeanDefinitionRegistryPostProcessor接口,因此通过重写postProcessBeanDefinitionRegistry方法可以实现自定义的注册bean定义的逻辑。

1
2
3
4
5
6
7
8
9
10
11
12
13
14
15
16
17
18
19
20
21
22
23
24
25
26
27
28
29
30
public class MapperScannerConfigurer implements BeanDefinitionRegistryPostProcessor, InitializingBean, ApplicationContextAware, BeanNameAware {

...

public void postProcessBeanDefinitionRegistry(BeanDefinitionRegistry registry) {
if (this.processPropertyPlaceHolders) {
this.processPropertyPlaceHolders();
}

ClassPathMapperScanner scanner = new ClassPathMapperScanner(registry);
scanner.setAddToConfig(this.addToConfig);
scanner.setAnnotationClass(this.annotationClass);
scanner.setMarkerInterface(this.markerInterface);
scanner.setSqlSessionFactory(this.sqlSessionFactory);
scanner.setSqlSessionTemplate(this.sqlSessionTemplate);
scanner.setSqlSessionFactoryBeanName(this.sqlSessionFactoryBeanName);
scanner.setSqlSessionTemplateBeanName(this.sqlSessionTemplateBeanName);
scanner.setResourceLoader(this.applicationContext);
scanner.setBeanNameGenerator(this.nameGenerator);
scanner.setMapperFactoryBeanClass(this.mapperFactoryBeanClass);
if (StringUtils.hasText(this.lazyInitialization)) {
scanner.setLazyInitialization(Boolean.valueOf(this.lazyInitialization));
}

scanner.registerFilters();
scanner.scan(StringUtils.tokenizeToStringArray(this.basePackage, ",; \t\n"));
}

...
}

ClassPathMapperScanner

ClassPathMapperScanner继承了ClassPathBeanDefinitionScannerClassPathBeanDefinitionScanner是spring-context类库下的类,它用于扫描类路径下所有类,并将符合过滤条件的类注册到IOC容器内。
ClassPathMapperScanner会将扫描到的Mapper接口的BeanDefinition的bean class设置为MapperFactoryBean

1
2
3
4
5
6
7
8
9
10
11
12
13
14
15
16
17
18
19
20
21
22
23
24
25
26
27
28
29
30
31
32
33
34
35
36
37
38
39
40
41
42
43
44
45
46
47
48
49
50
51
52
53
54
55
56
57
58
59
60
61
62
63
64
65
66
67
68
69
70
71
72
73
74
75
76
77
78
79
80
81
82
83
84
85
86
87
88
89
90
91
92
93
94
95
96
97
98
99
100
101
102
103
104
105
106
107
108
109
110
111
112
113
114
115
116
117
118
119
120
121
122
123
124
125
126
127
128
129
130
131
132
133
134

public class ClassPathMapperScanner extends ClassPathBeanDefinitionScanner {

...

public Set<BeanDefinitionHolder> doScan(String... basePackages) {
Set<BeanDefinitionHolder> beanDefinitions = super.doScan(basePackages);
if (beanDefinitions.isEmpty()) {
LOGGER.warn(() -> {
return "No MyBatis mapper was found in '" + Arrays.toString(basePackages) + "' package. Please check your configuration.";
});
} else {
this.processBeanDefinitions(beanDefinitions);
}

return beanDefinitions;
}

private void processBeanDefinitions(Set<BeanDefinitionHolder> beanDefinitions) {
GenericBeanDefinition definition;
for(Iterator var3 = beanDefinitions.iterator(); var3.hasNext(); definition.setLazyInit(this.lazyInitialization)) {
BeanDefinitionHolder holder = (BeanDefinitionHolder)var3.next();
definition = (GenericBeanDefinition)holder.getBeanDefinition();
String beanClassName = definition.getBeanClassName();
LOGGER.debug(() -> {
return "Creating MapperFactoryBean with name '" + holder.getBeanName() + "' and '" + beanClassName + "' mapperInterface";
});
definition.getConstructorArgumentValues().addGenericArgumentValue(beanClassName);
// 关键:设置bean为MapperFactoryBean
definition.setBeanClass(this.mapperFactoryBeanClass);
definition.getPropertyValues().add("addToConfig", this.addToConfig);
boolean explicitFactoryUsed = false;
if (StringUtils.hasText(this.sqlSessionFactoryBeanName)) {
definition.getPropertyValues().add("sqlSessionFactory", new RuntimeBeanReference(this.sqlSessionFactoryBeanName));
explicitFactoryUsed = true;
} else if (this.sqlSessionFactory != null) {
definition.getPropertyValues().add("sqlSessionFactory", this.sqlSessionFactory);
explicitFactoryUsed = true;
}

if (StringUtils.hasText(this.sqlSessionTemplateBeanName)) {
if (explicitFactoryUsed) {
LOGGER.warn(() -> {
return "Cannot use both: sqlSessionTemplate and sqlSessionFactory together. sqlSessionFactory is ignored.";
});
}

definition.getPropertyValues().add("sqlSessionTemplate", new RuntimeBeanReference(this.sqlSessionTemplateBeanName));
explicitFactoryUsed = true;
} else if (this.sqlSessionTemplate != null) {
if (explicitFactoryUsed) {
LOGGER.warn(() -> {
return "Cannot use both: sqlSessionTemplate and sqlSessionFactory together. sqlSessionFactory is ignored.";
});
}

definition.getPropertyValues().add("sqlSessionTemplate", this.sqlSessionTemplate);
explicitFactoryUsed = true;
}

if (!explicitFactoryUsed) {
LOGGER.debug(() -> {
return "Enabling autowire by type for MapperFactoryBean with name '" + holder.getBeanName() + "'.";
});
definition.setAutowireMode(2);
}
}

}

...

}

public class ClassPathBeanDefinitionScanner extends ClassPathScanningCandidateComponentProvider {

...

/**
* Perform a scan within the specified base packages.
* @param basePackages the packages to check for annotated classes
* @return number of beans registered
*/
public int scan(String... basePackages) {
int beanCountAtScanStart = this.registry.getBeanDefinitionCount();

doScan(basePackages);

// Register annotation config processors, if necessary.
if (this.includeAnnotationConfig) {
AnnotationConfigUtils.registerAnnotationConfigProcessors(this.registry);
}

return (this.registry.getBeanDefinitionCount() - beanCountAtScanStart);
}

/**
* Perform a scan within the specified base packages,
* returning the registered bean definitions.
* <p>This method does <i>not</i> register an annotation config processor
* but rather leaves this up to the caller.
* @param basePackages the packages to check for annotated classes
* @return set of beans registered if any for tooling registration purposes (never {@code null})
*/
protected Set<BeanDefinitionHolder> doScan(String... basePackages) {
Assert.notEmpty(basePackages, "At least one base package must be specified");
Set<BeanDefinitionHolder> beanDefinitions = new LinkedHashSet<>();
for (String basePackage : basePackages) {
Set<BeanDefinition> candidates = findCandidateComponents(basePackage);
for (BeanDefinition candidate : candidates) {
ScopeMetadata scopeMetadata = this.scopeMetadataResolver.resolveScopeMetadata(candidate);
candidate.setScope(scopeMetadata.getScopeName());
String beanName = this.beanNameGenerator.generateBeanName(candidate, this.registry);
if (candidate instanceof AbstractBeanDefinition) {
postProcessBeanDefinition((AbstractBeanDefinition) candidate, beanName);
}
if (candidate instanceof AnnotatedBeanDefinition) {
AnnotationConfigUtils.processCommonDefinitionAnnotations((AnnotatedBeanDefinition) candidate);
}
if (checkCandidate(beanName, candidate)) {
BeanDefinitionHolder definitionHolder = new BeanDefinitionHolder(candidate, beanName);
definitionHolder =
AnnotationConfigUtils.applyScopedProxyMode(scopeMetadata, definitionHolder, this.registry);
beanDefinitions.add(definitionHolder);
registerBeanDefinition(definitionHolder, this.registry);
}
}
}
return beanDefinitions;
}

...

}

MapperFactoryBean

MapperFactoryBean是一个FactoryBean,定义了将从SqlSessionTemplate中获取实现了Mapper接口的真实bean。
另外,它还继承了SqlSessionDaoSupportSqlSessionDaoSupport继承了DaoSupportDaoSupport实现了InitializingBean,且在afterPropertiesSet中调用了checkDaoConfig
checkDaoConfig又会经Configuration.addMapper(Class type)到调用MapperRegistry.addMapper(Class type),将Mapper Bean添加到MapperRegistry的注册表(knownMappers:Map<Class, MapperProxyFactory>)中。

1
2
3
4
5
6
7
8
9
10
11
12
13
14
15
16
17
18
19
20
21
22
23
24
25
26
27
28
29
30
31
32
33
34
35
36
public class MapperFactoryBean<T> extends SqlSessionDaoSupport implements FactoryBean<T> {

...

@Override
public T getObject() throws Exception {
return getSqlSession().getMapper(this.mapperInterface);
}

...

/**
* bean实例化之后调用
*/
@Override
protected void checkDaoConfig() {
super.checkDaoConfig();

notNull(this.mapperInterface, "Property 'mapperInterface' is required");

Configuration configuration = getSqlSession().getConfiguration();
if (this.addToConfig && !configuration.hasMapper(this.mapperInterface)) {
try {
configuration.addMapper(this.mapperInterface);
} catch (Exception e) {
logger.error("Error while adding the mapper '" + this.mapperInterface + "' to configuration.", e);
throw new IllegalArgumentException(e);
} finally {
ErrorContext.instance().reset();
}
}
}

...

}

MapperRegistry

MapperRegistry

1
2
3
4
5
6
7
8
9
10
11
12
13
14
15
16
17
18
19
20
21
22
23
24
25
26
27
28
29
30
31
32
33
34
35
36
37
38
39
40
41
42
43
44
45
46
47
48
49
50
51
52
53
54
55
56
57
58
59
60
61
62
63
64
65
66
67
68
69
70
71
72
73
74
75
76
77
78
79
80
81
82
83
public class MapperRegistry {

private final Configuration config;
// 注册表,key:mapper interface,value: MapperProxyFactory
private final Map<Class<?>, MapperProxyFactory<?>> knownMappers = new HashMap<>();

public MapperRegistry(Configuration config) {
this.config = config;
}

/**
* 从注册表中获取MapperProxyFactory
*/
@SuppressWarnings("unchecked")
public <T> T getMapper(Class<T> type, SqlSession sqlSession) {
final MapperProxyFactory<T> mapperProxyFactory = (MapperProxyFactory<T>) knownMappers.get(type);
if (mapperProxyFactory == null) {
throw new BindingException("Type " + type + " is not known to the MapperRegistry.");
}
try {
// 传入sqlSession,动态实例化type,即mapper interface
return mapperProxyFactory.newInstance(sqlSession);
} catch (Exception e) {
throw new BindingException("Error getting mapper instance. Cause: " + e, e);
}
}

public <T> boolean hasMapper(Class<T> type) {
return knownMappers.containsKey(type);
}

/**
* 添加到注册表中
*/
public <T> void addMapper(Class<T> type) {
if (type.isInterface()) {
if (hasMapper(type)) {
throw new BindingException("Type " + type + " is already known to the MapperRegistry.");
}
boolean loadCompleted = false;
try {
knownMappers.put(type, new MapperProxyFactory<>(type));
// It's important that the type is added before the parser is run
// otherwise the binding may automatically be attempted by the
// mapper parser. If the type is already known, it won't try.
MapperAnnotationBuilder parser = new MapperAnnotationBuilder(config, type);
parser.parse();
loadCompleted = true;
} finally {
if (!loadCompleted) {
knownMappers.remove(type);
}
}
}
}

/**
* @since 3.2.2
*/
public Collection<Class<?>> getMappers() {
return Collections.unmodifiableCollection(knownMappers.keySet());
}

/**
* @since 3.2.2
*/
public void addMappers(String packageName, Class<?> superType) {
ResolverUtil<Class<?>> resolverUtil = new ResolverUtil<>();
resolverUtil.find(new ResolverUtil.IsA(superType), packageName);
Set<Class<? extends Class<?>>> mapperSet = resolverUtil.getClasses();
for (Class<?> mapperClass : mapperSet) {
addMapper(mapperClass);
}
}

/**
* @since 3.2.2
*/
public void addMappers(String packageName) {
addMappers(packageName, Object.class);
}

}

查找

从Spring IoC容器中查找Mapper bean,首先会调用MapperFactoryBean.getObject(),然后经历:
MapperFactoryBean.getObject() ->
SqlSessionManager.getMapper(Class type) ->
Configuration.getMapper(Class type, SqlSession sqlSession) ->
MapperRegistry.getMapper(Class type, SqlSession sqlSession) ->
一直到最终调用:MapperProxyFactory.newInstance(SqlSession sqlSession)。

MapperProxyFactory

MapperProxyFactory是一个工厂类,用于动态创建代理类mapper proxy,也即mapper interface的实现类。

1
2
3
4
5
6
7
8
9
10
11
12
13
14
15
16
17
18
19
20
21
22
23
24
25
26
27
28
29
public class MapperProxyFactory<T> {

private final Class<T> mapperInterface;
private final Map<Method, MapperMethod> methodCache = new ConcurrentHashMap<>();

public MapperProxyFactory(Class<T> mapperInterface) {
this.mapperInterface = mapperInterface;
}

public Class<T> getMapperInterface() {
return mapperInterface;
}

public Map<Method, MapperMethod> getMethodCache() {
return methodCache;
}

@SuppressWarnings("unchecked")
protected T newInstance(MapperProxy<T> mapperProxy) {
// 利用jdk动态代理,动态创建实现类
return (T) Proxy.newProxyInstance(mapperInterface.getClassLoader(), new Class[] { mapperInterface }, mapperProxy);
}

public T newInstance(SqlSession sqlSession) {
final MapperProxy<T> mapperProxy = new MapperProxy<>(sqlSession, mapperInterface, methodCache);
return newInstance(mapperProxy);
}

}

整体流程

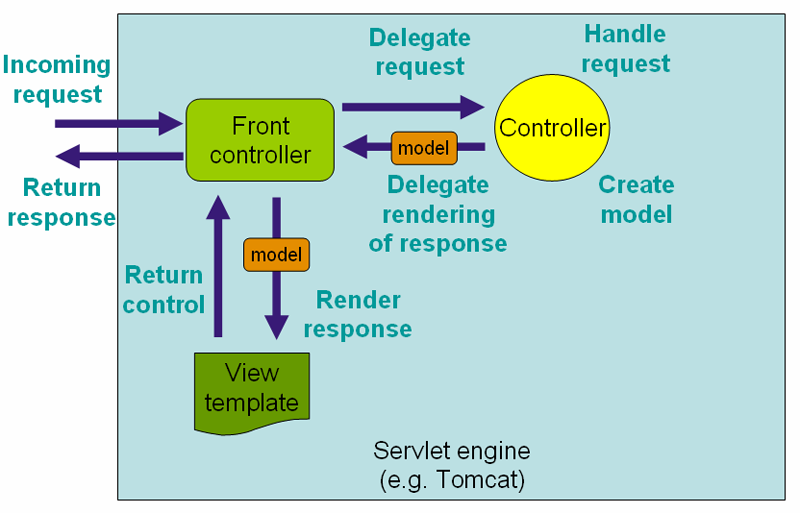
官方请求流程示意图:
Spring MVC请求处理流程示意图

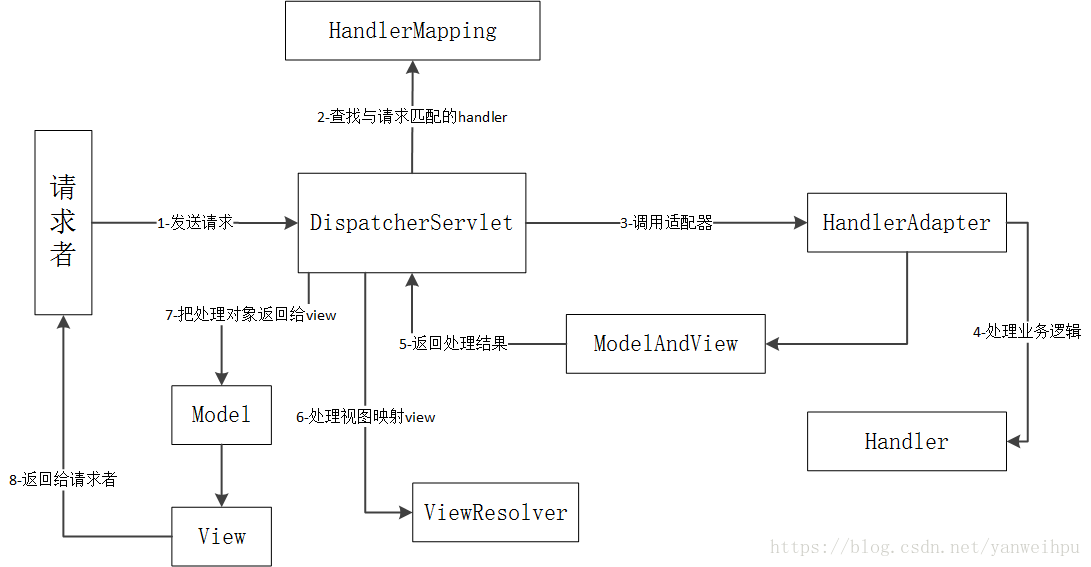
上图描述比较简单,详细描述如下:

  1. 用户发送请求,请求到达SpringMVC的前端控制器(DispatcherServlet)
  2. 根据请求的url,从请求处理器映射器(HandlerMapping)列表中查找与之匹配的handler,并将其与拦截器(HandlerInterceptor)列表一起包装为HandlerExecutionChain返回
  3. 根据前面的handler,从请求处理器映射适配器(HandlerAdapter)列表中查找与之适配的handler adapter
  4. 遍历HandlerExecutionChain中的拦截器(HandlerInterceptor)列表,依次调用拦截器的前置处理方法(preHandle)
  5. 执行请求处理器映射适配器(HandlerAdapter)中的处理方法(handle),返回ModelAndView
  6. 遍历HandlerExecutionChain中的拦截器(HandlerInterceptor)列表,依次调用拦截器的后置处理方法(postHandle)
  7. 从视图解析器(ViewResolver)列表中找到合适的view resolver,解析前面的ModelAndView
  8. 最后将返回的视图进行渲染并把数据装入到request域,返回给用户

流程图可表示为:
Spring MVC请求处理流程

源码如下:

1
2
3
4
5
6
7
8
9
10
11
12
13
14
15
16
17
18
19
20
21
22
23
24
25
26
27
28
29
30
31
32
33
34
35
36
37
38
39
40
41
42
43
44
45
46
47
48
49
50
51
52
53
54
55
56
57
58
59
60
61
62
63
64
65
66
67
68
69
70
71
72
73
74
75
76
77
78
79
80
81
82
83
84
85
86
87
88
89
90
91
92
93
94
95
96
97
98
99
100
101
102
103
104
105
106
/**
* Process the actual dispatching to the handler.
* <p>The handler will be obtained by applying the servlet's HandlerMappings in order.
* The HandlerAdapter will be obtained by querying the servlet's installed HandlerAdapters
* to find the first that supports the handler class.
* <p>All HTTP methods are handled by this method. It's up to HandlerAdapters or handlers
* themselves to decide which methods are acceptable.
* @param request current HTTP request
* @param response current HTTP response
* @throws Exception in case of any kind of processing failure
*/
protected void doDispatch(HttpServletRequest request, HttpServletResponse response) throws Exception {
HttpServletRequest processedRequest = request;
HandlerExecutionChain mappedHandler = null;
boolean multipartRequestParsed = false;

WebAsyncManager asyncManager = WebAsyncUtils.getAsyncManager(request);

try {
ModelAndView mv = null;
Exception dispatchException = null;

try {
// 处理附件:将请求转换为多部分请求,并使多部分解析器可用。如果没有设置多部分解析器,只需使用现有的请求
processedRequest = checkMultipart(request);
multipartRequestParsed = (processedRequest != request);

// Determine handler for the current request.
// 根据请求的url,获取与之匹配的handler,并将其与拦截器(HandlerInterceptor)列表一起包装为HandlerExecutionChain返回
// 这里的handler可能是HandlerMethod,可能是Controller,也可能是HttpRequestHandler或Servlet 对象
mappedHandler = getHandler(processedRequest);
if (mappedHandler == null) {
noHandlerFound(processedRequest, response);
return;
}

// Determine handler adapter for the current request.
// 将不同类型的handler统一转换成HandlerAdapter,以便统一调用
HandlerAdapter ha = getHandlerAdapter(mappedHandler.getHandler());

// Process last-modified header, if supported by the handler.
String method = request.getMethod();
boolean isGet = "GET".equals(method);
if (isGet || "HEAD".equals(method)) {
long lastModified = ha.getLastModified(request, mappedHandler.getHandler());
if (new ServletWebRequest(request, response).checkNotModified(lastModified) && isGet) {
return;
}
}

// 遍历拦截器(HandlerInterceptor)列表,依次调用拦截器的前置处理方法(preHandle)
// 如果其中有拦截器返回false,表示该拦截器已经处理了响应本身,这里就直接返回
if (!mappedHandler.applyPreHandle(processedRequest, response)) {
return;
}

// Actually invoke the handler.
// 处理请求,返回ModelAndView
mv = ha.handle(processedRequest, response, mappedHandler.getHandler());

if (asyncManager.isConcurrentHandlingStarted()) {
return;
}

// 视情况设置view name
applyDefaultViewName(processedRequest, mv);
// 遍历拦截器(HandlerInterceptor)列表,依次调用拦截器的后置处理方法(postHandle)
// 如果使用了@ResponseBody或ResponseEntity,则不建议使用postHandle,而是使用ResponseBodyAdvice,并将其声明为控制器通知bean,或者直接在RequestMappingHandlerAdapter上配置它
mappedHandler.applyPostHandle(processedRequest, response, mv);
}
catch (Exception ex) {
dispatchException = ex;
}
catch (Throwable err) {
// As of 4.3, we're processing Errors thrown from handler methods as well,
// making them available for @ExceptionHandler methods and other scenarios.
dispatchException = new NestedServletException("Handler dispatch failed", err);
}
// 处理调用结果,处理异常、国际化、视图解析等
processDispatchResult(processedRequest, response, mappedHandler, mv, dispatchException);
}
catch (Exception ex) {
triggerAfterCompletion(processedRequest, response, mappedHandler, ex);
}
catch (Throwable err) {
// 请求处理完成后回调,即呈现视图后回调
// 遍历拦截器(HandlerInterceptor)列表,依次调用拦截器的完成后处理方法(afterCompletion)
triggerAfterCompletion(processedRequest, response, mappedHandler,
new NestedServletException("Handler processing failed", err));
}
finally {
if (asyncManager.isConcurrentHandlingStarted()) {
// Instead of postHandle and afterCompletion
if (mappedHandler != null) {
mappedHandler.applyAfterConcurrentHandlingStarted(processedRequest, response);
}
}
else {
// Clean up any resources used by a multipart request.
// 清理多部分请求相关资源
if (multipartRequestParsed) {
cleanupMultipart(processedRequest);
}
}
}
}

DispatcherServlet

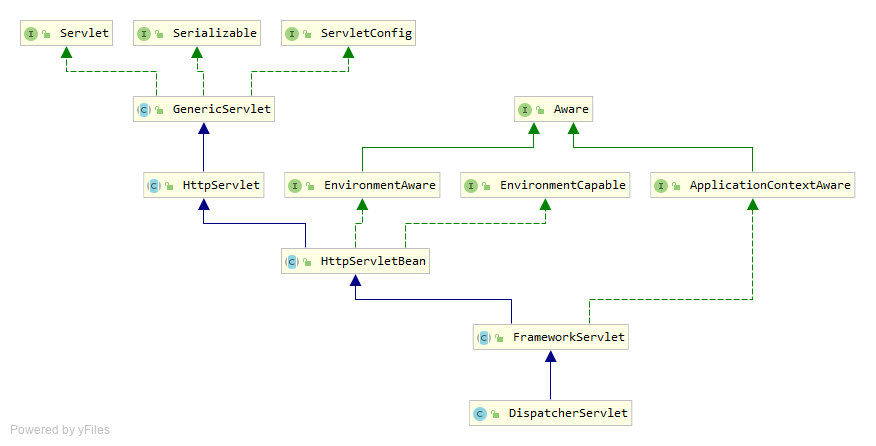
UML类图如下:
DispatcherServlet UML

由类图可知,DispatcherServlet继承自类FrameworkServlet,而FrameworkServlet又实现了接口ApplicationContextAware,这样FrameworkServlet就能拿到ApplicationContext来完成一些初始化工作。

1
2
3
4
5
6
7
8
9
10
11
12
13
14
15
16
17
18
19
20
21
22
23
24
25
26
27
28
29
30
31
32
33
34
35
36
37
38
39
40
41
42
43
44
45
46
47
48
49
50
51
52
53
54
55
56
57
58
59
60
61
62
63
64
65
66
67
68
69
70
71
72
73
74
75
76
77
78
79
80
81
82
83
84
85
86
87
88
89
90
91
92
93
94
95
96
97
98
99
100
101
102
103
104
105
106
107
108
109
110
111
112
113
114
115
116
117
118
119
120
121
122
123
124
125
126
127
128
129
130
131
132
133
134
135
136
137
138
139
140
141
142
143
144
145
146
147
148
149
public abstract class FrameworkServlet extends HttpServletBean implements ApplicationContextAware {
...

/**
* Called by Spring via {@link ApplicationContextAware} to inject the current
* application context. This method allows FrameworkServlets to be registered as
* Spring beans inside an existing {@link WebApplicationContext} rather than
* {@link #findWebApplicationContext() finding} a
* {@link org.springframework.web.context.ContextLoaderListener bootstrapped} context.
* <p>Primarily added to support use in embedded servlet containers.
* @since 4.0
*/
@Override
public void setApplicationContext(ApplicationContext applicationContext) {
if (this.webApplicationContext == null && applicationContext instanceof WebApplicationContext) {
this.webApplicationContext = (WebApplicationContext) applicationContext;
this.webApplicationContextInjected = true;
}
}


/**
* Overridden method of {@link HttpServletBean}, invoked after any bean properties
* have been set. Creates this servlet's WebApplicationContext.
*/
@Override
protected final void initServletBean() throws ServletException {
getServletContext().log("Initializing Spring " + getClass().getSimpleName() + " '" + getServletName() + "'");
if (logger.isInfoEnabled()) {
logger.info("Initializing Servlet '" + getServletName() + "'");
}
long startTime = System.currentTimeMillis();

try {
this.webApplicationContext = initWebApplicationContext();
initFrameworkServlet();
}
catch (ServletException | RuntimeException ex) {
logger.error("Context initialization failed", ex);
throw ex;
}

if (logger.isDebugEnabled()) {
String value = this.enableLoggingRequestDetails ?
"shown which may lead to unsafe logging of potentially sensitive data" :
"masked to prevent unsafe logging of potentially sensitive data";
logger.debug("enableLoggingRequestDetails='" + this.enableLoggingRequestDetails +
"': request parameters and headers will be " + value);
}

if (logger.isInfoEnabled()) {
logger.info("Completed initialization in " + (System.currentTimeMillis() - startTime) + " ms");
}
}

/**
* Initialize and publish the WebApplicationContext for this servlet.
* <p>Delegates to {@link #createWebApplicationContext} for actual creation
* of the context. Can be overridden in subclasses.
* @return the WebApplicationContext instance
* @see #FrameworkServlet(WebApplicationContext)
* @see #setContextClass
* @see #setContextConfigLocation
*/
protected WebApplicationContext initWebApplicationContext() {
WebApplicationContext rootContext =
WebApplicationContextUtils.getWebApplicationContext(getServletContext());
WebApplicationContext wac = null;

if (this.webApplicationContext != null) {
// A context instance was injected at construction time -> use it
wac = this.webApplicationContext;
if (wac instanceof ConfigurableWebApplicationContext) {
ConfigurableWebApplicationContext cwac = (ConfigurableWebApplicationContext) wac;
if (!cwac.isActive()) {
// The context has not yet been refreshed -> provide services such as
// setting the parent context, setting the application context id, etc
if (cwac.getParent() == null) {
// The context instance was injected without an explicit parent -> set
// the root application context (if any; may be null) as the parent
cwac.setParent(rootContext);
}
configureAndRefreshWebApplicationContext(cwac);
}
}
}
if (wac == null) {
// No context instance was injected at construction time -> see if one
// has been registered in the servlet context. If one exists, it is assumed
// that the parent context (if any) has already been set and that the
// user has performed any initialization such as setting the context id
wac = findWebApplicationContext();
}
if (wac == null) {
// No context instance is defined for this servlet -> create a local one
wac = createWebApplicationContext(rootContext);
}

if (!this.refreshEventReceived) {
// Either the context is not a ConfigurableApplicationContext with refresh
// support or the context injected at construction time had already been
// refreshed -> trigger initial onRefresh manually here.
synchronized (this.onRefreshMonitor) {
// 调用子类的onRefresh
onRefresh(wac);
}
}

if (this.publishContext) {
// Publish the context as a servlet context attribute.
String attrName = getServletContextAttributeName();
getServletContext().setAttribute(attrName, wac);
}

return wac;
}

...
}

public class DispatcherServlet extends FrameworkServlet {
...

/**
* This implementation calls {@link #initStrategies}.
*/
@Override
protected void onRefresh(ApplicationContext context) {
initStrategies(context);
}

/**
* Initialize the strategy objects that this servlet uses.
* <p>May be overridden in subclasses in order to initialize further strategy objects.
*/
protected void initStrategies(ApplicationContext context) {
initMultipartResolver(context);
initLocaleResolver(context);
initThemeResolver(context);
initHandlerMappings(context);
initHandlerAdapters(context);
initHandlerExceptionResolvers(context);
initRequestToViewNameTranslator(context);
initViewResolvers(context);
initFlashMapManager(context);
}

...
}

另外在FrameworkServlet类中还定义了内部类ContextRefreshListener,该内部类实现了ApplicationListener<ContextRefreshedEvent>接口,这样当上下文发生刷新时,FrameworkServlet能同步刷新内部的属性。

1
2
3
4
5
6
7
8
9
10
11
12
13
14
15
16
17
18
19
20
21
22
23
24
25
26
27
28
29
30
31
32
public abstract class FrameworkServlet extends HttpServletBean implements ApplicationContextAware {
...

/**
* Callback that receives refresh events from this servlet's WebApplicationContext.
* <p>The default implementation calls {@link #onRefresh},
* triggering a refresh of this servlet's context-dependent state.
* @param event the incoming ApplicationContext event
*/
public void onApplicationEvent(ContextRefreshedEvent event) {
this.refreshEventReceived = true;
synchronized (this.onRefreshMonitor) {
onRefresh(event.getApplicationContext());
}
}

...

/**
* ApplicationListener endpoint that receives events from this servlet's WebApplicationContext
* only, delegating to {@code onApplicationEvent} on the FrameworkServlet instance.
*/
private class ContextRefreshListener implements ApplicationListener<ContextRefreshedEvent> {

@Override
public void onApplicationEvent(ContextRefreshedEvent event) {
FrameworkServlet.this.onApplicationEvent(event);
}
}

...
}

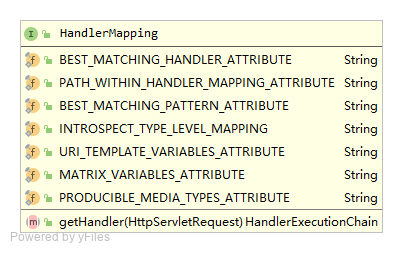
HandlerMapping

HandlerMapping

该接口只有一个方法getHandler,作用是根据当前请求的找到对应的Handler,并将Handler(执行程序)与一堆HandlerInterceptor(拦截器)封装到HandlerExecutionChain对象中。
这里的Handler可能是HandlerMethod(封装了Controller中的方法),可能是Controller,也可能是HttpRequestHandler或Servlet 对象,而这个Handler具体是什么对象,跟HandlerMapping的实现类有关。
如下图所示,可以看到HandlerMapping实现类有两个分支,分别继承自AbstractHandlerMethodMapping(得到 HandlerMethod)和AbstractUrlHandlerMapping(得到Controller、HttpRequestHandler或Servlet),它们又统一继承自AbstractHandlerMapping

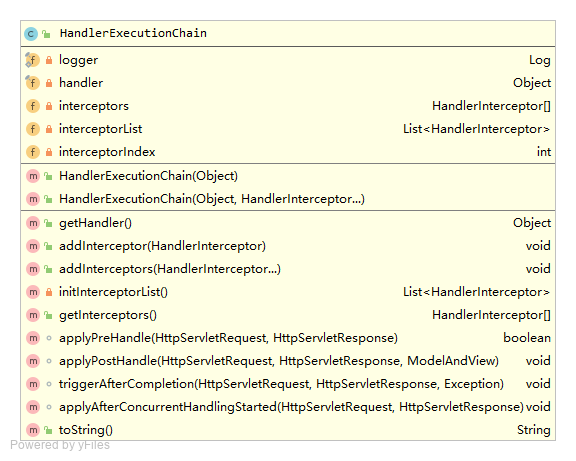
HandlerExecutionChain

HandlerExecutionChain用于将前面的Handler与拦截器(HandlerInterceptor)列表包装起来,并提供获取handler、添加拦截器、调用拦截器前后处理方法等操作。
HandlerExecutionChain

HandlerAdapter

由于Handler的类型有多种,因此调用方式就是不确定的,为此Spring创建了一个适配器接口(HandlerAdapter),使得每一种handler有一种对应的适配器实现类,让适配器代替handler执行相应的方法,这样在后面需要扩展Handler的类型时,只需要增加一个适配器类即可。

接口定义如下:
HandlerAdapter

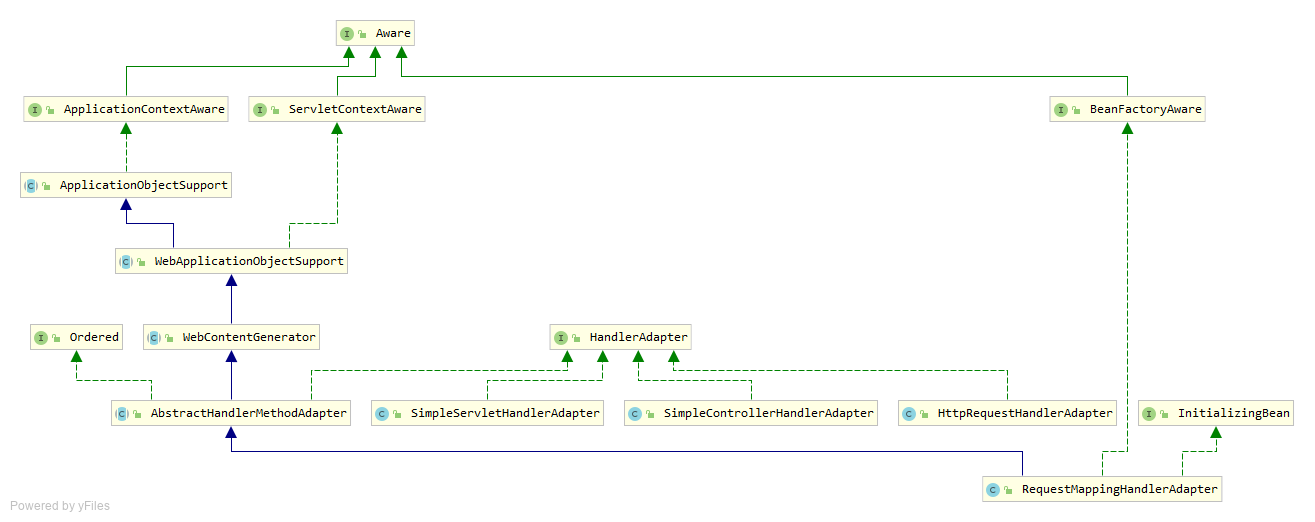
类继承结构如下:
HandlerAdapter UML

通过观察源码可知:

  • RequestMappingHandlerAdapter用于适配HandlerMethod类型的handler
  • SimpleControllerHandlerAdapter用于适配Controller类型的handler
  • HttpRequestHandlerAdapter用于适配HttpRequestHandler类型的handler
  • SimpleServletHandlerAdapter用于适配Servlet类型的handler

HandlerInterceptor

应用程序可以为某些处理器注册任意数量的现有或自定义拦截器,以添加公共预处理行为,而无需修改每个处理器实现。
在适当的HandlerAdapter触发处理器本身的执行之前,将调用HandlerInterceptor。这种机制可以用于预处理方面的大量领域,例如授权检查,或者常见的处理程序行为,如区域设置或主题更改。它的主要目的是允许分解出重复的处理程序代码。
HandlerInterceptor基本上类似于Servlet过滤器,但与Servlet过滤器不同的是,它只允许自定义预处理(可选则禁止执行处理器本身)和自定义后处理。过滤器更强大,例如,它们允许交换传递给链的请求和响应对象。

接口定义如下:
HandlerInterceptor

  • preHandle
    在业务处理器处理请求之前被调用。预处理,可以进行编码、安全控制、权限校验等处理。可以选择是否终止后续处理而直接返回。
  • postHandle
    在业务处理器处理请求执行完成后,生成视图之前执行。后处理(调用了Service并返回ModelAndView,但未进行页面渲染),有机会修改ModelAndView。
    注意,postHandle对于@ResponseBody和ResponseEntity方法不太有用,这些方法在HandlerAdapter中以及postHandle之前编写和提交响应。这意味着对响应进行任何更改都太晚了,比如添加额外的头部。对于此类场景,您可以实现ResponseBodyAdvice,并将其声明为控制器通知bean,或者直接在RequestMappingHandlerAdapter上配置它。
  • afterCompletion
    在DispatcherServlet完全处理完请求后被调用,可用于清理资源等。返回处理(已经渲染了页面)。

类继承结构如下:
HandlerInterceptor UML

这里也有个适配类HandlerInterceptorAdapter,其作用是实现HandlerInterceptor并提供接口的默认实现,这样子类可以选择性覆盖相关方法。

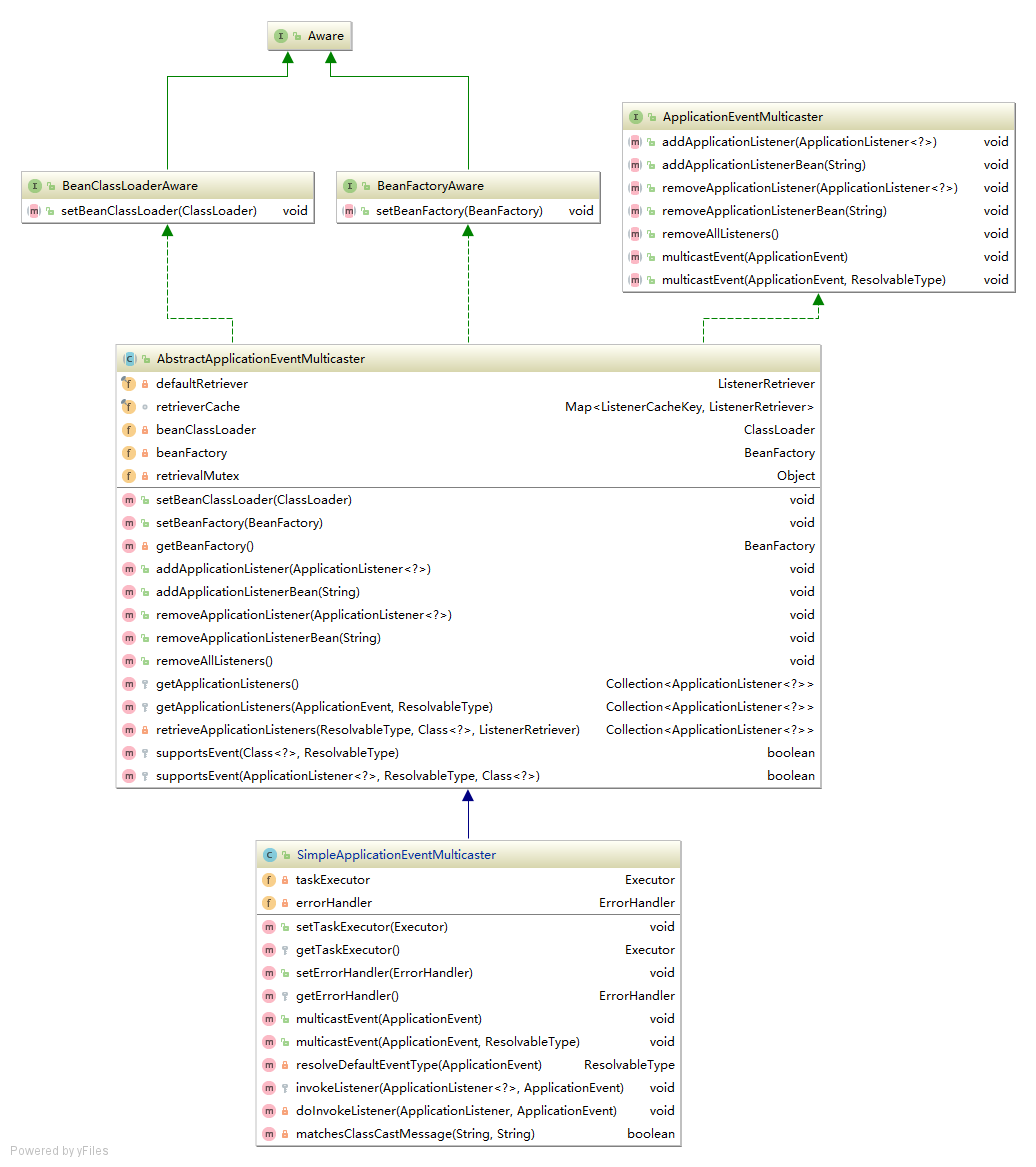
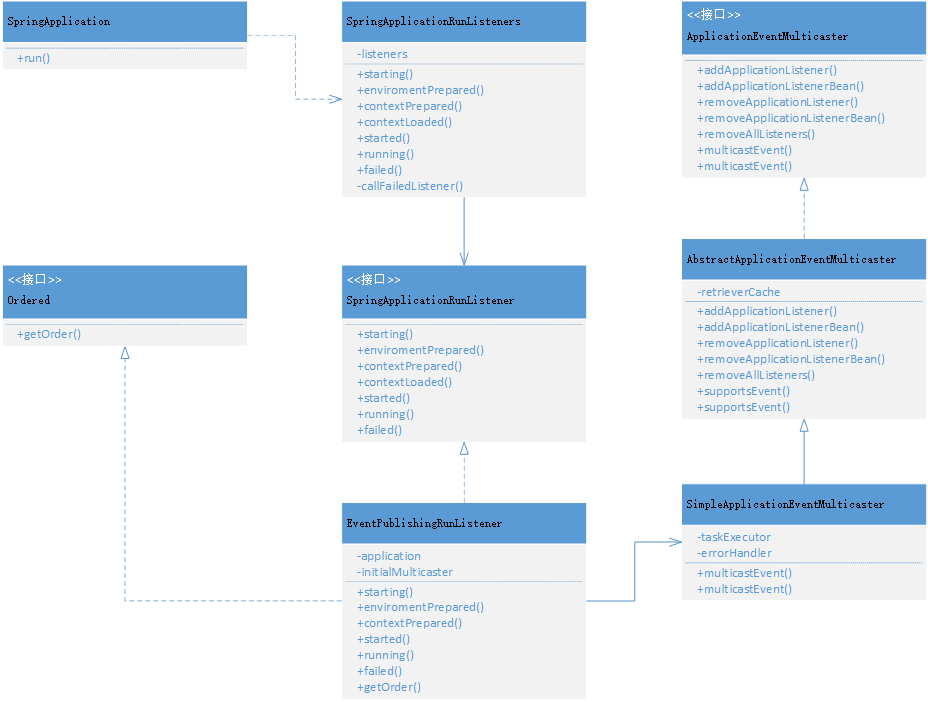
在[Spring Boot–启动流程分析](https://cdrcool.github.io/2019/09/12/Spring Boot–启动流程分析/)文中提到,在Spring Boot应用启动过程中,会经历某些固定的阶段,这些阶段中都会组播相应的事件,那么这些事件是如何发送,又是如何被接收处理的呢?本文将为大家详细介绍。

监听器模式

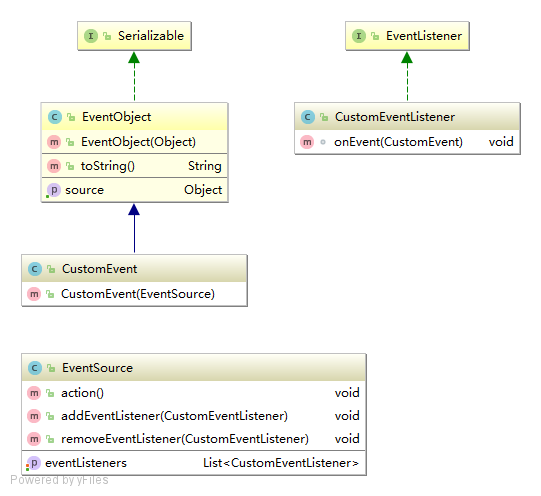
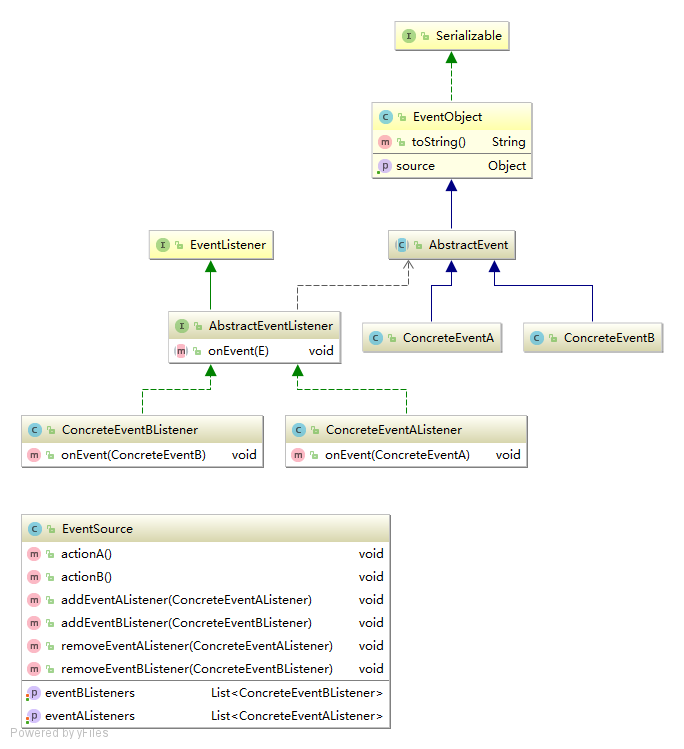
在介绍Spring Boot事件监听机制之前,我们有必要先了解事件监听器模式,事件监听器模式是观察者模式的另一种形态,同样基于事件驱动模型,事件监听器模式更加灵活,可以对不同事件作相应处理。其UML类图如下:
事件监听器模式-简单类图
由类图可知,事件监听器模式包含3中角色:

  • 事件对象:java提供了标准事件对象类EventObject,它有一个属性source,source指数据源,表示是在哪个对象上发生的该事件。这里我们定义了CustomEvent子类,该类只接受指定的数据源对象EventSource。
  • 事件监听类:同样,java提供了标准事件监听接口EventListener,它是一个空的接口。这里我们定义了CustomEventListener实现类,该类有一个方法onEvent,接受事件对象参数,表示对该事件进行处理。
  • 事件源:可以是任意Object,通常会包含一个监听类集合,具有添加、删除事件监听类的行为,这里action操作会触发事件监听。

扩展:支持泛型

上面类图中,事件监听器只能监听某个具体事件,要使其能监听某类多个具体事件,可以采用泛型:
事件监听器模式-泛型类图

扩展:组播类

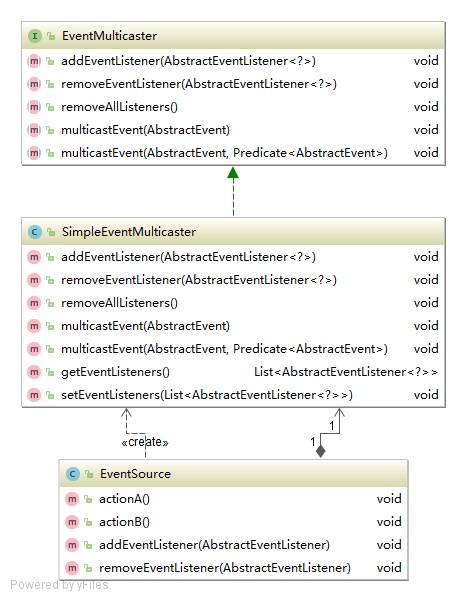
像addEventListener、removeEventListener等操作,我们可以在单独的类中封装,然后当事件源中需要执行某方法时,将方法委托给该封装类处理,这样可以保证接口的一致性:
事件组播

ApplicationListener

介绍完事件监听器模式之后,现在可以开始介绍Spring Boot事件监听机制啦(它可是采用标准的事件监听器模式实现的)。前文提到,Spring Boot应用启动过程中,会组播一系列的事件,这些事件继承于SpringApplicationEvent类:
SpringApplicationEvent
不难发现,这里的事件源对象正是SpringApplication类。有event,自然也有event listener:
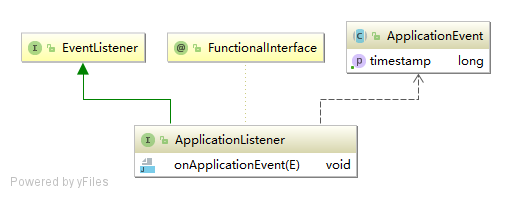
ApplicationListener
ApplicationListener有好多实现类,就不一一列举了,注意Spring Boot没有相应的定义SpringApplicationListener,我想是这是因为listener既会监听ApplicationEvent,也会监听SpringApplicationEvent。

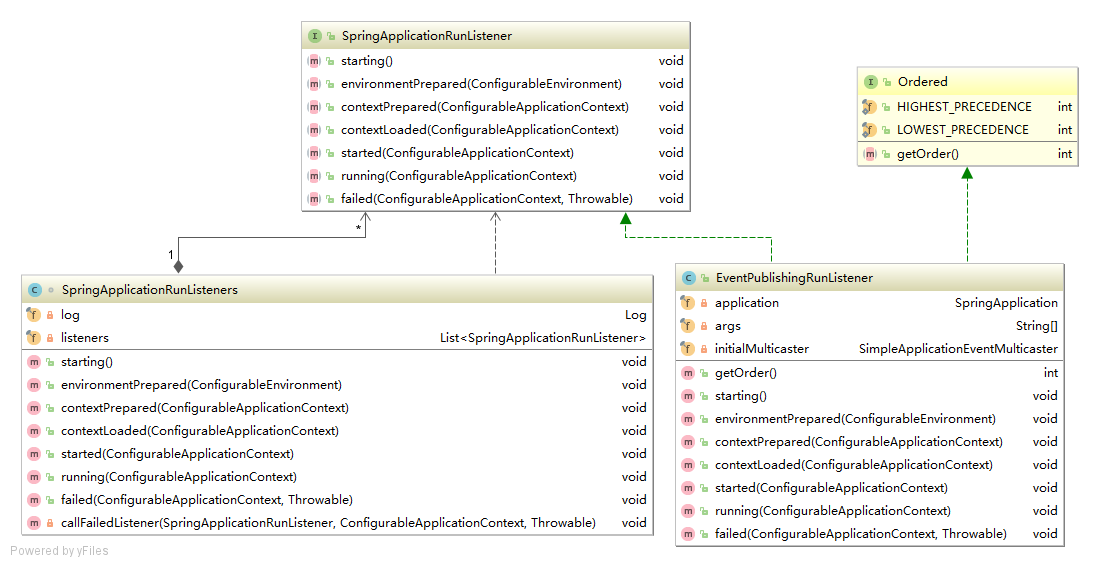
SpringApplicationRunListener

现在事件源、事件对象、事件对象监听类都清楚了,那么事件源是怎么触发事件监听的呢?下面贴出SpringApplication.run方法中的部分代码:

1
2
3
4
5
6
7
8
9
10
// 获取SpringApplicationRunListener实现类集合
SpringApplicationRunListeners listeners = getRunListeners(args);
// 组播starting事件
listeners.starting();
...
// 组播started事件
listeners.started(context);
...
// 组播running事件
listeners.running(context);

可以看到,事件的组播都是通过SpringApplicationRunListeners类实现的,之所以要创建该类是因为starting等操作都会触发一系列事件监听,所以它的构造函数接受SpringApplicationRunListener集合,看源码可知,除了failed方法,其他都是简单的循环调用单个listener的相应方法。
SpringApplicationRunListener
再看SpringApplicationRunListener实现类,它有一个application属性,这就是事件源,然后还有一个initialMulticaster属性,还记得“扩展:组播类”吗,没错,SimpleApplicationEventMulticaster就是Spring Boot封装的组播类:
ApplicationEventMulticaster
其中,ApplicationEventMulticaster简单定义了增加、删除、组播等操作,AbstractApplicationEventMulticaster实现了增加、删除操作(组播操作留给子类实现),同时增加了两个supportsEvent重载方法,这两个方法是用于判断某listener是否支持相应指定的事件类型。
SimpleApplicationEventMulticaster主要实现组播了操作,它只会通知支持某指定事件类型的监听类,同时支持异常处理和异步操作。

总体UML类图(主要部分):
SpringBoot应用启动-事件监听机制

Spring Boot是在刷新上下文(refreshContext)时执行单例Bean(non-lazy-init)的初始化的,其简要时序图如下:
Bean初始化序列图

以上几个类之间的UML类图:
Bean初始化类图

preInstantiateSingletons

流程图:
Bean初始化

源码:

1
2
3
4
5
6
7
8
9
10
11
12
13
14
15
16
17
18
19
20
21
22
23
24
25
26
27
28
29
30
31
32
33
34
35
36
37
38
39
40
41
42
43
44
45
46
47
48
49
50
51
52
53
54
55
56
57
58
59
60
61
62
63
64
65
66
67
68
69
70
71
/**
* Ensure that all non-lazy-init singletons are instantiated, also considering
* {@link org.springframework.beans.factory.FactoryBean FactoryBeans}.
* Typically invoked at the end of factory setup, if desired.
* @throws BeansException if one of the singleton beans could not be created.
* Note: This may have left the factory with some beans already initialized!
* Call {@link #destroySingletons()} for full cleanup in this case.
* @see #destroySingletons()
*
* 确保实例化了所有非惰性init单例,包括FactoryBean单例
*/
public void preInstantiateSingletons() throws BeansException {
if (logger.isTraceEnabled()) {
logger.trace("Pre-instantiating singletons in " + this);
}

// Iterate over a copy to allow for init methods which in turn register new bean definitions.
// While this may not be part of the regular factory bootstrap, it does otherwise work fine.
List<String> beanNames = new ArrayList<>(this.beanDefinitionNames);

// Trigger initialization of all non-lazy singleton beans...
for (String beanName : beanNames) {
RootBeanDefinition bd = getMergedLocalBeanDefinition(beanName);
// 如果不是抽象类,且是单例,且非延迟初始化
if (!bd.isAbstract() && bd.isSingleton() && !bd.isLazyInit()) {
// 如果类型是FactoryBean
if (isFactoryBean(beanName)) {
// 对于FactoryBean,获取bean需要在前面添加“&”符号
Object bean = getBean(FACTORY_BEAN_PREFIX + beanName);
if (bean instanceof FactoryBean) {
final FactoryBean<?> factory = (FactoryBean<?>) bean;
boolean isEagerInit;
if (System.getSecurityManager() != null && factory instanceof SmartFactoryBean) {
isEagerInit = AccessController.doPrivileged((PrivilegedAction<Boolean>)
((SmartFactoryBean<?>) factory)::isEagerInit,
getAccessControlContext());
}
else {
isEagerInit = (factory instanceof SmartFactoryBean &&
((SmartFactoryBean<?>) factory).isEagerInit());
}
// 如果是立即初始化,就获取bean实例(这里的实例不是FactoryBean,而是FactoryBean的getObject()返回的bean)
if (isEagerInit) {
getBean(beanName);
}
}
}
else {
getBean(beanName);
}
}
}

// Trigger post-initialization callback for all applicable beans...
// 为所有适用的bean触发初始化后回调
for (String beanName : beanNames) {
Object singletonInstance = getSingleton(beanName);
if (singletonInstance instanceof SmartInitializingSingleton) {
final SmartInitializingSingleton smartSingleton = (SmartInitializingSingleton) singletonInstance;
if (System.getSecurityManager() != null) {
AccessController.doPrivileged((PrivilegedAction<Object>) () -> {
smartSingleton.afterSingletonsInstantiated();
return null;
}, getAccessControlContext());
}
else {
smartSingleton.afterSingletonsInstantiated();
}
}
}
}

SmartInitializingSingletonInitializingBean的功能类似,都是在bean实例化后执行自定义初始化,不同的是它是在所有单例bean都创建之后才执行的。

doGetBean

流程图:
Bean创建

创建bean子流程图:
创建Bean分支

源码:

1
2
3
4
5
6
7
8
9
10
11
12
13
14
15
16
17
18
19
20
21
22
23
24
25
26
27
28
29
30
31
32
33
34
35
36
37
38
39
40
41
42
43
44
45
46
47
48
49
50
51
52
53
54
55
56
57
58
59
60
61
62
63
64
65
66
67
68
69
70
71
72
73
74
75
76
77
78
79
80
81
82
83
84
85
86
87
88
89
90
91
92
93
94
95
96
97
98
99
100
101
102
103
104
105
106
107
108
109
110
111
112
113
114
115
116
117
118
119
120
121
122
123
124
125
126
127
128
129
130
131
132
133
134
135
136
137
138
139
140
141
142
143
144
145
146
147
148
149
150
151
152
153
154
155
156
157
158
159
160
161
162
163
164
165
166
167
168
169
170
171
172
173
174
175
176
177
178
179
180
181
182
183
184
185
186
187
/**
* Return an instance, which may be shared or independent, of the specified bean.
* @param name the name of the bean to retrieve
* @param requiredType the required type of the bean to retrieve
* @param args arguments to use when creating a bean instance using explicit arguments
* (only applied when creating a new instance as opposed to retrieving an existing one)
* @param typeCheckOnly whether the instance is obtained for a type check,
* not for actual use
* @return an instance of the bean
* @throws BeansException if the bean could not be created
*
* 返回指定bean的一个实例,该实例可以是共享的,也可以是独立的。
*/
protected <T> T doGetBean(final String name, @Nullable final Class<T> requiredType,
@Nullable final Object[] args, boolean typeCheckOnly) throws BeansException {

final String beanName = transformedBeanName(name);
Object bean;

// Eagerly check singleton cache for manually registered singletons.
// 先从缓存中获取bean
Object sharedInstance = getSingleton(beanName);
// 如果缓存中存在,且参数为null
if (sharedInstance != null && args == null) {
if (logger.isTraceEnabled()) {
if (isSingletonCurrentlyInCreation(beanName)) {
logger.trace("Returning eagerly cached instance of singleton bean '" + beanName +
"' that is not fully initialized yet - a consequence of a circular reference");
}
else {
logger.trace("Returning cached instance of singleton bean '" + beanName + "'");
}
}
// 获取真正的bean
bean = getObjectForBeanInstance(sharedInstance, name, beanName, null);
}

else {
// Fail if we're already creating this bean instance:
// We're assumably within a circular reference.
// 如果是原型bean且正在创建中,抛出异常
if (isPrototypeCurrentlyInCreation(beanName)) {
throw new BeanCurrentlyInCreationException(beanName);
}

// Check if bean definition exists in this factory.
// 如果存在parent factory,且当前definitions中不包含beanName,就通过parent factory获取bean
BeanFactory parentBeanFactory = getParentBeanFactory();
if (parentBeanFactory != null && !containsBeanDefinition(beanName)) {
// Not found -> check parent.
String nameToLookup = originalBeanName(name);
if (parentBeanFactory instanceof AbstractBeanFactory) {
return ((AbstractBeanFactory) parentBeanFactory).doGetBean(
nameToLookup, requiredType, args, typeCheckOnly);
}
else if (args != null) {
// Delegation to parent with explicit args.
return (T) parentBeanFactory.getBean(nameToLookup, args);
}
else if (requiredType != null) {
// No args -> delegate to standard getBean method.
return parentBeanFactory.getBean(nameToLookup, requiredType);
}
else {
return (T) parentBeanFactory.getBean(nameToLookup);
}
}

if (!typeCheckOnly) {
// 将指定的bean标记为已经创建或即将创建(alreadyCreated)
markBeanAsCreated(beanName);
}

try {
final RootBeanDefinition mbd = getMergedLocalBeanDefinition(beanName);
checkMergedBeanDefinition(mbd, beanName, args);

// Guarantee initialization of beans that the current bean depends on.
// 保证当前bean所依赖的bean的初始化
String[] dependsOn = mbd.getDependsOn();
if (dependsOn != null) {
for (String dep : dependsOn) {
if (isDependent(beanName, dep)) {
throw new BeanCreationException(mbd.getResourceDescription(), beanName,
"Circular depends-on relationship between '" + beanName + "' and '" + dep + "'");
}
// 为给定bean注册一个依赖bean,在销毁给定bean之前销毁它
registerDependentBean(dep, beanName);
try {
getBean(dep);
}
catch (NoSuchBeanDefinitionException ex) {
throw new BeanCreationException(mbd.getResourceDescription(), beanName,
"'" + beanName + "' depends on missing bean '" + dep + "'", ex);
}
}
}

// Create bean instance.
if (mbd.isSingleton()) {
sharedInstance = getSingleton(beanName, () -> {
try {
return createBean(beanName, mbd, args);
}
catch (BeansException ex) {
// Explicitly remove instance from singleton cache: It might have been put there
// eagerly by the creation process, to allow for circular reference resolution.
// Also remove any beans that received a temporary reference to the bean.
destroySingleton(beanName);
throw ex;
}
});
// 从factoryBean中获取真正的bean实例
bean = getObjectForBeanInstance(sharedInstance, name, beanName, mbd);
}

else if (mbd.isPrototype()) {
// It's a prototype -> create a new instance.
Object prototypeInstance = null;
try {
// 将原型注册为当前正在创建的状态(prototypesCurrentlyInCreation)
beforePrototypeCreation(beanName);
prototypeInstance = createBean(beanName, mbd, args);
}
finally {
// 将原型标记为不在创建中
afterPrototypeCreation(beanName);
}
// 从factoryBean中获取真正的bean实例
bean = getObjectForBeanInstance(prototypeInstance, name, beanName, mbd);
}

else {
String scopeName = mbd.getScope();
final Scope scope = this.scopes.get(scopeName);
if (scope == null) {
throw new IllegalStateException("No Scope registered for scope name '" + scopeName + "'");
}
try {
Object scopedInstance = scope.get(beanName, () -> {
// 将原型注册为当前正在创建的状态(prototypesCurrentlyInCreation)
beforePrototypeCreation(beanName);
try {
return createBean(beanName, mbd, args);
}
finally {
// 将原型标记为不在创建中
afterPrototypeCreation(beanName);
}
});
// 从factoryBean中获取真正的bean实例
bean = getObjectForBeanInstance(scopedInstance, name, beanName, mbd);
}
catch (IllegalStateException ex) {
throw new BeanCreationException(beanName,
"Scope '" + scopeName + "' is not active for the current thread; consider " +
"defining a scoped proxy for this bean if you intend to refer to it from a singleton",
ex);
}
}
}
catch (BeansException ex) {
cleanupAfterBeanCreationFailure(beanName);
throw ex;
}
}

// Check if required type matches the type of the actual bean instance.
// 检查所需类型是否与实际bean实例的类型匹配
if (requiredType != null && !requiredType.isInstance(bean)) {
try {
T convertedBean = getTypeConverter().convertIfNecessary(bean, requiredType);
if (convertedBean == null) {
throw new BeanNotOfRequiredTypeException(name, requiredType, bean.getClass());
}
return convertedBean;
}
catch (TypeMismatchException ex) {
if (logger.isTraceEnabled()) {
logger.trace("Failed to convert bean '" + name + "' to required type '" +
ClassUtils.getQualifiedName(requiredType) + "'", ex);
}
throw new BeanNotOfRequiredTypeException(name, requiredType, bean.getClass());
}
}
return (T) bean;
}

getSingleton1

从一二三级缓存中获取bean并返回。

1
2
3
4
5
6
7
8
9
10
11
12
13
14
15
16
17
18
19
20
21
22
23
24
25
26
27
28
29
30
31
32
33
34
35
36
37
/**
* Return the (raw) singleton object registered under the given name.
* <p>Checks already instantiated singletons and also allows for an early
* reference to a currently created singleton (resolving a circular reference).
* @param beanName the name of the bean to look for
* @param allowEarlyReference whether early references should be created or not
* @return the registered singleton object, or {@code null} if none found
*
* 返回在给定名称下注册的(原始)单例对象
* 检查已经实例化的单例,并允许对当前创建的单例进行早期引用(解析循环引用)
*/
protected Object getSingleton(String beanName, boolean allowEarlyReference) {
// 从一级缓存中获取bean实例
Object singletonObject = this.singletonObjects.get(beanName);
// 如果一级缓存中不存在,且正在创建中(singletonsCurrentlyInCreation)
if (singletonObject == null && isSingletonCurrentlyInCreation(beanName)) { // double-check:1
synchronized (this.singletonObjects) {
// 从二级缓存中获取early bean实例
singletonObject = this.earlySingletonObjects.get(beanName);
// 如果二级缓存中不存在,且允许创建early reference
if (singletonObject == null && allowEarlyReference) { // double-check:2
// 从三级缓存中获取objectFactory对象
ObjectFactory<?> singletonFactory = this.singletonFactories.get(beanName);
// 如果三级缓存中存在objectFactory对象
if (singletonFactory != null) {
// 调用getObject返回真正的bean
singletonObject = singletonFactory.getObject();
// 添加到二级缓存
this.earlySingletonObjects.put(beanName, singletonObject);
// 从三级缓存中移除
this.singletonFactories.remove(beanName);
}
}
}
}
return singletonObject;
}

getSingleton2

从一级缓存中获取bean,如果不存在就创建并注册一个新的bean。

1
2
3
4
5
6
7
8
9
10
11
12
13
14
15
16
17
18
19
20
21
22
23
24
25
26
27
28
29
30
31
32
33
34
35
36
37
38
39
40
41
42
43
44
45
46
47
48
49
50
51
52
53
54
55
56
57
58
59
60
61
62
63
64
65
66
67
68
/**
* Return the (raw) singleton object registered under the given name,
* creating and registering a new one if none registered yet.
* @param beanName the name of the bean
* @param singletonFactory the ObjectFactory to lazily create the singleton
* with, if necessary
* @return the registered singleton object
*
* 返回在给定名称下注册的(原始)单例对象,如果还没有注册,则创建并注册一个新的单例对象。
*/
public Object getSingleton(String beanName, ObjectFactory<?> singletonFactory) {
Assert.notNull(beanName, "Bean name must not be null");
synchronized (this.singletonObjects) {
// 从一级缓存中获取bean实例
Object singletonObject = this.singletonObjects.get(beanName);
// 如果一级缓存中不存在
if (singletonObject == null) {
if (this.singletonsCurrentlyInDestruction) {
throw new BeanCreationNotAllowedException(beanName,
"Singleton bean creation not allowed while singletons of this factory are in destruction " +
"(Do not request a bean from a BeanFactory in a destroy method implementation!)");
}
if (logger.isDebugEnabled()) {
logger.debug("Creating shared instance of singleton bean '" + beanName + "'");
}
// 将正在创建的bean标记为正在创建中(singletonsCurrentlyInCreation)
beforeSingletonCreation(beanName);
boolean newSingleton = false;
boolean recordSuppressedExceptions = (this.suppressedExceptions == null);
if (recordSuppressedExceptions) {
this.suppressedExceptions = new LinkedHashSet<>();
}
try {
// 创建bean实例
singletonObject = singletonFactory.getObject();
newSingleton = true;
}
catch (IllegalStateException ex) {
// Has the singleton object implicitly appeared in the meantime ->
// if yes, proceed with it since the exception indicates that state.
singletonObject = this.singletonObjects.get(beanName);
if (singletonObject == null) {
throw ex;
}
}
catch (BeanCreationException ex) {
if (recordSuppressedExceptions) {
for (Exception suppressedException : this.suppressedExceptions) {
ex.addRelatedCause(suppressedException);
}
}
throw ex;
}
finally {
if (recordSuppressedExceptions) {
this.suppressedExceptions = null;
}
// 移除正在创建中标记
afterSingletonCreation(beanName);
}
if (newSingleton) {
// 将bean添加到一级缓存,同时从二级缓存、三级缓存中移除,并标记为已注册(registeredSingletons)
addSingleton(beanName, singletonObject);
}
}
return singletonObject;
}
}

getObjectForBeanInstance

如果bean实例是FactoryBean,且要获取的不是它自身,就调用getObject()返回真正的bean,否则直接返回bean实例。

1
2
3
4
5
6
7
8
9
10
11
12
13
14
15
16
17
18
19
20
21
22
23
24
25
26
27
28
29
30
31
32
33
34
35
36
37
38
39
40
41
42
43
44
45
46
47
48
49
50
51
/**
* Get the object for the given bean instance, either the bean
* instance itself or its created object in case of a FactoryBean.
* @param beanInstance the shared bean instance
* @param name name that may include factory dereference prefix
* @param beanName the canonical bean name
* @param mbd the merged bean definition
* @return the object to expose for the bean
*
* 获取给定bean实例的对象,对于FactoryBean,要么是bean实例本身,要么是它创建的对象
*/
protected Object getObjectForBeanInstance(
Object beanInstance, String name, String beanName, @Nullable RootBeanDefinition mbd) {

// Don't let calling code try to dereference the factory if the bean isn't a factory.
// 如果想要获取FactoryBean本身,那么beanInstance必须是FactoryBean的实例
if (BeanFactoryUtils.isFactoryDereference(name)) {
if (beanInstance instanceof NullBean) {
return beanInstance;
}
if (!(beanInstance instanceof FactoryBean)) {
throw new BeanIsNotAFactoryException(beanName, beanInstance.getClass());
}
}

// Now we have the bean instance, which may be a normal bean or a FactoryBean.
// If it's a FactoryBean, we use it to create a bean instance, unless the
// caller actually wants a reference to the factory.
// 如果instance不是FactoryBean实例,或者想要获取的就是FactoryBean实例,那么直接返回就好
if (!(beanInstance instanceof FactoryBean) || BeanFactoryUtils.isFactoryDereference(name)) {
return beanInstance;
}

Object object = null;
if (mbd == null) {
// 获取缓存的实例
object = getCachedObjectForFactoryBean(beanName);
}
// 如果缓存中没有对象,那么从头准备bean defition实例化一个
if (object == null) {
// Return bean instance from factory.
FactoryBean<?> factory = (FactoryBean<?>) beanInstance;
// Caches object obtained from FactoryBean if it is a singleton.
if (mbd == null && containsBeanDefinition(beanName)) {
mbd = getMergedLocalBeanDefinition(beanName);
}
boolean synthetic = (mbd != null && mbd.isSynthetic());
object = getObjectFromFactoryBean(factory, beanName, !synthetic);
}
return object;
}

createBean

1
2
3
4
5
6
7
8
9
10
11
12
13
14
15
16
17
18
19
20
21
22
23
24
25
26
27
28
29
30
31
32
33
34
35
36
37
38
39
40
41
42
43
44
45
46
47
48
49
50
51
52
53
54
55
56
57
58
59
60
61
62
63
64
65
66
67
68
69
70
71
72
73
74
75
76
77
78
79
/**
* Create a bean instance for the given merged bean definition (and arguments).
* The bean definition will already have been merged with the parent definition
* in case of a child definition.
* <p>All bean retrieval methods delegate to this method for actual bean creation.
*
* Central method of this class: creates a bean instance,
* populates the bean instance, applies post-processors, etc.
*
* @param beanName the name of the bean
* @param mbd the merged bean definition for the bean
* @param args explicit arguments to use for constructor or factory method invocation
* @return a new instance of the bean
* @throws BeanCreationException if the bean could not be created
*
* 为给定的合并bean定义(和参数)创建bean实例。对于子定义,bean定义已经与父定义合并。
* 该类的核心方法:创建bean实例、填充bean实例、应用后处理程序等。
*/
@Override
protected Object createBean(String beanName, RootBeanDefinition mbd, @Nullable Object[] args)
throws BeanCreationException {

if (logger.isTraceEnabled()) {
logger.trace("Creating instance of bean '" + beanName + "'");
}
RootBeanDefinition mbdToUse = mbd;

// Make sure bean class is actually resolved at this point, and
// clone the bean definition in case of a dynamically resolved Class
// which cannot be stored in the shared merged bean definition.
// 确保此时bean类已实际解析:将bean类名解析为类引用(如果需要),并将解析后的类存储在mbd(bean定义)中
Class<?> resolvedClass = resolveBeanClass(mbd, beanName);
if (resolvedClass != null && !mbd.hasBeanClass() && mbd.getBeanClassName() != null) {
// 克隆新的definition,并设置bean class
mbdToUse = new RootBeanDefinition(mbd);
mbdToUse.setBeanClass(resolvedClass);
}

// Prepare method overrides.
try {
// 验证并准备为该bean定义的方法覆盖
mbdToUse.prepareMethodOverrides();
}
catch (BeanDefinitionValidationException ex) {
throw new BeanDefinitionStoreException(mbdToUse.getResourceDescription(),
beanName, "Validation of method overrides failed", ex);
}

try {
// Give BeanPostProcessors a chance to return a proxy instead of the target bean instance.
// 让beanpostprocessor有机会返回代理而不是目标bean实例
// 当经过前置处理之后,返回的结果若不为空,那么会直接略过后续的Bean的创建而直接返回结果。AOP功能就是基于这里判断的.
Object bean = resolveBeforeInstantiation(beanName, mbdToUse);
if (bean != null) {
return bean;
}
}
catch (Throwable ex) {
throw new BeanCreationException(mbdToUse.getResourceDescription(), beanName,
"BeanPostProcessor before instantiation of bean failed", ex);
}

try {
Object beanInstance = doCreateBean(beanName, mbdToUse, args);
if (logger.isTraceEnabled()) {
logger.trace("Finished creating instance of bean '" + beanName + "'");
}
return beanInstance;
}
catch (BeanCreationException | ImplicitlyAppearedSingletonException ex) {
// A previously detected exception with proper bean creation context already,
// or illegal singleton state to be communicated up to DefaultSingletonBeanRegistry.
throw ex;
}
catch (Throwable ex) {
throw new BeanCreationException(
mbdToUse.getResourceDescription(), beanName, "Unexpected exception during bean creation", ex);
}
}

doCreateBean

1
2
3
4
5
6
7
8
9
10
11
12
13
14
15
16
17
18
19
20
21
22
23
24
25
26
27
28
29
30
31
32
33
34
35
36
37
38
39
40
41
42
43
44
45
46
47
48
49
50
51
52
53
54
55
56
57
58
59
60
61
62
63
64
65
66
67
68
69
70
71
72
73
74
75
76
77
78
79
80
81
82
83
84
85
86
87
88
89
90
91
92
93
94
95
96
97
98
99
100
101
102
103
104
105
106
107
108
109
110
111
112
113
114
115
116
117
118
119
120
121
122
123
124
125
126
127
128
129
130
131
/**
* Actually create the specified bean. Pre-creation processing has already happened
* at this point, e.g. checking {@code postProcessBeforeInstantiation} callbacks.
* <p>Differentiates between default bean instantiation, use of a
* factory method, and autowiring a constructor.
* @param beanName the name of the bean
* @param mbd the merged bean definition for the bean
* @param args explicit arguments to use for constructor or factory method invocation
* @return a new instance of the bean
* @throws BeanCreationException if the bean could not be created
* @see #instantiateBean
* @see #instantiateUsingFactoryMethod
* @see #autowireConstructor
*
* 实际创建指定的bean。此时预创建处理已经完成,例如检查{@code postprocessbeforeinstance化}回调。
* 默认bean实例化、使用工厂方法和自动装配构造函数之间有区别。
*/
protected Object doCreateBean(final String beanName, final RootBeanDefinition mbd, final @Nullable Object[] args)
throws BeanCreationException {

// Instantiate the bean.
// 包含了真正的bean对象和bean的class,以及PropertyDescriptor集合
BeanWrapper instanceWrapper = null;
// 单例的情况下尝试从factoryBeanInstanceCache获取instanceWrapper
if (mbd.isSingleton()) {
instanceWrapper = this.factoryBeanInstanceCache.remove(beanName);
}
// 如果没有则需要自己创建
if (instanceWrapper == null) {
// 使用适当的实例化策略为指定的bean创建一个新实例:工厂方法、构造函数自动装配或简单实例化。
instanceWrapper = createBeanInstance(beanName, mbd, args);
}
final Object bean = instanceWrapper.getWrappedInstance();
Class<?> beanType = instanceWrapper.getWrappedClass();
// 如果不是NullBean,则将resolvedTargetType属性设置为当前的WrappedClass
if (beanType != NullBean.class) {
mbd.resolvedTargetType = beanType;
}

// Allow post-processors to modify the merged bean definition.
synchronized (mbd.postProcessingLock) {
if (!mbd.postProcessed) {
try {
// 遍历MergedBeanDefinitionPostProcessor接口的实现类,调用它们的postProcessMergedBeanDefinition方法,并将结果应用于bean definition
// 像@Autowire、@Value、@Required、@PostConstruct、@PreDestor、@Scheduled等注解都是在这里预解析的
applyMergedBeanDefinitionPostProcessors(mbd, beanType, beanName);
}
catch (Throwable ex) {
throw new BeanCreationException(mbd.getResourceDescription(), beanName,
"Post-processing of merged bean definition failed", ex);
}
mbd.postProcessed = true;
}
}

// Eagerly cache singletons to be able to resolve circular references
// even when triggered by lifecycle interfaces like BeanFactoryAware.
// 立即缓存单例,以便能够解析循环引用,即使是由生命周期接口(如BeanFactoryAware)触发的
// 如果当前bean是单例,且支持循环依赖,且当前bean正在创建中,通过往singletonFactories添加一个objectFactory,这样后期如果有其他bean依赖该bean 可以从singletonFactories获取到bean,getEarlyBeanReference可以对返回的bean进行修改,这边目前除了可能会返回动态代理对象 其他的都是直接返回bean
boolean earlySingletonExposure = (mbd.isSingleton() && this.allowCircularReferences &&
isSingletonCurrentlyInCreation(beanName));
if (earlySingletonExposure) {
if (logger.isTraceEnabled()) {
logger.trace("Eagerly caching bean '" + beanName +
"' to allow for resolving potential circular references");
}
// 如果一级缓存中不存在,就添加到二级缓存,并从三级缓存中移除,同时标记为已注册(registeredSingletons)
addSingletonFactory(beanName, () -> getEarlyBeanReference(beanName, mbd, bean));
}

// Initialize the bean instance.
Object exposedObject = bean;
try {
// 填充bean实例,即完成属性注入
populateBean(beanName, mbd, instanceWrapper);
// 初始化bean
// 1. 调用BeanNameAware、BeanClassLoaderAware、BeanFactoryAware接口方法
// 2. 执行初始化之前的前置操作(BeanPostProcessor#getBeanPostProcessors())
// 3. 初始化:调用InitializingBean#afterPropertiesSet(),执行@PostConstruct方法
// 4. 执行初始化之后的后置操作(BeanPostProcessor#postProcessAfterInitialization(result, beanName))
exposedObject = initializeBean(beanName, exposedObject, mbd);
}
catch (Throwable ex) {
if (ex instanceof BeanCreationException && beanName.equals(((BeanCreationException) ex).getBeanName())) {
throw (BeanCreationException) ex;
}
else {
throw new BeanCreationException(
mbd.getResourceDescription(), beanName, "Initialization of bean failed", ex);
}
}

if (earlySingletonExposure) {
Object earlySingletonReference = getSingleton(beanName, false);
if (earlySingletonReference != null) {
if (exposedObject == bean) {
exposedObject = earlySingletonReference;
}
else if (!this.allowRawInjectionDespiteWrapping && hasDependentBean(beanName)) {
String[] dependentBeans = getDependentBeans(beanName);
Set<String> actualDependentBeans = new LinkedHashSet<>(dependentBeans.length);
for (String dependentBean : dependentBeans) {
if (!removeSingletonIfCreatedForTypeCheckOnly(dependentBean)) {
actualDependentBeans.add(dependentBean);
}
}
if (!actualDependentBeans.isEmpty()) {
throw new BeanCurrentlyInCreationException(beanName,
"Bean with name '" + beanName + "' has been injected into other beans [" +
StringUtils.collectionToCommaDelimitedString(actualDependentBeans) +
"] in its raw version as part of a circular reference, but has eventually been " +
"wrapped. This means that said other beans do not use the final version of the " +
"bean. This is often the result of over-eager type matching - consider using " +
"'getBeanNamesOfType' with the 'allowEagerInit' flag turned off, for example.");
}
}
}
}

// Register bean as disposable.
// 注册disposable bean
try {
registerDisposableBeanIfNecessary(beanName, bean, mbd);
}
catch (BeanDefinitionValidationException ex) {
throw new BeanCreationException(
mbd.getResourceDescription(), beanName, "Invalid destruction signature", ex);
}

return exposedObject;
}

循环依赖

对于单例Bean,如果是构造器循环依赖,Spring会抛出BeanCurrentlyInCreationException异常;如果是属性循环依赖,Spring则会利用三级缓存来解决。

假设有组件A、B相互依赖:

1
2
3
4
5
6
7
8
9
10
11
@Component
public class ComponentA {
@Autowired
private ComponentB componentB;
}

@Component
public class ComponentB {
@Autowired
private ComponentA componentA;
}

Spring会按以下步骤创建Bean A和Bean B:

  1. 从缓存中获取Bean A,此时一、二、三级缓存中都还没有
  2. 将Bean A标记为正在创建中
  3. 将Bean A添加到三级缓存中,同时将其从二级缓存中移除,并将其标记为已注册
  4. 填充Bean A,此时发现Bean A依赖于Bean B
  5. 重复执行步骤1、2、3、4,不过Bean A与Bean B互换
  6. 从缓存中获取Bean A,此时Bean A已存在于三级缓存中,就从三级缓存中获取并返回,同时将其添加到二级缓存中,并将其从三级缓存中移除
  7. 创建Bean A完毕之后,清除其正在创建中的标记,然后将其添加到一级缓存中,同时将其从二、三级缓存中移除,并将其标记为已注册

BeanFactory

Spring Ioc容器顶层接口。

BeanFactory

FactoryBean

以Bean结尾,表示它是一个bean,但它不是普通的的bean,而是一个能生产对象的工厂bean,它的实现与设计模式中的工厂模式和修饰器模式类似。

FactoryBean

根据Bean的id从BeanFactory中获取的实际上是FactoryBean的getObject()方法返回的对象,而不是FactoryBean本身,如果要获取FactoryBean本身,需要在id前面加一个“&”符号。

1
2
3
4
5
6
7
8
9
10
11
12
13
14
15
16
17
18
19
if (isFactoryBean(beanName)) {
Object bean = getBean(FACTORY_BEAN_PREFIX + beanName);
if (bean instanceof FactoryBean) {
final FactoryBean<?> factory = (FactoryBean<?>) bean;
boolean isEagerInit;
if (System.getSecurityManager() != null && factory instanceof SmartFactoryBean) {
isEagerInit = AccessController.doPrivileged((PrivilegedAction<Boolean>)
((SmartFactoryBean<?>) factory)::isEagerInit,
getAccessControlContext());
}
else {
isEagerInit = (factory instanceof SmartFactoryBean &&
((SmartFactoryBean<?>) factory).isEagerInit());
}
if (isEagerInit) {
getBean(beanName);
}
}
}

ObjectFactory

一个普通的对象工厂接口,它可以在调用时返回一个对象实例(可能是共享的或独立的)。

ObjectFactory

通过查看Spring源码,可以发现SpringObjectFactory的应用之一就是:将创建对象的步骤封装到ObjectFactory中,交给自定义的Scope来选择是否需要创建对象来灵活的实现Scope。

  • singleton

    1
    2
    3
    4
    5
    6
    7
    8
    9
    10
    11
    12
    sharedInstance = getSingleton(beanName, () -> {
    try {
    return createBean(beanName, mbd, args);
    }
    catch (BeansException ex) {
    // Explicitly remove instance from singleton cache: It might have been put there
    // eagerly by the creation process, to allow for circular reference resolution.
    // Also remove any beans that received a temporary reference to the bean.
    destroySingleton(beanName);
    throw ex;
    }
    });
  • scope

    1
    2
    3
    4
    5
    6
    7
    8
    9
    10
    11
    12
    13
    14
    15
    16
    17
    18
    19
    20
    21
    22
    23
    24
    25
    Object scopedInstance = scope.get(beanName, () -> {
    beforePrototypeCreation(beanName);
    try {
    return createBean(beanName, mbd, args);
    }
    finally {
    afterPrototypeCreation(beanName);
    }
    });

    public class ServletContextScope implements Scope, DisposableBean {
    ...

    public Object get(String name, ObjectFactory<?> objectFactory) {
    Object scopedObject = this.servletContext.getAttribute(name);
    if (scopedObject == null) {
    scopedObject = objectFactory.getObject();
    this.servletContext.setAttribute(name, scopedObject);
    }

    return scopedObject;
    }

    ...
    }

启动Spring Boot应用只需执行以下代码:

1
SpringApplication.run(ExampleApplication.class, args);

它会先初始化SpringApplication实例,然后执行该实例的run方法:

1
new SpringApplication(primarySources).run(args);

初始化

1
2
3
4
5
6
7
8
9
10
11
12
13
14
15
16
17
/**
* 初始化SpringApplication实例
*
* @param resourceLoader 资源加载器,加载类路径或文件系统文件,默认为null
* @param primarySources 应用程序主源,这里也就是ExampleApplication.class,application context将从此类开始加载beans
*/
public SpringApplication(ResourceLoader resourceLoader, Class<?>... primarySources) {
this.resourceLoader = resourceLoader;
Assert.notNull(primarySources, "PrimarySources must not be null");
this.primarySources = new LinkedHashSet<>(Arrays.asList(primarySources));
// 推断应用程序类型,NONE|SERVLET|REACTIVE,一般为SERVLET
this.webApplicationType = WebApplicationType.deduceFromClasspath();
setInitializers((Collection) getSpringFactoriesInstances(ApplicationContextInitializer.class));
setListeners((Collection) getSpringFactoriesInstances(ApplicationListener.class));
// 推断应用程序主类,这里也就是ExampleApplication.class
this.mainApplicationClass = deduceMainApplicationClass();
}

初始化比较简单:

  1. 设置资源加载器,默认为null
  2. 设置应用程序主源,一般为应用程序启动类
  3. 推断应用程序类型,枚举值有:NONE|SERVLET|REACTIVE
  4. 设置SpringApplication实例的initializers(ApplicationContextInitializer)属性
  5. 设置SpringApplication实例的listeners(ApplicationListener)属性
  6. 推断应用程序主类,其实就是启动类

getSpringFactoriesInstances

在设置SpringApplication实例的的initializers和listeners属性时,调用了getSpringFactoriesInstances简单工厂方法,它是用来指定接口类型的示例集合。

1
2
3
4
5
6
7
8
9
10
11
12
13
14
15
16
17
18
19
20
/**
* 获取指定接口的实现类的实例集合
*
* @param type 接口class
* @param parameterTypes 构造器参数类型数组,这里为空数组
* @param args 构造器参数数组,这里为空数组
* @return 实现类实例集合
*/
private <T> Collection<T> getSpringFactoriesInstances(Class<T> type, Class<?>[] parameterTypes, Object... args) {
// 1. 如果指定了资源加载器,就获取资源加载其的类加载器,否则获取当前线程的类加载器
ClassLoader classLoader = getClassLoader();
// Use names and ensure unique to protect against duplicates
// 2. 获取指定接口的实现类的类名集合(全限定名,且去重)
Set<String> names = new LinkedHashSet<>(SpringFactoriesLoader.loadFactoryNames(type, classLoader));
// 3. 利用反射获取实例集合
List<T> instances = createSpringFactoriesInstances(type, parameterTypes, classLoader, args, names);
// 4. 排序(添加了@Order注解或实现了Ordered接口)
AnnotationAwareOrderComparator.sort(instances);
return instances;
}

SpringFactoriesLoader

SpringFactoriesLoader是一个简单工厂类,它供Spring内部使用,用于读取META-INF/spring.factories文件(可能存在于类路径中的多个JAR文件中),返回指定接口的实现类的实例集合。

UML类图:

SpringFactoriesLoader

源码

重点看下loadFactoryNames方法:

1
2
3
4
5
6
7
8
9
10
11
12
13
14
15
16
17
18
19
20
21
22
23
24
25
26
27
28
29
30
31
32
33
34
35
36
37
38
public static List<String> loadFactoryNames(Class<?> factoryClass, @Nullable ClassLoader classLoader) {
String factoryClassName = factoryClass.getName();
return loadSpringFactories(classLoader).getOrDefault(factoryClassName, Collections.emptyList());
}

private static Map<String, List<String>> loadSpringFactories(@Nullable ClassLoader classLoader) {
// 如果cache中存在,就直接返回
// private static final Map<ClassLoader, MultiValueMap<String, String>> cache = new ConcurrentReferenceHashMap<>();
MultiValueMap<String, String> result = cache.get(classLoader);
if (result != null) {
return result;
}

try {
// 如果类加载器不为空,就读取类路径下的目录“META-INF/spring.factories”,否则读取系统变量“META-INF/spring.factories”
Enumeration<URL> urls = (classLoader != null ?
classLoader.getResources(FACTORIES_RESOURCE_LOCATION) :
ClassLoader.getSystemResources(FACTORIES_RESOURCE_LOCATION));
result = new LinkedMultiValueMap<>();
while (urls.hasMoreElements()) {
URL url = urls.nextElement();
UrlResource resource = new UrlResource(url);
Properties properties = PropertiesLoaderUtils.loadProperties(resource);
for (Map.Entry<?, ?> entry : properties.entrySet()) {
String factoryClassName = ((String) entry.getKey()).trim();
for (String factoryName : StringUtils.commaDelimitedListToStringArray((String) entry.getValue())) {
result.add(factoryClassName, factoryName.trim());
}
}
}
cache.put(classLoader, result);
return result;
}
catch (IOException ex) {
throw new IllegalArgumentException("Unable to load factories from location [" +
FACTORIES_RESOURCE_LOCATION + "]", ex);
}
}

通过源码可以学习到MultiValueMapConcurrentReferenceHashMap的应用:

  • MultiValueMap
    同一个key,可以存在多个value
  • ConcurrentReferenceHashMap
    存储软引用或弱引用,内存溢出以前会清理该对象,适用于缓存

实现类

spring-boot-version.jar

1
2
3
4
5
6
7
8
9
10
11
12
13
14
15
16
17
18
# Application Context Initializers
org.springframework.context.ApplicationContextInitializer=\
org.springframework.boot.context.ConfigurationWarningsApplicationContextInitializer,\
org.springframework.boot.context.ContextIdApplicationContextInitializer,\
org.springframework.boot.context.config.DelegatingApplicationContextInitializer,\
org.springframework.boot.web.context.ServerPortInfoApplicationContextInitializer

# Application Listeners
org.springframework.context.ApplicationListener=\
org.springframework.boot.ClearCachesApplicationListener,\
org.springframework.boot.builder.ParentContextCloserApplicationListener,\
org.springframework.boot.context.FileEncodingApplicationListener,\
org.springframework.boot.context.config.AnsiOutputApplicationListener,\
org.springframework.boot.context.config.ConfigFileApplicationListener,\
org.springframework.boot.context.config.DelegatingApplicationListener,\
org.springframework.boot.context.logging.ClasspathLoggingApplicationListener,\
org.springframework.boot.context.logging.LoggingApplicationListener,\
org.springframework.boot.liquibase.LiquibaseServiceLocatorApplicationListener

spring-boot-autoconfigure-version.jar

1
2
3
4
5
6
7
8
# Initializers
org.springframework.context.ApplicationContextInitializer=\
org.springframework.boot.autoconfigure.SharedMetadataReaderFactoryContextInitializer,\
org.springframework.boot.autoconfigure.logging.ConditionEvaluationReportLoggingListener

# Application Listeners
org.springframework.context.ApplicationListener=\
org.springframework.boot.autoconfigure.BackgroundPreinitializer

启动

1
2
3
4
5
6
7
8
9
10
11
12
13
14
15
16
17
18
19
20
21
22
23
24
25
26
27
28
29
30
31
32
33
34
35
36
37
38
39
40
41
42
43
44
45
46
47
48
49
50
51
52
53
54
55
56
57
public ConfigurableApplicationContext run(String... args) {
// 秒表计时器:统计代码段执行时间并一次输出
StopWatch stopWatch = new StopWatch();
stopWatch.start();
ConfigurableApplicationContext context = null;
Collection<SpringBootExceptionReporter> exceptionReporters = new ArrayList<>();
// 设置系统变量:java.awt.headless
configureHeadlessProperty();
// 获取SpringApplicationRunListener实现类集合
SpringApplicationRunListeners listeners = getRunListeners(args);
// 组播starting事件
listeners.starting();
try {
ApplicationArguments applicationArguments = new DefaultApplicationArguments(args);
// 准备环境 & 组播environmentPrepared事件(这个过程会加载application配置文件)
ConfigurableEnvironment environment = prepareEnvironment(listeners, applicationArguments);
configureIgnoreBeanInfo(environment);
// 打印banner,可自定义
Banner printedBanner = printBanner(environment);
// 创建applicationContext(此时还只是空对象,对于web应用,其类型为AnnotationConfigServletWebServerApplicationContext)
context = createApplicationContext();
// 获取异常报告类数组,用于在发生异常时输出日志
exceptionReporters = getSpringFactoriesInstances(SpringBootExceptionReporter.class,
new Class[] { ConfigurableApplicationContext.class }, context);
// 准备上下文(组播contextPrepared -> 记录启动信息 -> contextLoaded事件)
prepareContext(context, environment, listeners, applicationArguments, printedBanner);
// 刷新上下文
refreshContext(context);
// 刷新后操作
afterRefresh(context, applicationArguments);
stopWatch.stop();
if (this.logStartupInfo) {
// 记录已启动 & 运行中 信息
new StartupInfoLogger(this.mainApplicationClass).logStarted(getApplicationLog(), stopWatch);
}
// 组播started事件
listeners.started(context);
// 调用其他runners的run方法(实现ApplicationRunner或CommandLineRunner接口)
callRunners(context, applicationArguments);
}
catch (Throwable ex) {
// 处理异常(组播failed事件)
handleRunFailure(context, ex, exceptionReporters, listeners);
throw new IllegalStateException(ex);
}

try {
// 组播running事件
listeners.running(context);
}
catch (Throwable ex) {
// 处理异常(组播failed事件)
handleRunFailure(context, ex, exceptionReporters, null);
throw new IllegalStateException(ex);
}
return context;
}

流程图

![Spring Boot应用启动流程图](/images/springboot/Spring Boot应用启动流程图.png)
在启动过程中,如果发生异常,会执行异常处理,并组播failed事件。

实现类

spring-boot-version.jar

1
2
3
4
5
6
7
# Run Listeners
org.springframework.boot.SpringApplicationRunListener=\
org.springframework.boot.context.event.EventPublishingRunListener

# Error Reporters
org.springframework.boot.SpringBootExceptionReporter=\
org.springframework.boot.diagnostics.FailureAnalyzers

开闭原则

类应该对扩展开放,对修改关闭。

单一职责原则

一个类应该只有一个引起变化的原因。

接口隔离原则

一个类对另一个类的依赖应该建立在最小的接口上。

依赖倒置原则

要依赖抽象,不要依赖具体类。

里氏替换原则

所有引用基类的地方必须能透明地使用其子类的对象。

迪米特法则

最少知识原则:一个对象应该对其他对象有最少的了解。

合成/复用原则

多用组合,少用继承。