人的知识就好比一个圆圈,圆圈里面是已知的,圆圈外面是未知的。你知道得越多,圆圈也就越大,你不知道的也就越多。

0%

Spring Security 开发实践

Maven 依赖

1
2
3
4
<dependency>
<groupId>org.springframework.boot</groupId>
<artifactId>spring-boot-starter-security</artifactId>
</dependency>

基本安全验证

因为 spring-boot-starter-security 是开箱即用的,所以当项目中添加了该依赖之后,便具备了基本安全验证能力。示例:
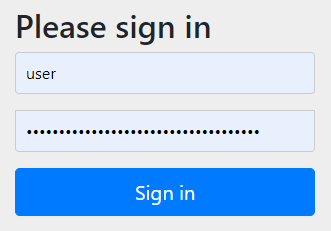
基本安全验证

如上,未登录访问项目时,会自动跳转到一个简易的登录页面,用户名默认是 user,密码会在控制台输出。

配置用户

内存配置

1
2
3
4
5
6
7
8
9
@Bean
public UserDetailsService userDetailsService() {
// ensure the passwords are encoded properly
User.UserBuilder users = User.withDefaultPasswordEncoder();
InMemoryUserDetailsManager manager = new InMemoryUserDetailsManager();
manager.createUser(users.username("user").password("password").roles("USER").build());
manager.createUser(users.username("admin").password("password").roles("USER","ADMIN").build());
return manager;
}

数据库配置

HSQLDB

Maven 依赖:

1
2
3
4
5
<dependency>
<groupId>org.hsqldb</groupId>
<artifactId>hsqldb</artifactId>
<scope>runtime</scope>
</dependency>

Java 代码:

1
2
3
4
5
6
7
8
9
10
11
12
13
@Autowired
public void configureGlobal(AuthenticationManagerBuilder auth) throws Exception {
// ensure the passwords are encoded properly
User.UserBuilder users = User.withDefaultPasswordEncoder();
auth
.jdbcAuthentication()
.dataSource(dataSource)
// 使用 "org/springframework/security/core/userdetails/jdbc/users.ddl" 自动建表
.withDefaultSchema()
// 往 users 表中插入数据
.withUser(users.username("user").password("password").roles("USER"))
.withUser(users.username("admin").password("password").roles("USER","ADMIN"));
}

MySQL

Maven 依赖:

1
2
3
4
<dependency>
<groupId>mysql</groupId>
<artifactId>mysql-connector-java</artifactId>
</dependency>

配置属性:

1
2
3
4
5
6
7
8
9
10
11
12
13
14
spring:
datasource:
# always:始终执行初始化;embedded:内存数据库时才执行初始化;never:不执行初始化
initialization-mode: always
# 表初始化,默认值 classpath:schema.sql
schema: classpath:schema.sql
# 数据初始化,默认值 classpath:data.sql
data: classpath:data.sql
# 默认加载 data.sql 或 data-${platform}.sql,默认值 all
platform: all
driverClassName: com.mysql.cj.jdbc.Driver
url: jdbc:mysql://localhost:3306/demo?useUnicode=true&characterEncoding=utf-8&autoReconnect=true&failOverReadOnly=false&useSSL=true&serverTimezone=Asia/Shanghai
username: root
password: admin123

注意:

  • schema.sql 中不能带有注释。
  • 如果表名/字段名为 MySQL 关键字,则需要添加 `` 符号。
  • 用户登录密码指定加密算法,如 bcrypt、PBKDF2、scrypt、Argon2 等。指定方式为在密码前添加 {${algorithm}} 前缀,${algorithm} 为加密算法的名称。如果确实要明文存储密码,也可以添加前缀 {noop}。

Java 配置:

1
2
3
4
@Bean
public UserDetailsService userDetailsService() {
return new JdbcUserDetailsManager(dataSource);
}

密码加密

1
2
3
4
5
6
7
8
@Bean
public PasswordEncoder passwordEncoder() {
// 如果不考虑兼容 Spring Security 5.0 之前的版本,可以直接返回 new BCryptPasswordEncoder()
DelegatingPasswordEncoder passwordEncoder = (DelegatingPasswordEncoder) PasswordEncoderFactories
.createDelegatingPasswordEncoder();
passwordEncoder.setDefaultPasswordEncoderForMatches(new BCryptPasswordEncoder());
return passwordEncoder;
}

注意: 在 passwordEncoder() 方法中,也可以直接 return new BCryptPasswordEncoder(),之所以这里要使用 DelegatingPasswordEncoder 并将 BCryptPasswordEncoder 作为默认值给其赋值,是为了兼容 Spring Security 5.0 之前的版本。(在 Spring Security 5.0 之前,密码是明文存储的,而现在要求密码前面都要带加密算法前缀。)

会话管理

检测超时

1
2
3
4
5
6
7
8
9
10
11
12
13
14
15
16
17
@Configuration
public class SecurityConfiguration extends WebSecurityConfigurerAdapter {

@Override
protected void configure(HttpSecurity http) throws Exception {
http.authorizeRequests()
.antMatchers("/invalidSession").permitAll()
.anyRequest().authenticated().and()
.formLogin().and()
// session 超时后,跳转到 /invalidSession
.sessionManagement().invalidSessionUrl("/invalidSession")
.and()
// 由于配置了 session 超时检测,因此需要保证用户退出时清理掉 JSESSIONID cookie,
// 不然在用户注销后重新登录时可能会错误地报告错误(测试并未出现该问题)
.logout().deleteCookies("JSESSIONID");
}
}

session 默认超时时间为 30m,可以通过配置 server.servlet.session.timeout 属性来修改超时时间。

注意: 这不能保证与每个 servlet 容器一起工作,所以需要在环境中测试它。

并发会话控制

1
2
3
4
5
6
7
8
9
10
11
12
13
14
@Configuration
public class SecurityConfiguration extends WebSecurityConfigurerAdapter {

@Override
protected void configure(HttpSecurity http) throws Exception {
http.authorizeRequests()
.antMatchers("/invalidSession").permitAll()
.anyRequest().authenticated().and()
.formLogin().and()
.sessionManagement()
// 一个用户只能同时在一处登陆。如果存在用户在多处重复登录,前面登录的用户再访问系统时会被重定向到 /invalidSession
.maximumSessions(1).expiredUrl("/invalidSession");
}
}

当用户在另一处重复登录后,之前登录的用户再访问系统时,默认会收到 “This session has been expired (possibly due to multiple concurrent logins being attempted as the same user).” 错误提示。在上例中,我们是通过设置 expiredSessionStrategy 来将用户重定向到 /invalidSession。

我们也可以通过设置 sessionManagement().maxSessionsPreventsLogin(true) 来阻止用户重复登录。

会话固定攻击保护

会话固定攻击是一种潜在的风险,恶意攻击者可能通过访问站点来创建会话,然后说服另一个用户使用相同的会话进行登录(例如,通过将包含会话标识符的链接作为参数发送给他们)。

Spring Security 通过创建一个新会话或在用户登录时更改会话 ID 来自动防止这种情况。

默认情况下,Spring Security 启用了此保护,我们可以通过设置 sessionManagement().sessionFixation().xx 来禁用此保护或调整相关行为。

  • sessionFixation().none() 什么都不要做,将保留原来的会议。
  • sessionFixation().newSession() 创建一个新的“干净”的会话,而不复制现有的会话数据(Spring 安全相关的属性仍然会被复制)。
  • sessionFixation().migrateSession() 创建一个新会话,并将所有现有的会话属性复制到新会话中。这是 Servlet 3.0 或更旧的容器中的默认值。
  • sessionFixation().changeSessionId() 不创建新会话。相反,使用 Servlet 容器提供的会话固定保护(HttpServletRequest#changeSessionId())。此选项仅在 Servlet 3.1 (Java EE 7) 和更新的容器中可用。在旧的容器中指定它将导致异常。这是 Servlet 3.1 和更新的容器中的默认值。

Remember-me 身份验证

Remember-me 或 persistent-login 身份验证是指 web 站点能够记住不同会话间的主体身份。这通常是通过向浏览器发送 cookie 来完成的,在以后的会话中检测到 cookie 并进行自动登录。

Spring Security 提供了两种具体的 remember-me 实现:

  • 使用哈希来保持基于 cookie 的令牌的安全性
  • 使用数据库或其他持久存储机制来存储生成的令牌(同样需要使用 cookie)

注意: 以上两种实现都需要上下文中存在 UserDetailsService bean。

基于哈希的令牌

1
2
3
4
5
6
7
8
9
10
11
12
@Configuration
public class SecurityConfiguration extends WebSecurityConfigurerAdapter {

@Override
protected void configure(HttpSecurity http) throws Exception {
http.authorizeRequests()
.anyRequest().authenticated().and()
.formLogin().and()
// 使用哈希来保持基于 cookie 的令牌的安全性
.rememberMe().key("secret");
}
}

cookie 示例:
cookie 示例

这种方式有个弊端,浏览器端要携带的这个 cookie 值在服务端是存放在内存中的,并没有进行持久化,所以如果服务重启后服务器端存储的这个值就会丢失,浏览器端的 remember-me 就会失效。为了解决这个问题就需要将服务器端生成的这个 cookie 值持久化到数据库中。

注意: Remember-me 令牌仅在指定的时间段内有效,前提是用户名、密码和密钥不变。值得注意的是,这有一个潜在的安全问题,即捕获的“记住我”令牌在令牌到期之前可以从任何用户代理使用。这与 digest 身份验证的问题相同。如果 principal 知道捕获了令牌,则可以轻松地更改其密码并立即使所有有关问题的“记住我”令牌无效。如果需要更重要的安全性,则应该使用下一节中描述的方法。或者,记住“我”服务根本不应该被使用。

持久化令牌

内存存储

1
2
3
4
5
6
7
8
9
10
11
12
@Configuration
public class SecurityConfiguration extends WebSecurityConfigurerAdapter {

@Override
protected void configure(HttpSecurity http) throws Exception {
http.authorizeRequests()
.anyRequest().authenticated().and()
.formLogin().and()
// 使用内存数据库来存储生成的令牌
.rememberMe().tokenRepository(new InMemoryTokenRepositoryImpl());
}
}

数据库存储

1
2
3
4
5
6
7
8
9
10
11
12
13
14
15
16
17
18
19
20
21
22
23
24
25
26
@Configuration
public class SecurityConfiguration extends WebSecurityConfigurerAdapter {
private final DataSource dataSource;

public SecurityConfiguration(DataSource dataSource) {
this.dataSource = dataSource;
}

@Override
protected void configure(HttpSecurity http) throws Exception {
http.authorizeRequests()
.anyRequest().authenticated().and()
.formLogin().and()
// 使用数据库来存储生成的令牌
.rememberMe().tokenRepository(tokenRepository());
}

@Bean
public PersistentTokenRepository tokenRepository() {
JdbcTokenRepositoryImpl tokenRepository = new JdbcTokenRepositoryImpl();
tokenRepository.setDataSource(dataSource);
// 自动创建表,仅在首次启动时开启
tokenRepository.setCreateTableOnStartup(true);
return tokenRepository;
}
}

在上例中,我们采用了首次启动时自动建表的方式,也可以手动建表,sql 脚本如下:

1
2
3
4
5
6
7
8
9
10
create table persistent_logins
(
series varchar(64) not null comment '主键',
username varchar(64) not null comment '用户名',
token varchar(64) not null comment '访问令牌',
last_used timestamp not null comment '最后使用时间',
PRIMARY KEY (`series`)
) ENGINE = InnoDB
DEFAULT CHARSET = utf8mb4
COLLATE = utf8mb4_0900_ai_ci;

持久化 token 示例:
持久化 token 示例

CSRF 保护

CSRF 就是诱导已登录过的用户在不知情的情况下,使用自己的登录凭据来完成一些不可告人之事。比如利用 img 标签或者 script 标签的 src 属性自动访问一些敏感 api,或者是伪造一个 form 标签,action 写的是一些敏感 api,通过 js 自动提交表单等。

CSRF 攻击之所以成为可能,是因为来自受害者网站的 HTTP 请求与来自攻击者网站的请求完全相同。这意味着无法拒绝来自邪恶网站的请求,也无法允许来自银行网站的请求。为了防止 CSRF 攻击,我们需要确保在请求中存在邪恶站点无法提供的内容,以便区分这两个请求。

Spring 提供了两种机制来抵御 CSRF 攻击:

  • 同步器令牌模式(默认方式)
  • SameSite 属性

注意:为了使任何一种针对 CSRF 的保护起作用,应用程序必须确保“安全的” HTTP 方法是幂等的。这意味着使用 HTTP 方法 GET、HEAD、OPTIONS 和 TRACE 的请求不应该改变应用程序的状态。

默认情况下,Spring Security 启用了此保护,我们可以通过设置 http.csrf().xx 来禁用此保护或调整相关行为。

csrf示例

1
2
3
4
5
6
7
8
9
10
11
12
@Configuration
public class SecurityConfiguration extends WebSecurityConfigurerAdapter {

@Override
protected void configure(HttpSecurity http) throws Exception {
http.authorizeRequests()
.anyRequest().authenticated().and()
.formLogin().and()
// 默认已启用 CSRF 保护,并将 csrf token 存储在 session 中
http.csrf().csrfTokenRepository(new LazyCsrfTokenRepository(new HttpSessionCsrfTokenRepository()));
}
}

匿名登录

匿名登录,即用户尚未登录系统,系统会为所有未登录的用户分配一个匿名用户,这个用户也拥有自己的权限,不过他是不能访问任何被保护资源的。

设置一个匿名用户的好处是,我们在进行权限判断时,可以保证 SecurityContext 中永远是存在着一个权限主体的,启用了匿名登录功能之后,我们所需要做的工作就是从 SecurityContext 中取出权限主体,然后对其拥有的权限进行校验,不需要每次去检验这个权限主体是否为空了。这样做的好处是我们永远认为请求的主体是拥有权限的,即便他没有登录,系统也会自动为他赋予未登录系统角色的权限,这样后面所有的安全组件都只需要在当前权限主体上进行处理,不用一次一次的判断当前权限主体是否存在。这就更容易保证系统中操作的一致性。

默认情况下,匿名用户的用户名为 anonymousUser,拥有的权限是 ROLE_ANONYMOUS。

1
2
3
4
5
6
7
8
9
10
11
12
@Configuration
public class SecurityConfiguration extends WebSecurityConfigurerAdapter {

@Override
protected void configure(HttpSecurity http) throws Exception {
http.authorizeRequests()
.anyRequest().authenticated().and()
.formLogin().and()
// 配置匿名用户的用户名和权限
.anonymous().principal("游客").authorities("ROLE_VISITOR");
}
}

表单登录

Spring Security 默认就是表单登录,我们可以通过调用 http.formLogin().xx 方法来调整相关行为。

  • formLogin().loginPage(loginPage) 登录页面地址,默认会自动创建。
  • formLogin().loginProcessingUrl(loginProcessingUrl) 登录验证地址,默认为 /login。
  • formLogin().usernameParameter(usernameParameter) 用户名参数名,默认为 username。
  • formLogin().passwordParameter(passwordParameter) 密码参数名,默认为 password。
  • formLogin().successForwardUrl(forwardUrl) 登录验证成功后 forward 地址,默认为 /。注意:自定义跳转地址请求方法需为 POST。
  • formLogin().defaultSuccessUrl(defaultSuccessUrl,alwaysUse) 登录验证成功后 redirect 地址。如果在身份验证之前未访问受保护的页面,则跳转到登录页面,否则跳转到之前访问的受保护的页面。如果 alwaysUse 为 true(默认为 false),则始终跳转到登录页面。
  • formLogin().successHandler(successHandler) 登录验证成功后处理器,默认重定向到 /。(前两个方法调用的都是该方法,只是处理器不同而已。)
  • formLogin().failureForwardUrl(authenticationFailureUrl) 登录验证失败时 forward 地址,默认为 /login?error。
  • formLogin().failureUrl(authenticationFailureUrl) 登录验证失败时 redirect 地址,默认重定向到 /login?error。
  • formLogin().failureHandler(authenticationFailureHandler) 登录验证失败时处理器,默认重定向到 /login?error。(前两个方法调用的都是该方法,只是处理器不同而已。)

处理注销

当使用 WebSecurityConfigurerAdapter 时,会自动应用注销功能。默认情况下,访问 URL /logout 将通过以下方式将用户注销:

  • 使 HTTP 会话无效
  • 清除任何已配置的 RememberMe 身份验证
  • 清理 SecurityContextHolder
  • 重定向到 /login?logout

与表单登录功能类似,我们也可以通过各种选项来进一步定制注销要求。

  • logout().logoutUrl(logoutUrl) 触发注销操作的 URL,默认为 /logout。(测试不生效 >_<)
  • logout().logoutSuccessUrl(logoutUrl) 注销成功后 redirect 地址,默认为 /login?logout。
  • logout().logoutSuccessHandler(logoutUrl) 注销成功后处理器,如果设置了该选项,logoutSuccessUrl 就会失效。
  • logout().defaultLogoutSuccessHandlerFor(handler,preferredMatcher) 配置 logout ur 与 LogoutSuccessHandler 的映射,
  • logout().addLogoutHandler(logoutUrl) 添加注销处理器,通常用于清理一些会话相关的。默认 SecurityContextLogoutHandler 会被添加为最后一个 logoutHandler。
  • logout().invalidateHttpSession(invalidateHttpSession) 注销时让 HttpSession 无效,默认为 true。
  • logout().deleteCookies(cookieNamesToClear) 注销成功后要移除的 cookies。

参考资料

  1. Spring-Security的Password Encoding
  2. spring security 4.0 教程 步步深入 6
  3. spring security 匿名登录
  4. 浅谈CSRF攻击方式
小礼物走一走,来 Github 关注我